Archive | lunch RSS feed for this section

Mushroom Pepperoni and Mozz. Pizza with Mike’s Hot Honey

20 Dec

Processed with VSCOcam with f2 preset

Me, hovering over the stovetop to snap a picture before I dive into the pizza

There’s a bottle of Mike’s Hot Honey sitting on my desk. Honey spiked with vinegar and chiles.

This spicy honey begs to swirled on cheesy pizza and if there’s bits of oven-toasted cured meat, even better. (For more food pairings, look here).

Processed with VSCOcam with f2 preset

I made a quick, no-knead dough with a mix of bread flour and whole wheat flour. Olive oil and a dash of cornmeal go onto the baking sheet before the dough to get a nice crust with color and texture.

The dough recipe makes enough for two pizza pies.

Sauce, fresh mozz, mushrooms, pepperoni, Parmesan, fresh oregano. Top with lots of honey. Enjoy with a big salad (whoops, not pictured, but this meal definitely calls for a big salad).

I had extra toppings leftover, so I just toasted some regular, whole wheat bread, spread it with the toppings, and popped it in the oven for 10 minutes. Another easy option if you don’t want to make the dough recipe.

IMG_1728

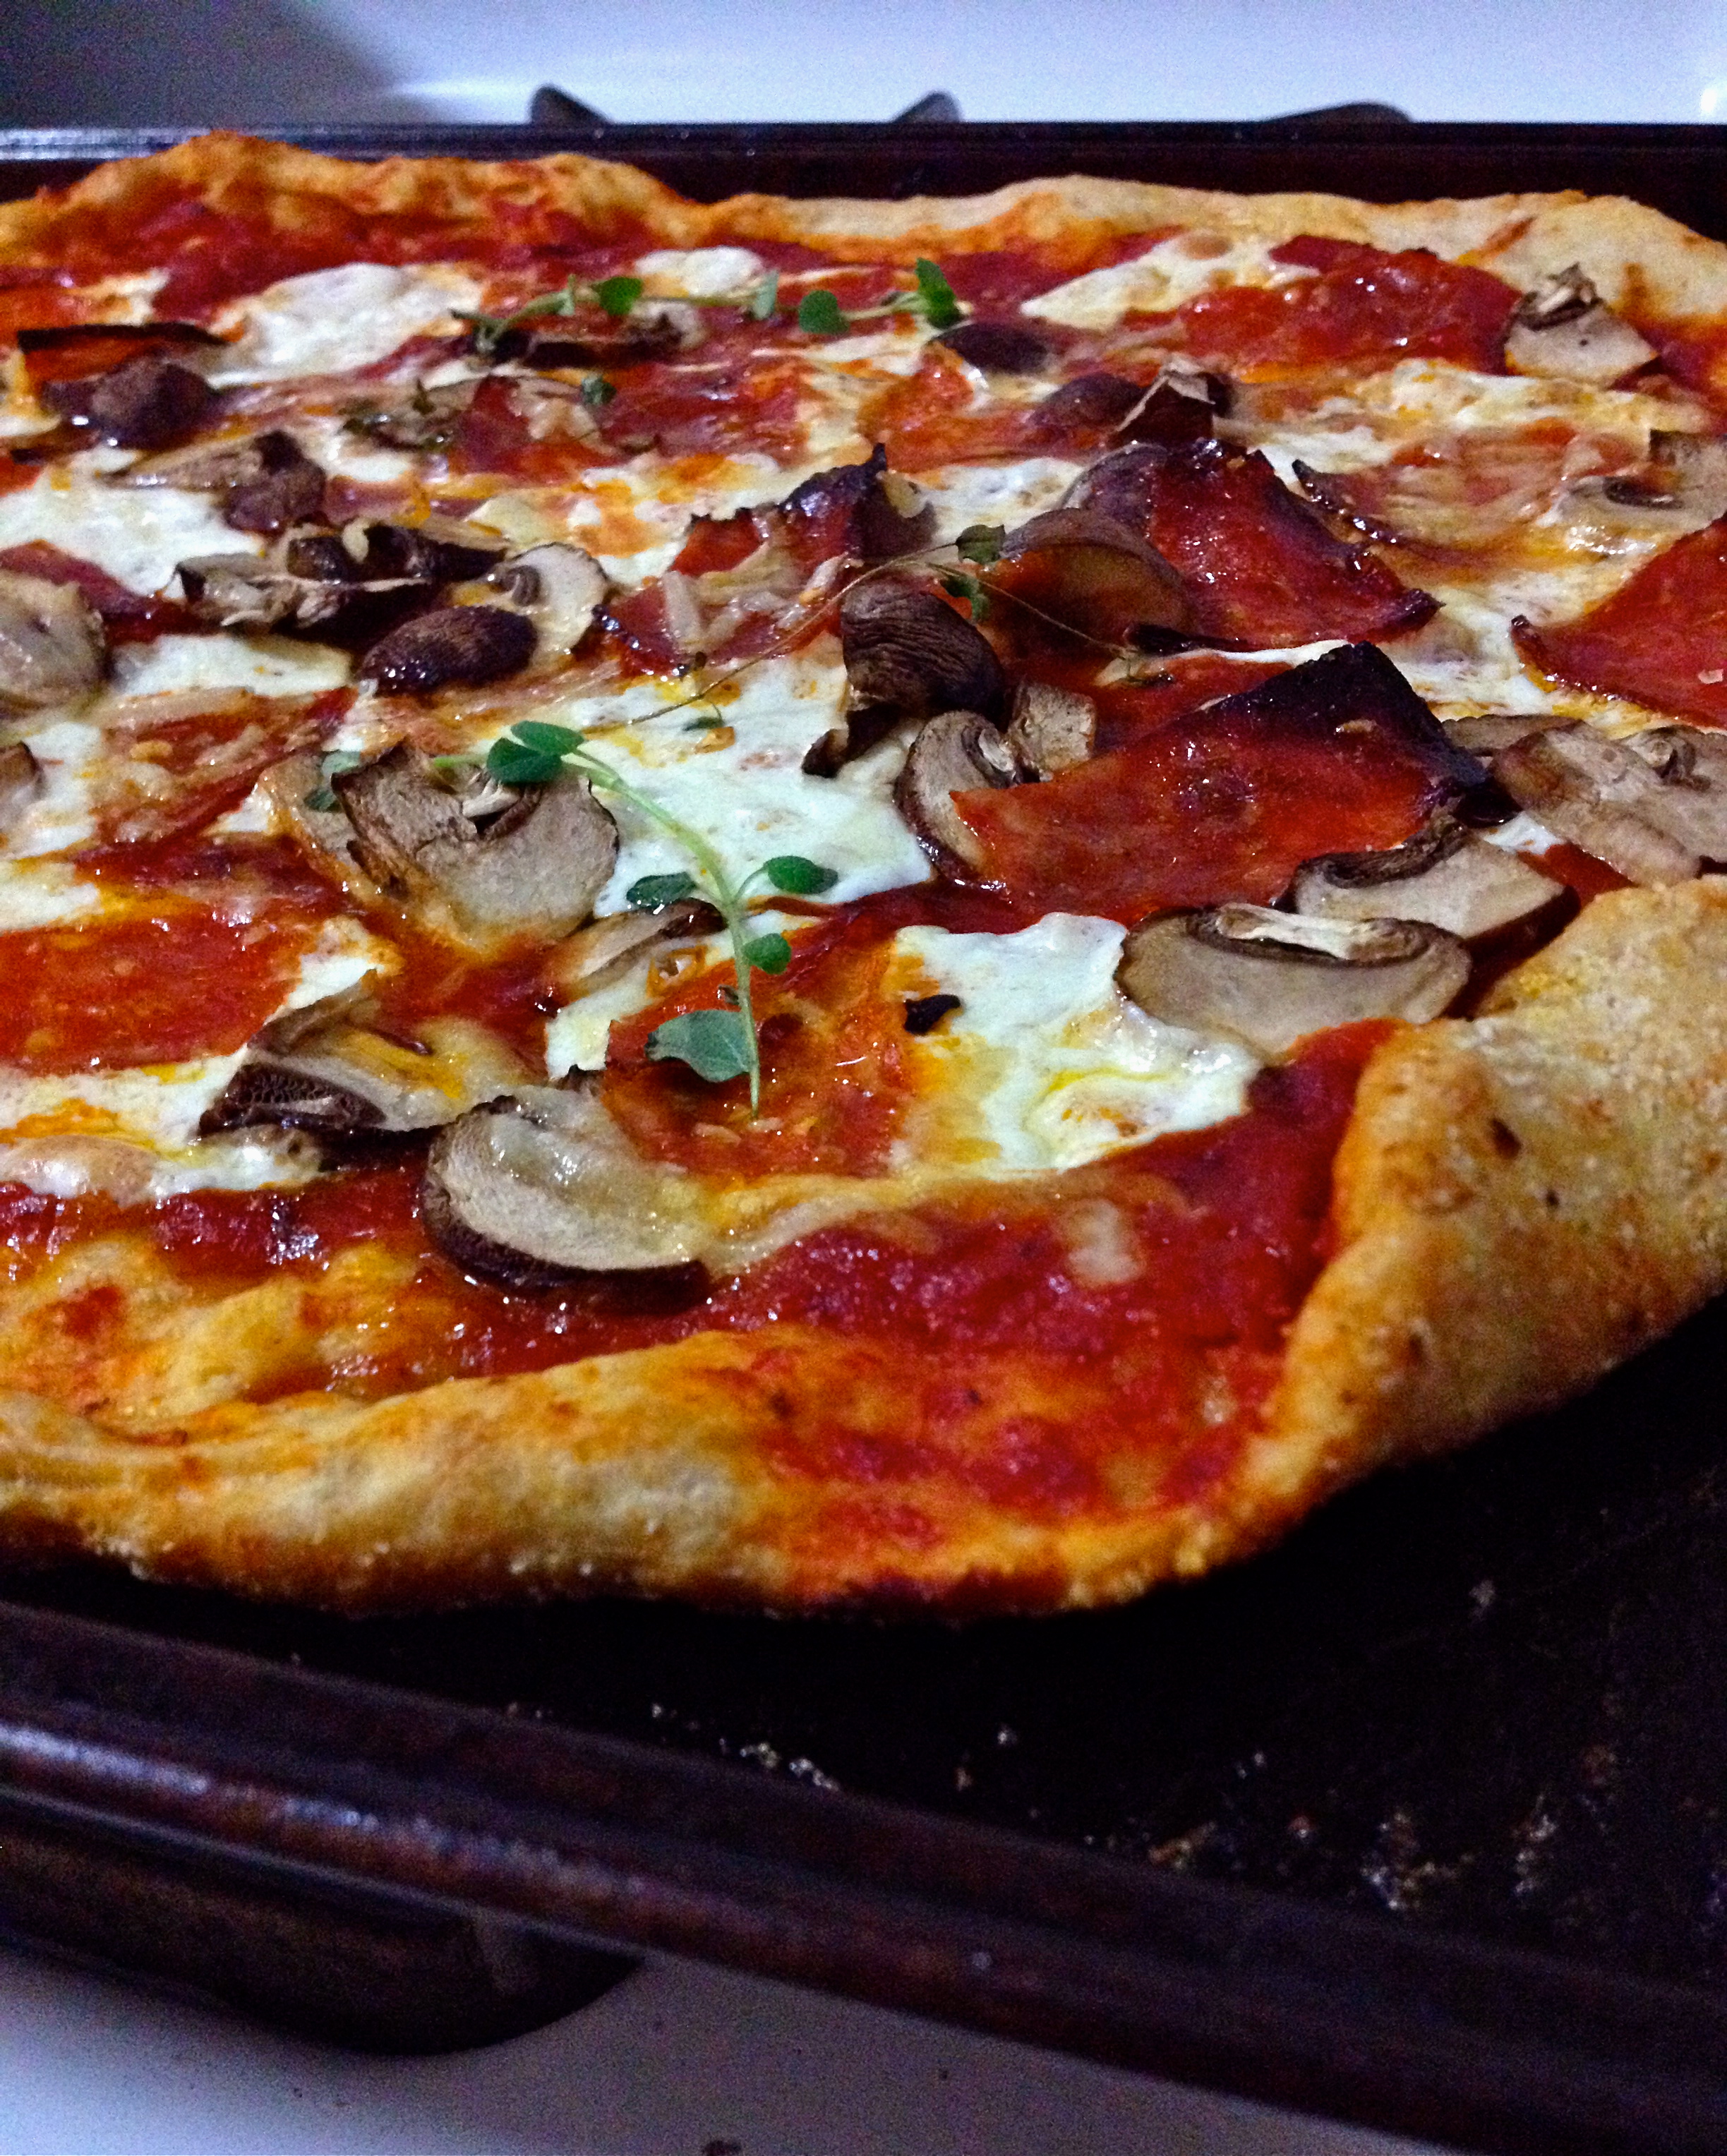
Mushroom Pepperoni and Mozz Pizza with Mike’s Hot Honey

For the dough recipe, I used Joy’s version, which was based on Tracy’s version, which was originally from Jim Lahey’s book (it makes enough for 2 pizzas. You can freeze one or save it for the next day). I found the dough to be very shaggy. It ended up working, though, so just let it do it’s thing. I had to knead it one or two times to get it how I wanted.

**NOTE: This dough recipe needs about 2.5 hours to do it’s thing before it can go in the oven. Give yourself enough time if you are making your own dough.

Toppings (for 1 pizza): 

3/4 cup sauce

3-4 oz ball of fresh mozzarella, sliced

4 oz mushrooms, sliced

1/8 pound thin sliced pepperoni, cut into wedges or strips (I found pepperoni at the Whole Foods Deli, from Chestnut Valley Charcuterie)

1/2 cup Parmesan, shredded or grated

Toppings after the oven: fresh oregano, red pepper flakes, spicy honey

Directions: 

Preheat oven to 450-500 degrees F.

Oil a 13×18-inch rimmed baking sheet with olive oil, and sprinkle cornmeal over the oil. Place the 1 of the 2 dough balls on the pan and stretch and press the dough out into a flat rectangle.  If the dough springs bag as you’re pressing it out, simply wait five minutes to allow the dough to rest and then try again.  The dough should be very thin. If the dough tears, don’t worry, just press it back together.

Top the dough with sauce, cheeses, mushrooms, and pepperoni.

Bake for 15 to 20 minutes until the edges are charred and bubbling.  Remove from the oven.  Allow to cool for a few moments then slice and top with fresh oregano, red pepper flakes, and spicy honey.  Serve immediately, with a big salad.

Thanksgiving Leftover Nachos

1 Dec

Processed with VSCOcam with f2 preset

Bon Appetit swooped in and helped me jazz up my Thanksgiving leftovers.

There really is no better way to put it:

“Leftovers. They’re perfect, really. You’re in the middle of a four-day weekend, the house is once again empty, the kitchen is clean, and all that remains is a giant Ziploc bag full of turkey for you to eat from the fridge in your pajamas. Without leaving the house, you have all you need to make sandwichespot pierisotto, you name it. But what if there were something more? Something even better? What if there were… Thanksgiving Leftover Nachos?”

And then I proceeded to make Thanksgiving Leftover Nachos, and they were just the crunch I needed to get me over the hump of mushy comfort food remnants.

Processed with VSCOcam with f2 preset

Thanksgiving Leftover Nachos

from BonAppetit 

Tortilla Chips

Stuffing

Turkey, shredded or cut up (if you have leftover crispy skin, throw that in, too!)

Mashed potatoes

Gravy

Cheese, shredded

Raw Brussels sprouts, cut into slivers (or any kind of green vegetable)

Cran sauce

Sour cream or Greek yogurt

Combine pieces of leftover stuffing with a layer of tortilla chips on a baking sheet. This is your base layer.

Shred the turkey (The skin, too! It gets crispy in the oven) and nestle it with the chips/stuffing. Mashed potatoes are next, acting like refried beans. A little grate of white cheddar and a drizzle of gravy. Pop in a 425 degree oven until it gets oozy and crispy all in one, about 10-15 minutes.

Out of the oven and in come a few hits of leftover cranberry sauce (I like to say “cran sauce”), a few pinches of leftover raw brussels sprouts shavings (made this salad on Thanksgiving day), and some dollops of sour cream.

Brain Food: Seasonal Frittata with a Potato Hash Crust

25 Sep

IMG_1482

School is in full swing, and I am having writers block like woah.

It is so hard to concentrate when I get paid to stare at these salty gems 3 mornings a week:

IMG_1460

…but I must remember to eat my veggies so that my brain can start working properly again…

IMG_1481

This is a funky time of year at the farmer’s market in New York City. Apples, pears, potatoes, and winter squash abound, but the tomatoes, peaches and plums, and corn are still pulling through for their final hurrah.

I just learned about the “nuke and shake method” for husking corn, and now before I blink my eyes three times, all of the corn will be gone! Drat.

IMG_1483

This is a simple egg bake that you could do with any seasonal ingredients–vegetables, herbs, cheeses, and meat. I adapted the recipe from Sara Forte’s The Sprouted Kitchen Cookbook. Sara’s recipe includes sweet potatoes and goat cheese; I happened to have a variety of small colorful potatoes on hand and a ball of mozzarella hanging out in the fridge, so into the frittata they went.

Fresh corn got thrown into the mix as well, because corn + eggs = awesome.

Processed with VSCOcam with f2 preset

Sure, I love a good quiche. How could you not love anything baked up in a flaky, buttery crust? But remember, we need brain fuel here, so potatoes for a “crust” will do. A few dashes of hot sauce always help fire up those neurons, too.

IMG_0799

Seasonal Frittata with a Potato Hash Crust

adopted from Sprouted Kitchen, also seen on Cookie and Kate

serves 4-6, depending how you slice and serve

6-8 eggs (I used 6 extra large eggs)

1/2 cup milk

pinches of salt and pepper

2 small sweet potatoes, or about 2 cups of colorful new potatoes, chopped

1 tablespoon olive oil

1 teaspoon cumin

2 garlic cloves, chopped

2 cups baby spinach

1-2 ears of corn, husked and sliced off the cob

3 oz. cheese, mozzarella ball or goat cheese

herbs, hot sauce, salt n’ pepper for topping

  1. Preheat the oven to 425 degrees F. In a large bowl, whisk together the eggs, milk, a pinch of salt and black pepper.
  2. Chop the potatoes into 1/4-inch cubes. In a 10-inch sauté pan (or well-seasoned cast iron skillet), warm the olive oil over medium heat. Add the potatoes and toss to coat, then sprinkle with cumin and 1/2 teaspoon salt and stir. Cook the potatoes, stirring occasionally, until they are cooked through and have brown marks, 10 to 15 minutes (add another little splash of olive oil if the potatoes start sticking to the pan).
  3. Sprinkle the garlic on top of the potatoes, then the spinach and corn. Cover the pan with a lid or cookie sheet if you have one, and cook until the spinach wilts, a minute or two.
  4. Turn the heat down to low. Whisk the eggs one last time and pour them over the spinach. Crumble or slice the cheese and plop over the top of the frittata. Put the pan in the oven and bake until you can shake the pan and see that the middle is just barely set, about 12 to 18 minutes.
  5. Set the frittata aside to cool down slightly. You can either leave it in the pan or flip it onto a plate. Sprinkle with more salt and pepper, and add some herbs and hot sauce if you’re feelin’ it.

Creamy Cauliflower Pasta Sauce

3 Aug

IMG_1271

I recently made the Peas and Shells Alfredo from the Smitten Kitchen Cookbook. Of course, it was outstanding, and dinner was ready by the time the shells finished boiling.

I try, however, to save a heavy pasta cream sauce for those special comfort dinners. Today’s recipe is a riff on that heavier sauce. There’s still shells, there’s still peas, but no cream! The sauce is thickened with boiled and pureed cauliflower, and wow is it good.

Cauliflower is part of the cruciferous vegetable family, along with broccoli, kale, collards, and cabbage. It is a rich source of vitamins C and K, thus providing antioxidant and anti-inflammatory benefits! You can read more about cruciferous veggies here.

To make this pasta sauce, cauliflower gets boiled and pureed in a blender with milk (you could use non-dairy milk to make the sauce vegan). Added to a saucepan with some nutritional yeast, a little garlic, salt, pepper, and a dash of hot sauce, you would never know there was a vegetable hiding in all of that goodness.

I’ve heard the buzz about making mashed cauliflower. It is supposed to be a great alternative to starchy mashed potatoes. Even Bill Clinton agrees. Maybe as the season turns to fall I will experiment with cauliflower mashes…

Until then, this cauliflower cream sauce hits the spot. I used 1% milk (cow’s milk), which allowed my sauce to still fit the healthy bill without compromising on a creamy, luxurious taste. If you still want a little more decadence, you could always stir in a small pat of butter and a grate of cheese to the sauce. I won’t tell if you won’t…

Creamy Cauliflower Pasta Sauce

adapted from Baker Bettie 

serves 8

**NOTE: I recommend preparing the sauce and saving leftovers in a tupperware.  Cook the pasta as needed, to order. It tastes fresher.

1 head of cauliflower 

2 cups of milk 

3 cloves garlic, minced

2 tablespoons nutritional yeast

salt and pepper

1 lb of pasta (I used various pasta shapes throughout the week with this sauce: shells, angel hair, and egg noodles)

vegetables of choice (I used some frozen peas and a few fresh cherry tomatoes)

optional: fresh basil, dash of red pepper flakes, pat of butter, grate of cheese…

Bring a large pot of water to a boil. While the water is heating up, chop the cauliflower into florets. Boil the cauliflower for 15 minutes, or until very tender. Strain the cauliflower.

In batches, place the cauliflower in the blender with the milk (I did this in 2 batches). Blend until very smooth. Pour the mixture into a saucepan over medium heat. Add the garlic, nutritional yeast, and salt and pepper to taste.

Bring some more water to boil and cook your pasta until al dente (if using frozen peas, add them to the boiling water during the last 2 minutes of cooking). Combine the pasta, peas and tomatoes, and sauce. Toss with your favorite accouterment and enjoy!

Summer Squash Fritters

9 Jul

IMG_1204

Holy smokes, I’ve fallen head over heels for fritters!

Maybe the fact that the word “fritter” implies fried, I have steered clear of anything fritter-related in my kitchen. Until NOW.

…and I’ve had my share of deep fried apple fritter mania in the past (Gosh, I was so young here. This was an event at the restaurant I used to work at where I had to make tons of apple fritters, I was scooping batter out of buckets!).

pizzaiolo fritters

I shall steer clear no more…these Summer Squash Fritters are lightly pan-fried on a cast-iron skillet, and they totally bust my fears of frittering at home. They are like potato latkes, but a bit healthier and more colorful.

I’ve been making so many quick pasta dinners and taco/quesadilla/migas dinners these days, and tonight I was looking to do something out of my usual throw-together repertoire. Alas, Deb from the Smitten Kitchen has saved dinner once again.

These lil guys hit the spot. With a fried egg on top and a shake or two of hot sauce, I was dancin’ in my dinner seat! You just can’t beat the golden brown crisp exterior of these fritters, oozing supple and sweet summer squash in every bite.

The summer squash are lookin’ mighty fine at the New York City farmer’s markets right now. Vibrant, plump, and simply aching to be eaten.

And if summer squash is not your thing, how about Broccoli Parmesan Fritters? (also in season right now in NYC). Deb has quite an extensive fritter library, so go check it out here if zucchini is not your thing.

These fritters would be an excellent for brunch, too.

Now go fight your fritter fears and experience the goodness.

IMG_0764

Summer Squash Fritters

adapted from The Smitten Kitchen 

I got about 6 fritters out of this batch (serves 2 people as a main dish)

1 large zucchini + 2 small and thin yellow summer squash

1 teaspoon Kosher salt, plus extra to taste

2 small garlic cloves, minced

1 large egg, lightly beaten

2 tablespoons grated cheddar cheese (I used a spicy chipotle cheddar. zing!)

freshly ground black pepper

1/2 cup all-purpose flour

1/2 teaspoon baking powder

olive oil or canola oil, for frying

Trim the ends off of the zucchini/summer squash and grate the squash on the large holes of a box grater.

Place a colander over a large bowl. Add the grated squash to the colander with 1 teaspoon of salt and let it sit for about 10 minutes. Using a wooden spoon, press the squash against the holes of the colander and drain as much excess water as you can. You will probably get a lot of liquid out of the squash! This reduces the likelihood of soggy fritters.

Dump the liquid down the sink, rinse the large bowl, and add the pressed grated squash to the bowl. Stir in the garlic, lightly beaten egg, cheddar, and black pepper. In a small bowl, whisk together the flour and baking powder, then stir the mixture into the zucchini batter.

In a large heavy skillet (cast iron is indeed dreamy here), heat 2 tablespoons of oil over medium-high heat until shimmering. Drop small bunches (I used a 1/4 cup measure) of the zucchini mixture onto the skillet only a few at a time (I did 3 fritters at a time) so they don’t become crowded and lightly nudge them flatter with the back of your spatula. Cook the fritters over moderately high heat until the edges underneath are golden, about 3 to 4 minutes. If you find this happening too quickly, reduce the heat to medium. Flip the fritters and fry them on the other side until browned underneath again, about 2 to 3 minutes more (if you are making a bigger batch, you can keep finished fritters in a 200 degree F oven to stay warm).

Enjoy with a poached or fried egg on top and a few good shakes of hot sauce, so the yolk runs down and around the fritters (I wish I took a picture of this but I chose to shove the goodness in my face instead!).

**Deb says: These fritters keep well, either chilled in the fridge for the better part of a week and or frozen in a well-sealed package for months. When you’re ready to use them, simply spread them out on a tray in a 325 degree oven until they’re hot and crisp again.

IMG_0763