Tag Archives: comfort

Mustard Greens and Grits

25 May

Processed with VSCOcam with f2 preset

Let’s step away from the convenient pre-washed, packaged spinach for a minute. It’s greens season, and there are bunches and bushels of young spring greens awaiting you at your local farmer’s market.

I’ve been reading through Jo Robinson’s Eating on the Wild Side, and she makes an interesting point about modern greens:

“Over the course of ten thousand years of agriculture, our farming ancestors managed to remove the bitterness from most of our greens. Unwittingly, though, when they removed the bitterness, they were also stripping away a host of highly beneficial phytonutrients that happen to have a bitter, astringent, or sour taste. Our mild-to-a-fault iceberg lettuce, for example, has one-fortieth as many bionutrients as bitter dandelion greens. Calcium is bitter as well, so the calcium content of our modern greens is also relatively low.”

Robinson also notes that to tone down bitter flavors, fat can help. One might, for example, add some avocado to a salad with bitter lettuce greens. Another option: *~bacon~*

Bacon + mustard greens nudged with creamy yellow corn grits. Bitter-creamy-toothy-savory goodness. A real spring comfort.

IMG_2615

Bacon gets sizzled in a pan (cast-iron or dutch oven preferable). A little onion for a little more bite.

Processed with VSCOcam with f2 preset

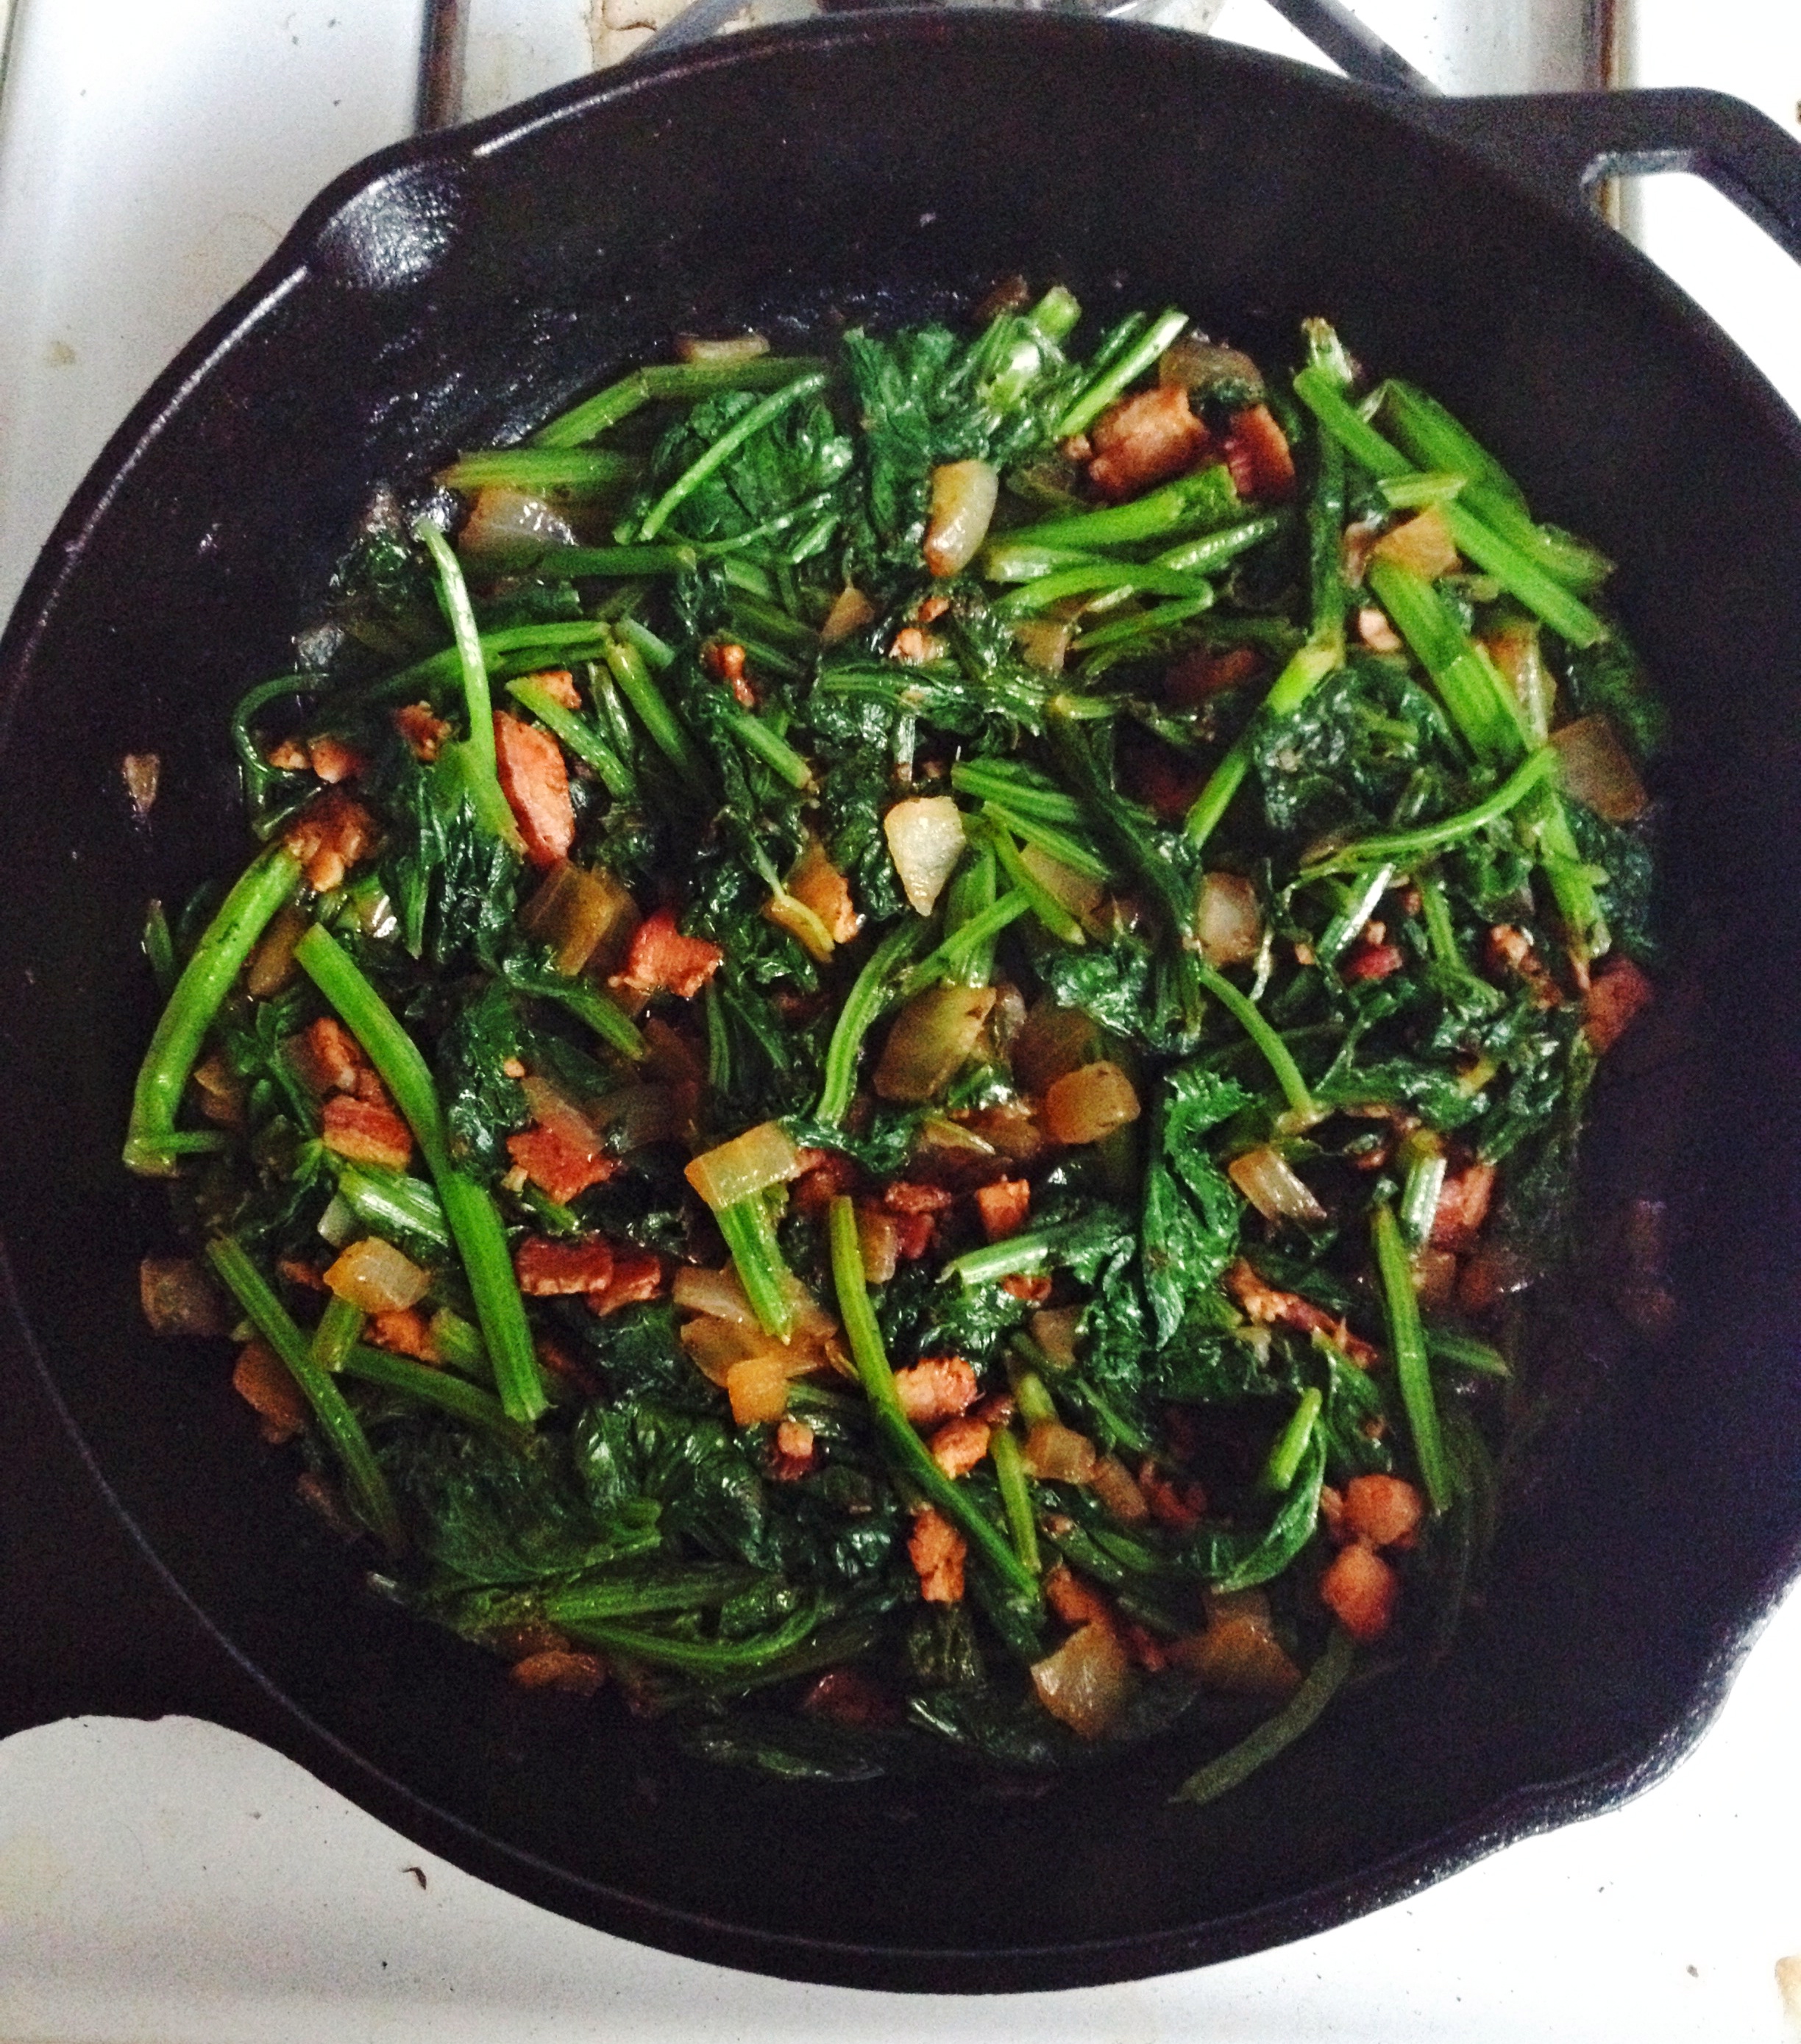
In batches, throw torn mustard greens  into the pan. They cook down quite a bit, so d0n’t be afraid to add the entire bunch. Cover with a lid to let the stems braise in their own liquid.

Processed with VSCOcam with f2 preset

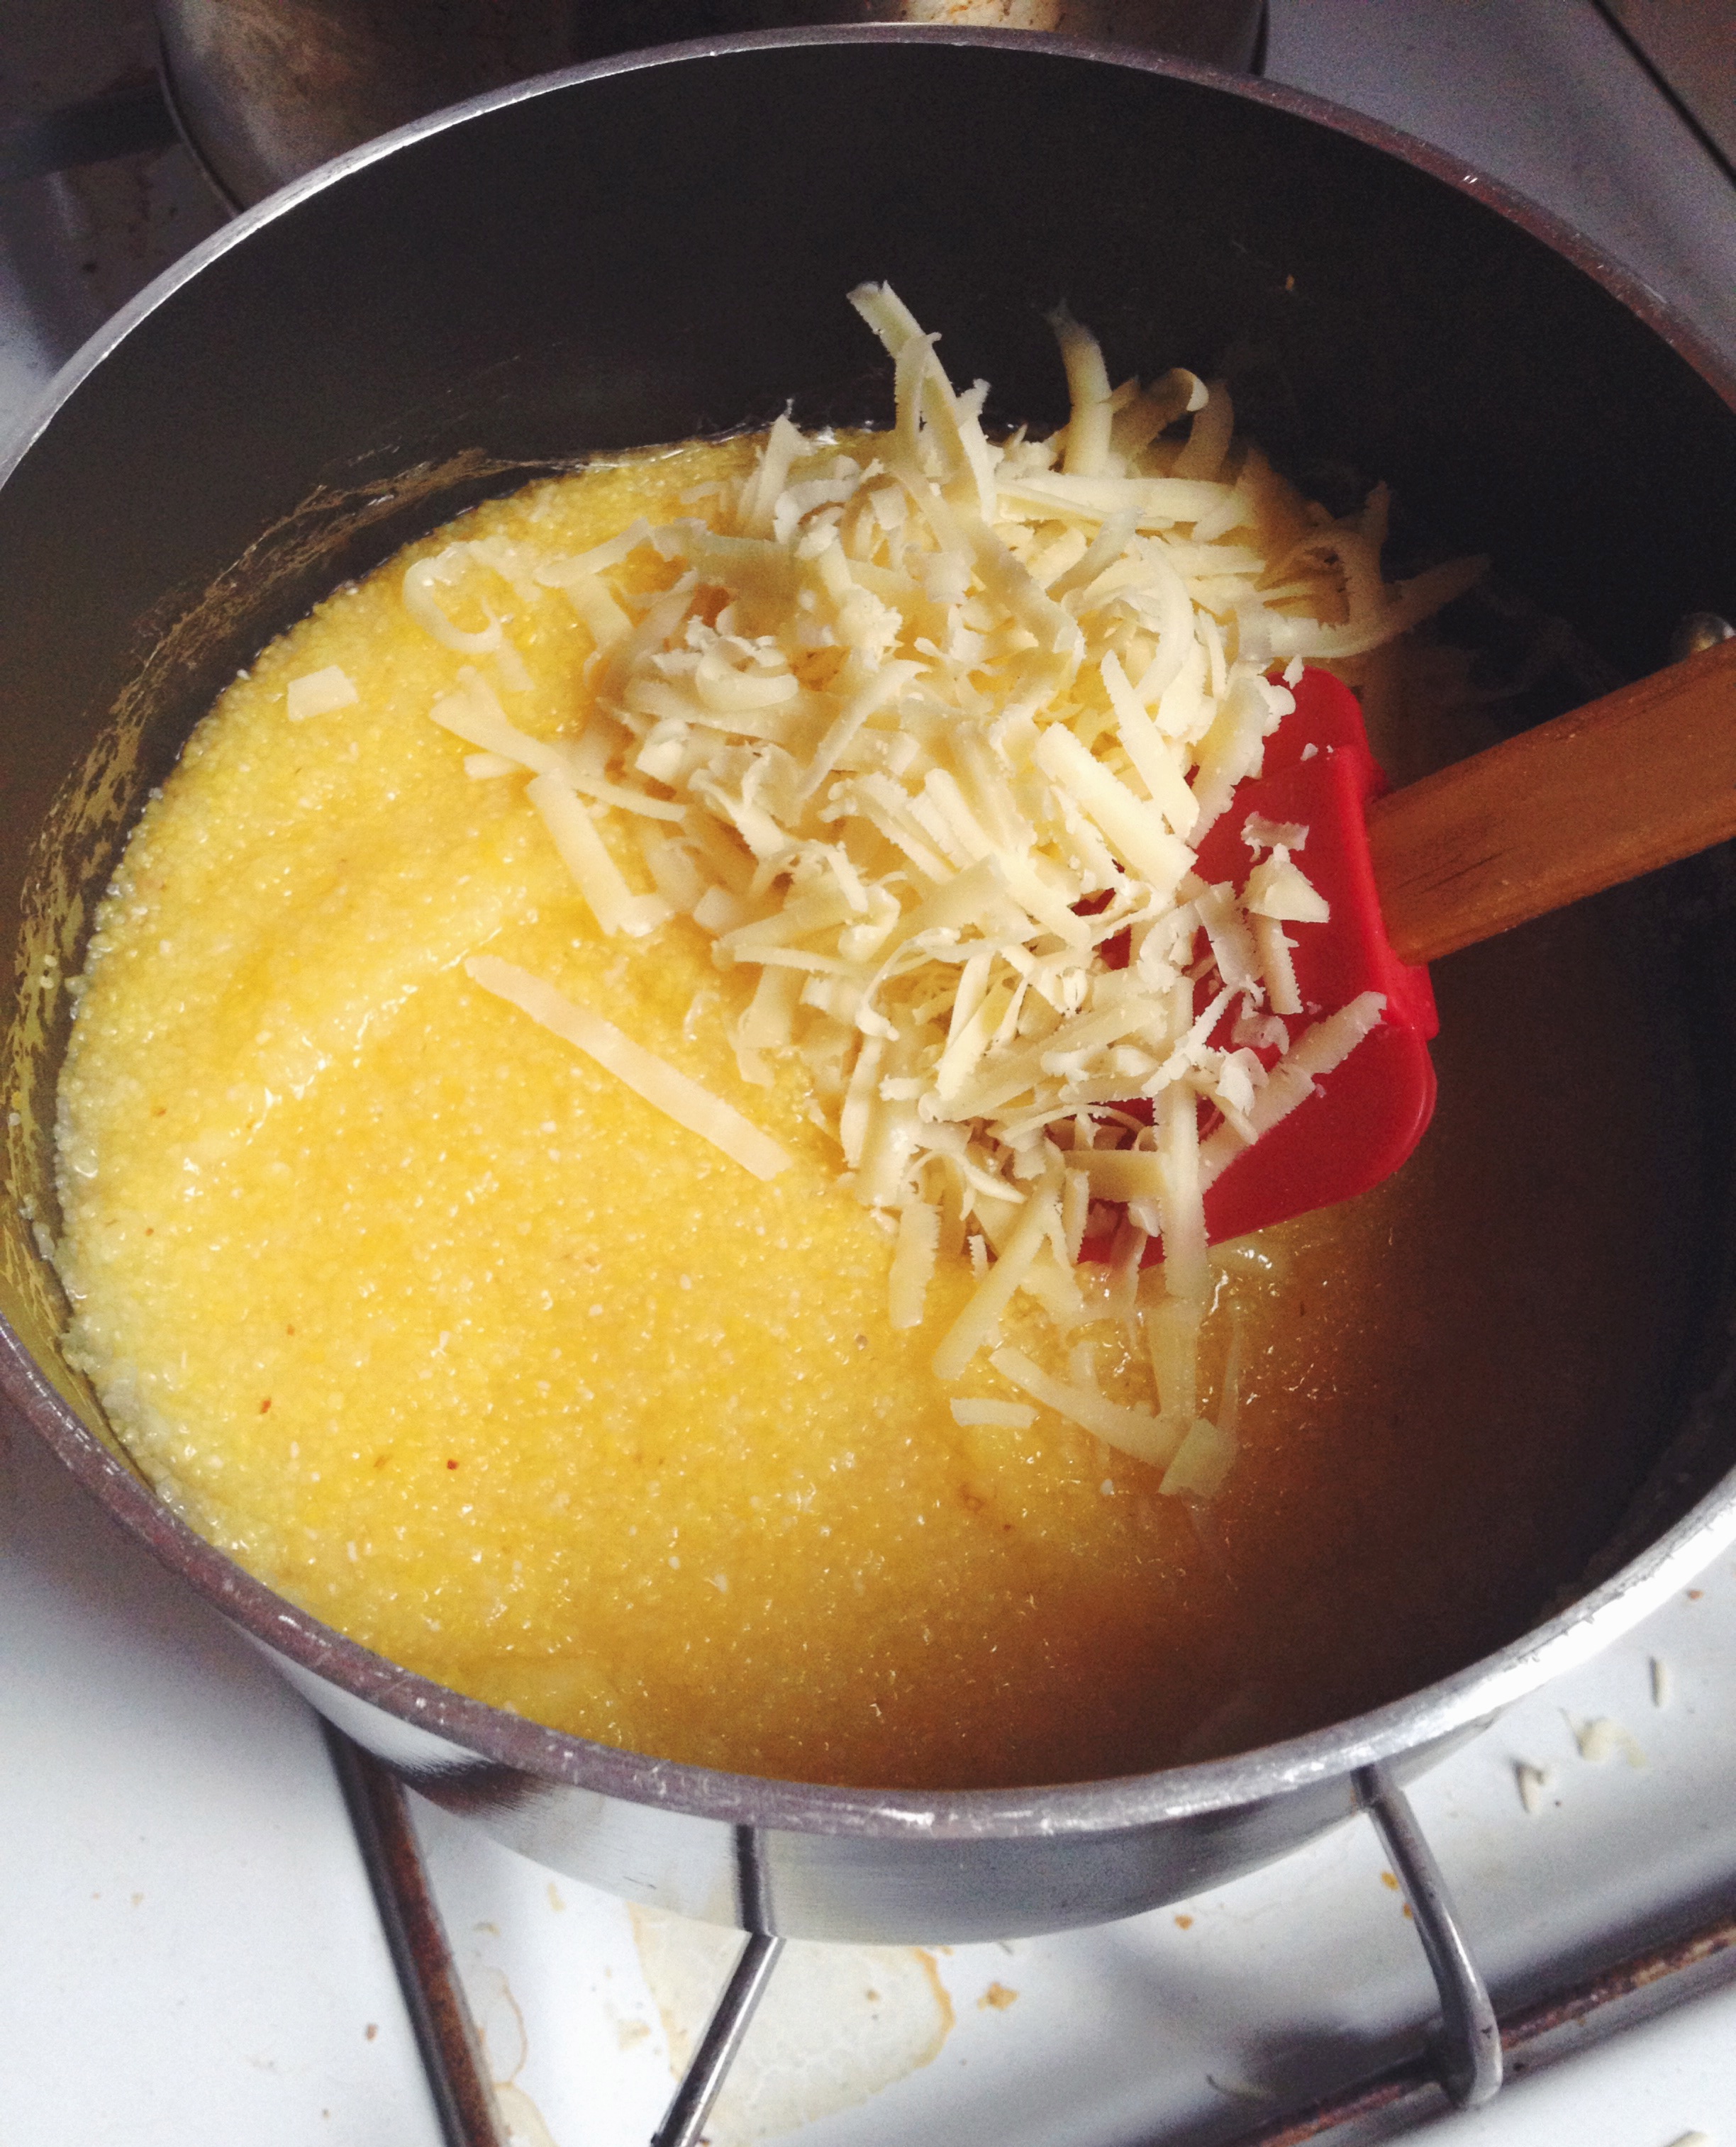
While the bacon braised greens get going, cook the grits. It’s a 1 to 4 grits to liquid ratio. I used water. Boil the water, add the grits, stir. Done in roughly 5 minutes. Finish with freshly grated sharp cheddar and a little pat of butter.

IMG_1136

Mustard greens with bacon and onion, nudged and nestled with fluffy yellow grits.

You’re welcome.

Quick Mustard Greens With Bacon

makes about 3-4 servings

4 slices bacon, diced (I used Brooklyn Cured bacon)

1 bunch mustard greens (from Migliorelli Farms), torn into smallish pieces

1 small onion, chopped

splash of red wine vinegar

pinch of salt

Heat a cast iron skillet over medium-high heat. Add the bacon and cook, stirring every so often to brown the bacon. Add the onion and cook for another few minutes. *I needed to add a dash of canola oil here because my bacon was very lean.

Add the mustard greens to the pan in batches and saute until just wilted. Turn the heat to low, cover the pan, and let it simmer for about 4-5 minutes, or until the greens have braised in their own liquid and the stems are slightly softened.

Uncover, add a splash of vinegar (helps reduce the bitterness of the mustard greens) and a pinch or two of salt. Serve nestled next to or on top of some creamy cheddar grits.


Cheddar Grits

makes about 4 servings

4 cups water

1 cup yellow corn grits (I used Arrowhead Mills Organic Yellow Corn Grits)

pinch salt

2-3 ounces grated cheddar

1 tablespoon butter

  • Bring water to a boil. Slowly add in the grits, stirring constantly. Reduce the heat to low, and stir for about 5-6 minutes or until thickened slightly and cooked.
  • Once the grits are cooked, add in a pinch of salt, the grated cheddar, and the butter. Stir to incorporate and melt.

IMG_1137

Advertisement

Ellie Krieger’s Korean Beef and Broccoli Stir-Fry

19 Feb

Processed with VSCOcam with c1 preset

Here’s a hot, spicy stir-fry to get you through the week. Korean Beef and Broccoli Stir-Fry. Three stand-out ingredients make this recipe great: lots of broccoli, lean sirloin and crunchy, spicy kimchi.

Broccoli is such a good vehicle for soaking up all the juicy sauces and spices of a stir-fry. The broccoli gets steamed in the microwave to keep the recipe fast and healthy.

I put my money on the table for a nice cut of sirloin from the farmer’s market. I got it from Sawkill Farm in Red Hook–totally worth the few extra dollars for this beautiful piece of meat. If you are trying to keep things lean, sirloin is the way to go. Generally, if the name of the cut has the word “loin” or “round” in it, it is a lean cut.

Every time I eat kimchi at a restaurant, I love it, so why haven’t I thought to use it home?! You can buy kimchi at most markets now, and I definitely want to try making it myself one day.

Note that the recipe calls for low-sodium beef broth. I’m not usually a fan of beef broth because I don’t like how most of them taste. Instead, I used water with a dash of soy sauce. I’m just giving you options if you are like me and get fussy for good beef broth.

This stir-fry hit the spot for me this week. Serve it over rice, and you’ve got healthy restaurant-style food in the comfort of your own home.

Processed with VSCOcam with c1 preset

I am obsessed with Ellie Krieger’s latest cookbook, Weeknight Wonders. It is definitely helping me get out of my rut in the kitchen. So far I made her pork tenderloin with fennel and grapes, warm bulgur salad with feta and grapes, simple meatballs marinara with spaghetti, a variation of her tuna and white bean salad, and her earl grey spiced fruit compote. I am excited to try more of her 30-minute recipes.

Ellie Krieger’s Korean Beef and Broccoli Stir-Fry

from Weeknight Wonders

makes 4 servings

1 head of broccoli

1 pound beef sirloin, trimmed of all visible fat (I used slightly less, a 0.7 pound cut)

2 tablespoons canola or olive oil, divided

1 onion

3 cloves garlic

1 1/4 cups store-bought kimchi (10 ounces)

1 cup low sodium beef broth (I used 1 cup water + 1 tablespoon soy sauce)

1 tablespoon + 1 teaspoon cornstarch

1 teaspoon chili-garlic sauce

Cut the large stems off the broccoli, peel them, then slice them into 18-inch-thick coins. Cut the top into florets about 2 inches in diameter. Place the broccoli, with the water still clinging to it from washing it, in a microwave-safe dish. Cover tightly and microwave on high power until just crisp-tender, about 4 minutes. (Alternatively, you can steam the broccoli in a pot on the stove for 4 minutes).

Thinly slice the beef against the grain into 1/4-inch-thick strips. Heat 1 tablespoon oil in a very large skillet or wok over medium-high heat. Add the beef and brown until just cooked through and slightly browned, about 2 minutes per side. (I like to use tongs here). Transfer to a plate.

Meanwhile, thinly slice the onion and garlic and roughly chop the kimchi. After transferring the beef to the plate, add the remaining 1 tablespoon oil to the skillet, then add the onions and cook until softened, about 6 minutes. Add the garlic and cook for 1 additional minute.

While the onions are cooking, add whisk together the broth (or water + soy sauce if using), cornstarch, and chili-garlic sauce until the cornstarch is dissolved.

Add the broth mixture to the pan, turn the heat to high, and cook, stirring, until the liquid begins to thicken, 2 to 3 minutes. Stir in the beef with any accumulated juices, broccoli, and kimchi and cook until just warmed through, 2 minutes more.

Serving size: 1 1/2 cups

Calories: 330; Total Fat 13g (Sat Fat 2.5g, Mono Fat 6.5g, Poly Fat 2.3g); Protein 33g; Carb 21g; Fiber 6g; Cholesterol 50mg; Sodium 660mg

Quick Whole Wheat and Oat Pancakes for 2

16 Feb

Processed with VSCOcam with f2 preset

I don’t really care about Valentine’s Day, but I do care about pancakes!

I can whip up a small batch of pancakes on a weekend morning in no time. Most days, I like a sweet and carb-filled breakfast (oats, cereal, toast, fruit…). These Whole Wheat & Oat cakes make the morning extra special and sweet, but still manage to pack in some healthy ingredients to start the day.

The recipe below is my idea of a perfect portion for 2.

I folded in some Qi’a cereal mix (you could also use chopped nuts or chia/hemp seeds) into my batter, and I loved the slight crunch they provided.

I’m the kind of lady who likes to eat a little of everything, so pile as many toppings onto my pancakes as I can–fruit, jam, syrup, nut butter. All so delicious, I can’t just pick one!

If you are looking for a slightly lighter “pancake” for 1 that packs more of a protein punch, check out this recipe.

Whether you’re a V-day fan (raspberry jam on top makes these ‘cakes festive) or a just a pancake fan, or both, get out your skillets and spatulas and start flipping. You won’t be disappointed with the end result!

IMG_2032

Quick Whole Wheat & Oat Pancakes for 2

adapted from Cast-Iron Skillet Blueberry Pancakes

serves 2 (about 3 pancakes each) **if you want more, double the recipe or triple it, etc…

1/2 cup whole wheat flour

1/4 cup rolled oats

1 1/2 teaspoons sugar

1/2 teaspoon baking powder

1/4 teaspoon baking soda

1/4 teaspoon salt

1 egg

1/2 cup buttermilk (I used 1/2 cup 1% cow’s milk + 1 teaspoon cider vinegar)

1/2 teaspoon vanilla extract

optional: 1 tablespoon chia seeds or Qi’a cereal mix

1 tablespoon of butter, divided, for frying the pancakes

1. In a medium bowl, whisk together the flour, oats, sugar, baking powder, baking soda, and salt.

2. In a small bowl, whisk together the egg, milk, vanilla extract, and chia/Qi’a seeds, if using.

3. Pour the wet mixture into the dry, and whisk until just combined. Let the mix sit for 5 minutes while you heat your griddle or cast-iron skillet.

4. Heat the cast-iron skillet over medium to get it warmed up, about 1-3 minutes. Drop in a small amount of butter, enough to coat the skillet. I used a 1/4 cup measure to portion my pancakes. Drop the batter into the hot buttered skillet (I dropped 2 pancakes at a time). Let them cook for about 2 minutes, flip, then cook about 2 minutes more. Re-butter the skillet as needed and cook the remaining pancakes the same way (they will start to cook quicker now that the skillet has been on for a while, just keep an eye out).

Enjoy with your favorite toppings.

“Creamy” Chicken Barley Soup

17 Jan

IMG_1058

You know that area right underneath your nostrils? Mine is red and dry because I have been blowing my nose for almost a week now. Yuck. Colds are the worst. I still have energy to go about my usual business, but I’m just a snotty, gross mess.

Alas, chicken soup.

Processed with VSCOcam with f2 preset

Funny enough, a few days into the snotty sickness that has been permeating my apartment, I received an email from my boyfriend’s mom with a recipe for a fantastic chicken barley soup. Must have been mother’s intuition that we needed comfort.

This “Creamy” Chicken Barley Soup is heartier than the typical clear-broth chicken soup. Blending some of the broth with cooked potato, onion, celery, and garlic lends a creamy texture without any cream. If your favorite kitchen tool is an immersion blender, raise your hand! Makes life so easy.

Adding a little barley to the soup offers a nice contrast, a bite of texture. Barley is a great source of whole grain, it is rich in fiber and protein, and it turns the soup into its own meal.

I used a homemade turkey stock for this soup. It is so easy to freeze a bunch of leftover odds and ends of vegetables and prepare a quick stock. After I made a vegetable stock, I strained it, and then added it back to a pot with the neck and giblets I had in the freezer from my Thanksgiving turkey. There’s some good dark meat on the neck of a turkey, so don’t throw the neck away! Prepare your stock the day before if you want to get ahead.

So I had turkey stock in my chicken soup. No big deal. If you are short on time, you could just use water instead of stock, and add salt. Or buy stock. Either way.

Note that you could buy pre-cooked chicken, but I found it very easy to just toss two breasts (save the bones for stock if you want!) in the oven while I was preparing the rest of my ingredients.

“Creamy” Chicken Barley Soup

Recipe from Lucy, by way of Jackie

This makes a LOT of soup, about 10 servings (you could freeze extras, bring some to a friend, or halve the recipe)

2 T butter or oil
2 onions, chopped
6-7 celery sticks, chopped
2 cloves garlic, minced
1 1/2 C russet potatoes, diced
2 large carrots, diced
1/2 C pearl barley
8 -9 C stock (I made my vegetable stock, strained it, and added the neck and giblets that were in my freezer from Thanksgiving and simmered for ~1hour)
2 bay leaves
1/2 C white wine
2 bone-in chicken breasts (or slightly less than 2lbs), pre-cooked and shredded (see below for how to cook)
salt and pepper to taste

First, cook your chicken breasts. Preheat the oven to 350 degrees F. Place the chicken breasts skin side up on a parchment-lined sheet pan. Rub with olive oil, sprinkle with salt and pepper, and roast for 35 to 40 minutes, until done (165 degrees F). When the chicken is cool enough to handle, discard the skin and bones (save the bones in your freezer for stock), and shred the meat. Cover and set aside.

Meanwhile, in a large stockpot melt butter (or oil) and saute onions, celery, garlic until soft.

Next, add potatoes, 6 – 7 C chicken stock, and thyme. Cook until potatoes are soft (15- 30 min), then use an immersion blender or transfer 3/4 of the mixture to a blender and blend until smooth.

Return this mixture to the pot, add the carrots, barley and bay leaves.  Cook partially covered for 30 minutes. Add more stock for a soupier soup. When barley is tender, add wine and chicken, salt and pepper to taste. Cook for a few more minutes to warm up the chicken.

Mushroom Pepperoni and Mozz. Pizza with Mike’s Hot Honey

20 Dec

Processed with VSCOcam with f2 preset

Me, hovering over the stovetop to snap a picture before I dive into the pizza

There’s a bottle of Mike’s Hot Honey sitting on my desk. Honey spiked with vinegar and chiles.

This spicy honey begs to swirled on cheesy pizza and if there’s bits of oven-toasted cured meat, even better. (For more food pairings, look here).

Processed with VSCOcam with f2 preset

I made a quick, no-knead dough with a mix of bread flour and whole wheat flour. Olive oil and a dash of cornmeal go onto the baking sheet before the dough to get a nice crust with color and texture.

The dough recipe makes enough for two pizza pies.

Sauce, fresh mozz, mushrooms, pepperoni, Parmesan, fresh oregano. Top with lots of honey. Enjoy with a big salad (whoops, not pictured, but this meal definitely calls for a big salad).

I had extra toppings leftover, so I just toasted some regular, whole wheat bread, spread it with the toppings, and popped it in the oven for 10 minutes. Another easy option if you don’t want to make the dough recipe.

IMG_1728

Mushroom Pepperoni and Mozz Pizza with Mike’s Hot Honey

For the dough recipe, I used Joy’s version, which was based on Tracy’s version, which was originally from Jim Lahey’s book (it makes enough for 2 pizzas. You can freeze one or save it for the next day). I found the dough to be very shaggy. It ended up working, though, so just let it do it’s thing. I had to knead it one or two times to get it how I wanted.

**NOTE: This dough recipe needs about 2.5 hours to do it’s thing before it can go in the oven. Give yourself enough time if you are making your own dough.

Toppings (for 1 pizza): 

3/4 cup sauce

3-4 oz ball of fresh mozzarella, sliced

4 oz mushrooms, sliced

1/8 pound thin sliced pepperoni, cut into wedges or strips (I found pepperoni at the Whole Foods Deli, from Chestnut Valley Charcuterie)

1/2 cup Parmesan, shredded or grated

Toppings after the oven: fresh oregano, red pepper flakes, spicy honey

Directions: 

Preheat oven to 450-500 degrees F.

Oil a 13×18-inch rimmed baking sheet with olive oil, and sprinkle cornmeal over the oil. Place the 1 of the 2 dough balls on the pan and stretch and press the dough out into a flat rectangle.  If the dough springs bag as you’re pressing it out, simply wait five minutes to allow the dough to rest and then try again.  The dough should be very thin. If the dough tears, don’t worry, just press it back together.

Top the dough with sauce, cheeses, mushrooms, and pepperoni.

Bake for 15 to 20 minutes until the edges are charred and bubbling.  Remove from the oven.  Allow to cool for a few moments then slice and top with fresh oregano, red pepper flakes, and spicy honey.  Serve immediately, with a big salad.