Tag Archives: zucchini

Cauliflower “Rice” Sauté: Food For the Summer-Fall Transition

25 Sep

Processed with VSCOcam with f2 preset

Making Cauliflower Pesto a few weeks ago turned me on to a whole world of cauliflower possibilities.

My post-pesto experiment? Rice! Or couscous, or whatever you want to call the small, fluffy tufts of pulsed, grated cauliflower.

The below links provided me with some background and technique on making grain-like cauliflower salads:

The Kitchn provides an easy how-to tutorial on cauliflower couscous

Food52 makes an easy spiced couscous with cumin, za’atar, and lemon

Joy the Baker turns colorful cauliflower  into a rice burrito bowl

The First Mess knows how to make a mean “rice and peas” with all of the best crunchy elements

Clearly, I wanted to be among those in the use-cauliflower-like-a-grain club. So, I picked out the biggest head of cauliflower at the farmer’s market and set to work.

An efficient person would likely use a food processor or blender to pulse the cauliflower into tiny pieces. I, on the other hand, used my box grater, justifying the mess I made all over the counter and the floor as a yearning for the old-fashioned and an excuse to exercise my arm and core muscles. To make less of a mess when grating my hand, try setting the box grater in a large bowl to catch fly-away cauliflower bits.

The cauliflower “rice” can be eaten raw, but I prefer it lightly sautéed.

Use the “rice” plain as a bed for a curry, or stir the “rice” into some seasonal vegetables and add-ins to create a full meal.

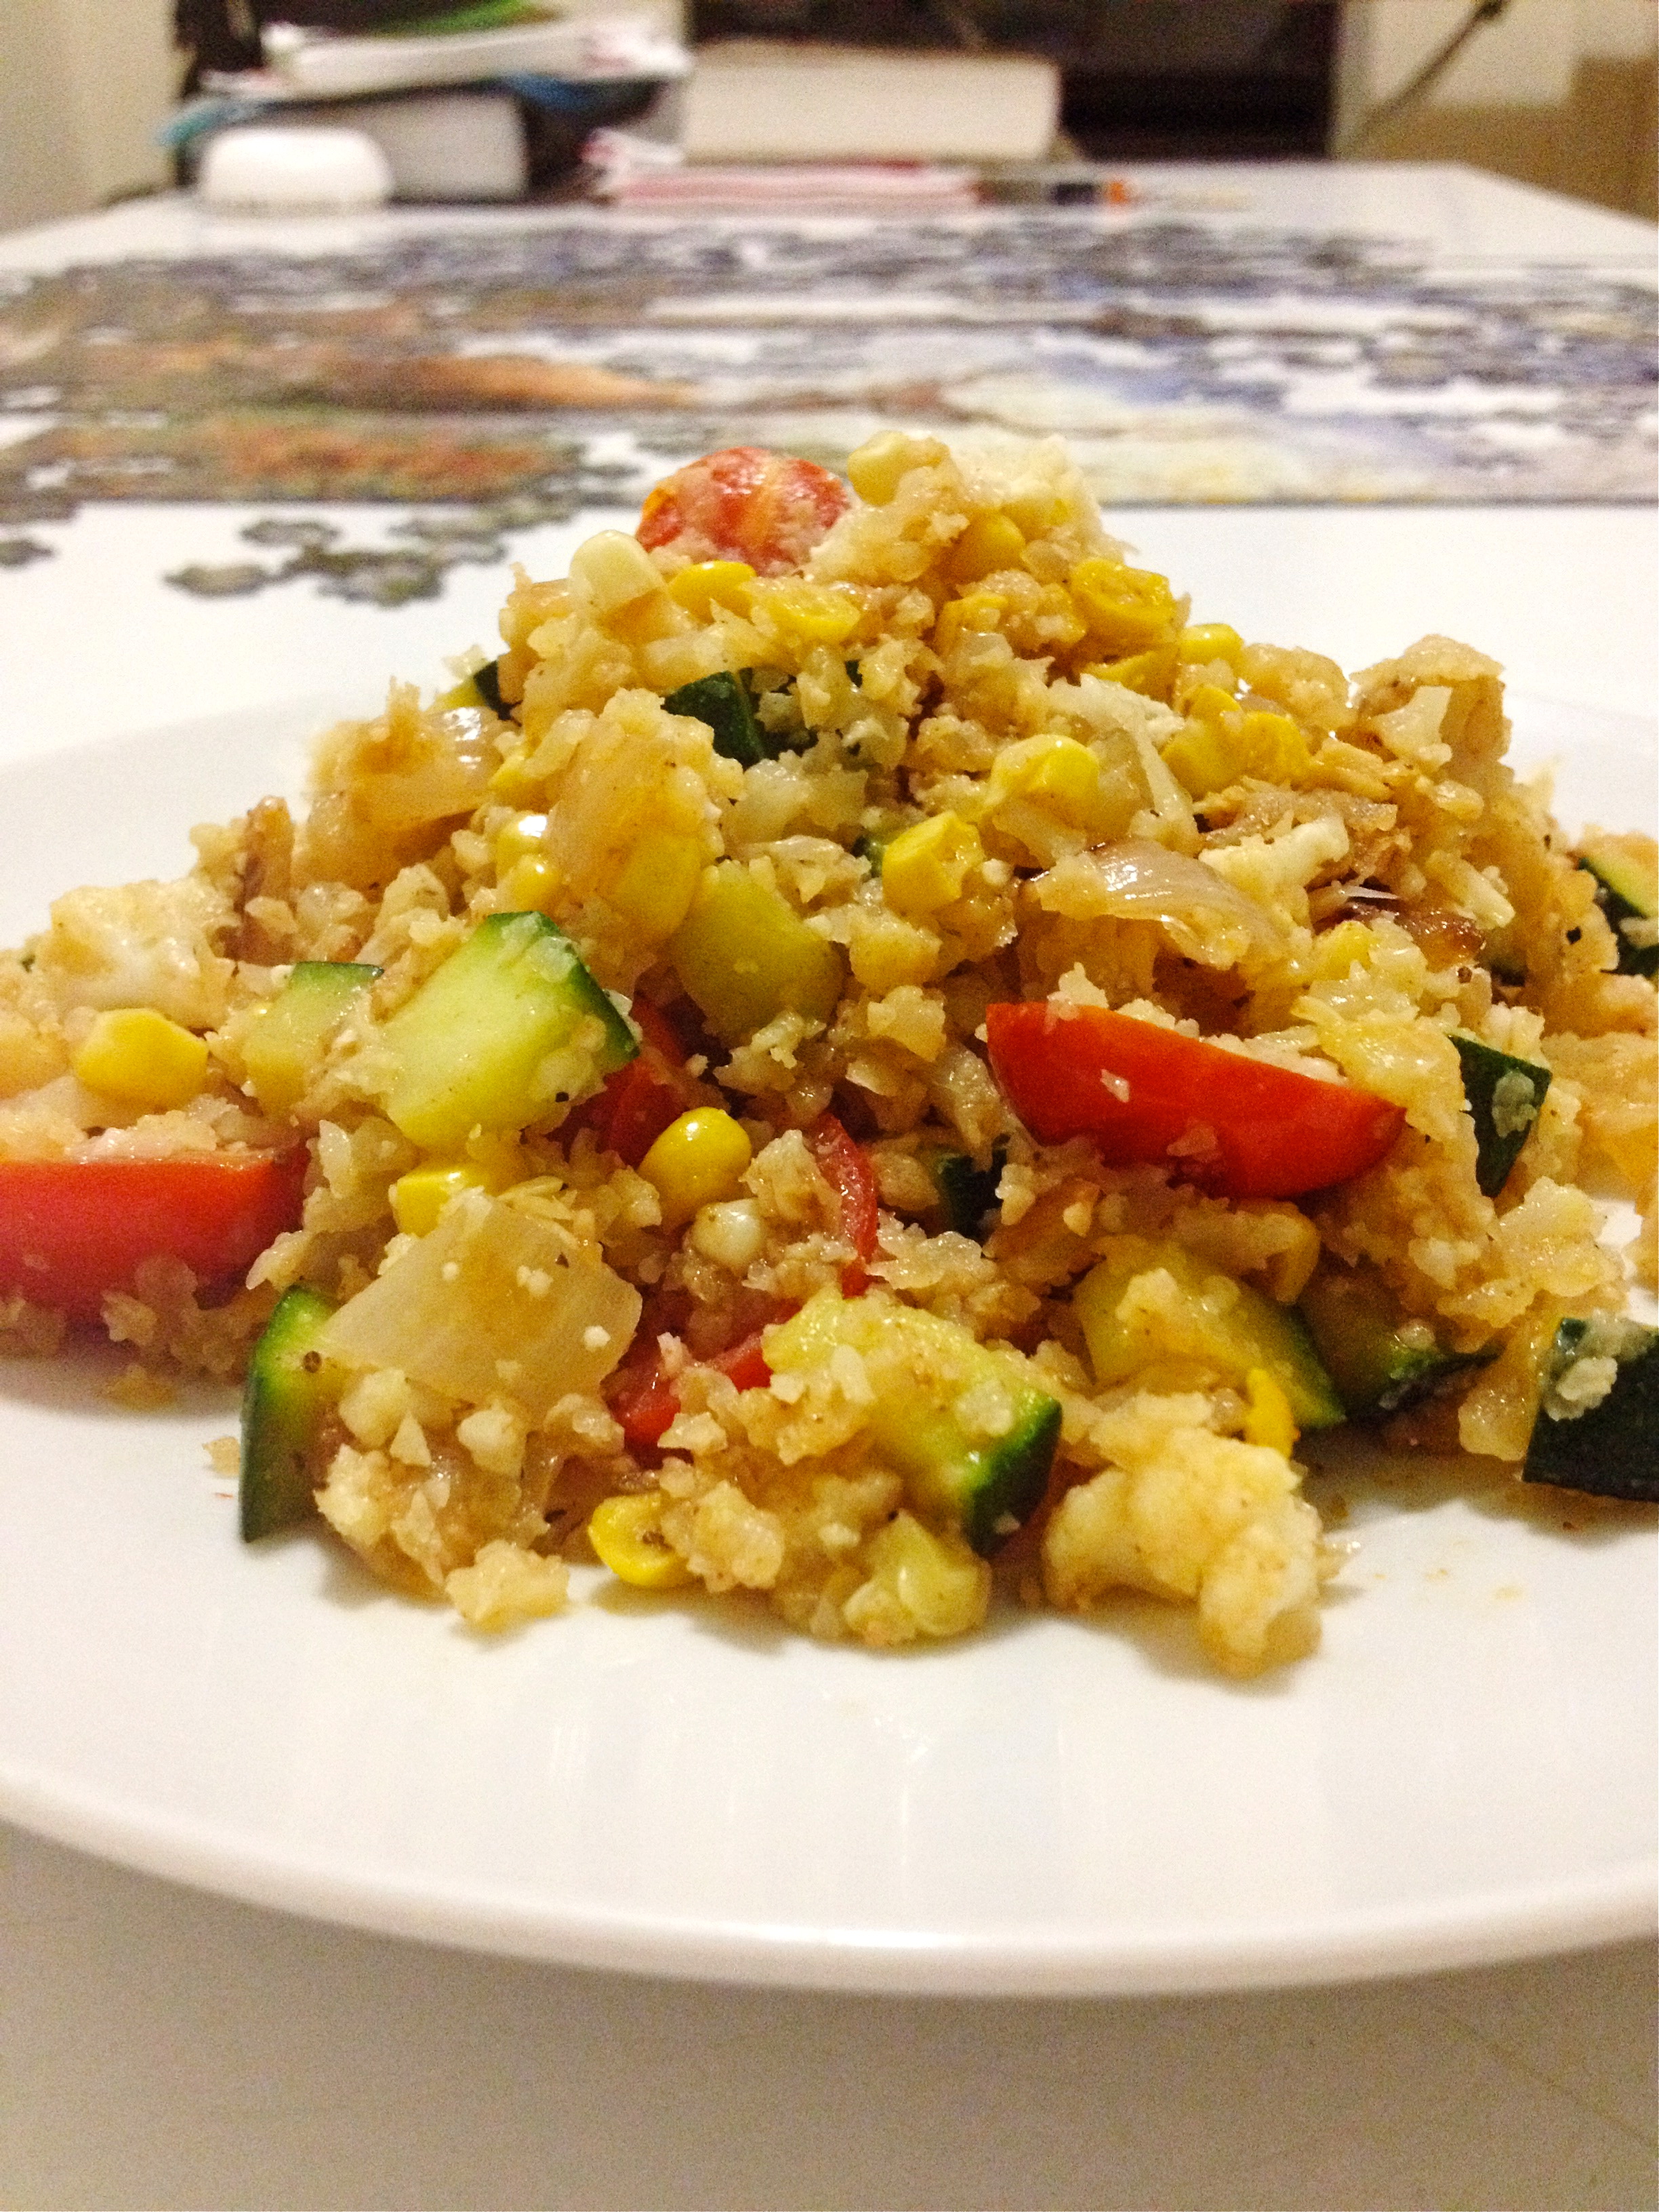
I cooked up some onion with zucchini, corn, and tomato, and mixed in the cauliflower “rice” with some chili powder, paprika, and my friend Amy’s uncle’s special Maryland spice blend (you can use something like Old Bay). Shave some Parmesan on top if you want. I took this for lunch every day this week, sometimes adding a little avocado or hummus on top to make things interesting.

Cauliflower is hot, hot, hot right now, as it should be. Jump on board.

Cauliflower “Rice” Sauté: Food For the Summer-Fall Transition

1/2 very large or 1 regular size head of cauliflower

1 tablespoon oil, olive or canola

1 small onion, chopped

1 small zucchini, chopped small

1/2 cup small tomatoes, sliced in half or quartered

1 ear corn, sliced off the cob

1 teaspoon each: chili powder, paprika, Old Bay

salt and pepper, to taste

optional: fresh grated Parmesan cheese and/or hot sauce

Wash the cauliflower and take off the stalk and leaves. Cut or tear the cauliflower into large florets. In batches, pulse the cauliflower florets until finely chopped and they look approximately the size of rice or couscous. **You can also use a box grater to grate the florets by hand. You should get about 4 cups, more or less. Set the “rice” aside.

In a large skillet, heat the oil over medium-high heat. Add the onion and sauté for 2-3 minutes. Add the zucchini, corn, and tomatoes and sauté for another 5 minutes.

Slowly toss the cauliflower “rice” into the skillet with the spices. Continue cooking everything for another few minutes. Taste and add salt and pepper as needed. Finish with Parmesan and/or hot sauce.

Advertisement

Throw-Together Late Spring/Early Summer Pasta

8 Jun

Processed with VSCOcam with f2 preset

I’m back in New York after visiting California for 10 days, five in the Bay Area with friends and five in Los Angeles with family. All of the summer produce was in full swing: stone fruit, cherries, berries,  summer squashes, tomatoes…

New York greenmarkets literally just started selling strawberries, and rhubarb and asparagus are still hanging on, even into the month of June (this is rare according to my greenmarket vendor).

While I had a giant list of restaurants to eat at, I found myself cooking and baking quite often during my California visit.

I made a plum galette using this recipe as a guide (I didn’t use almonds to keep things simple). I made Smitten Kitchen’s brown butter salted rice crispy treats. I made the Silver Palate’s  zucchini bread. I made lots of smoothies. I made poached eggs and veggie egg scrambles. Simple things, but so nourishing.

Processed with VSCOcam with f2 preset

Processed with VSCOcam with f2 preset

I found myself making this throw-together pasta twice, once in the Bay Area and once in Los Angeles. The trick: save about 1/2-3/4 cup of the water that you use to cook the pasta in. Adding back the hot starchy water keeps the veggie-filled pasta creamy and coated.

I made this pasta the first time in Berkeley, with my friends Sara and Nir. We used a mix of chard and kale, onion, ribboned asparagus, basil, and lemon zest. Pasta water, Parmesan, a splash of red wine vinegar, and salt and pepper were added as finishing touches. A great vegetarian meal. To go with the pasta, Sara made us a colorful salad with lemon dressing, and Nir made his cheesy garlic olive oiled bread.

IMG_2698

Sara, Nir, and I loved the pasta so much, so I made it again for my parents on my last night in L.A. My mom grilled some sausages and we added them into the pasta at the end. I used zucchini ribbons instead of asparagus. No basil, but some rosemary on the side. And lemon zest and juice this time instead of a splash of vinegar.

Remember: save your cooking water. It makes all the difference.

New York, I’m waiting very patiently for the rest of the summer produce to arrive. Until then, I’m eating as much rhubarb, strawberry, young greens, and asparagus as I can.

Processed with VSCOcam with f2 preset

Throw Together Late Spring/Early Summer Pasta

makes about 3-4 servings

1/2 pound pasta (if you can find it, use mini penne)

1-2 tablespoons olive oil

2 medium zucchini or 1/2 bunch of asparagus

1/2 onion, red or white

1-2 cloves garlic

1 small bunch kale or chard

zest and juice from 1 small lemon

Salt and pepper, to taste

Parmesan cheese, to taste

Grilled sausage (I used a chicken cilantro sausage), optional

Using a vegetable peeler and holding one end of the vegetable, shave the zucchini (or asparagus) into long ribbons. Chop the onion, mince the garlic, and chop the kale and/or chard (you can use the chard stems but not the kale stems).

Bring a large pot of water to a boil. Once boiling, add a hefty amount of salt and the pasta. Cook according to the package directions or until al dente. In the last minute of cooking, drop the zucchini or asparagus ribbons into the boiling water. When the pasta is cooked, drain the pasta/vegetable ribbon mixture. *SAVE 1/2-3/4 cup of the water and set aside.*

Heat the grill and grill some sausages. Once grilled, cut them up into bite-size pieces. (alternatively, you could cut the sausages up and saute them in the skillet with the kale, or omit altogether to keep things vegetarian).

Heat the olive oil in a large skillet. Add the onion and saute for about 5 minutes. Add the garlic and saute for another minute. Add the kale and cook until just wilted. Turn off the heat.

Mix the cooked pasta/ribbons in with the sauteed onions and greens mixture. Pour in the reserved pasta water and toss. Toss in the lemon zest and juice. Mix in the grilled sausages. Add salt and pepper and Parmesan to taste.

You’ll want seconds. Trust me. 

Summer Squash Fritters

9 Jul

IMG_1204

Holy smokes, I’ve fallen head over heels for fritters!

Maybe the fact that the word “fritter” implies fried, I have steered clear of anything fritter-related in my kitchen. Until NOW.

…and I’ve had my share of deep fried apple fritter mania in the past (Gosh, I was so young here. This was an event at the restaurant I used to work at where I had to make tons of apple fritters, I was scooping batter out of buckets!).

pizzaiolo fritters

I shall steer clear no more…these Summer Squash Fritters are lightly pan-fried on a cast-iron skillet, and they totally bust my fears of frittering at home. They are like potato latkes, but a bit healthier and more colorful.

I’ve been making so many quick pasta dinners and taco/quesadilla/migas dinners these days, and tonight I was looking to do something out of my usual throw-together repertoire. Alas, Deb from the Smitten Kitchen has saved dinner once again.

These lil guys hit the spot. With a fried egg on top and a shake or two of hot sauce, I was dancin’ in my dinner seat! You just can’t beat the golden brown crisp exterior of these fritters, oozing supple and sweet summer squash in every bite.

The summer squash are lookin’ mighty fine at the New York City farmer’s markets right now. Vibrant, plump, and simply aching to be eaten.

And if summer squash is not your thing, how about Broccoli Parmesan Fritters? (also in season right now in NYC). Deb has quite an extensive fritter library, so go check it out here if zucchini is not your thing.

These fritters would be an excellent for brunch, too.

Now go fight your fritter fears and experience the goodness.

IMG_0764

Summer Squash Fritters

adapted from The Smitten Kitchen 

I got about 6 fritters out of this batch (serves 2 people as a main dish)

1 large zucchini + 2 small and thin yellow summer squash

1 teaspoon Kosher salt, plus extra to taste

2 small garlic cloves, minced

1 large egg, lightly beaten

2 tablespoons grated cheddar cheese (I used a spicy chipotle cheddar. zing!)

freshly ground black pepper

1/2 cup all-purpose flour

1/2 teaspoon baking powder

olive oil or canola oil, for frying

Trim the ends off of the zucchini/summer squash and grate the squash on the large holes of a box grater.

Place a colander over a large bowl. Add the grated squash to the colander with 1 teaspoon of salt and let it sit for about 10 minutes. Using a wooden spoon, press the squash against the holes of the colander and drain as much excess water as you can. You will probably get a lot of liquid out of the squash! This reduces the likelihood of soggy fritters.

Dump the liquid down the sink, rinse the large bowl, and add the pressed grated squash to the bowl. Stir in the garlic, lightly beaten egg, cheddar, and black pepper. In a small bowl, whisk together the flour and baking powder, then stir the mixture into the zucchini batter.

In a large heavy skillet (cast iron is indeed dreamy here), heat 2 tablespoons of oil over medium-high heat until shimmering. Drop small bunches (I used a 1/4 cup measure) of the zucchini mixture onto the skillet only a few at a time (I did 3 fritters at a time) so they don’t become crowded and lightly nudge them flatter with the back of your spatula. Cook the fritters over moderately high heat until the edges underneath are golden, about 3 to 4 minutes. If you find this happening too quickly, reduce the heat to medium. Flip the fritters and fry them on the other side until browned underneath again, about 2 to 3 minutes more (if you are making a bigger batch, you can keep finished fritters in a 200 degree F oven to stay warm).

Enjoy with a poached or fried egg on top and a few good shakes of hot sauce, so the yolk runs down and around the fritters (I wish I took a picture of this but I chose to shove the goodness in my face instead!).

**Deb says: These fritters keep well, either chilled in the fridge for the better part of a week and or frozen in a well-sealed package for months. When you’re ready to use them, simply spread them out on a tray in a 325 degree oven until they’re hot and crisp again.

IMG_0763

Farmer’s Market Veggie Explosion with Miso Curry Dressing

6 Aug

A variation on the Miso-Curry Delicata Squash that I was making over and over again last fall.

This time around there’s eggplant, heirloom tomato, baby potatoes, and zucchini from the farmer’s market. And tofu for protein!

Dressed with a smash and a stir of white miso, red Thai curry paste, and extra virgin olive oil. Finished with a squeeze of lemon, fresh herbs, and slivered almonds.

I was inspired by the produce at the farmer’s market. I suggest you do the same and use whatever strikes your interest–corn, peppers, sprouts, peas, baby eggplants…

I think my favorites right now have to be the cherry tomatoes. Farmer’s market tomatoes taste SO much better than any grocery store variety. Just remember not to put them in the refrigerator or they will lose their luscious tomato taste. They are great roasted or raw.

Looking for another quick, farmer’s market-inspired dinner idea? Tacos are always the answer in my book.

I know that this Miso Curry Veggie Explosion requires you to turn on the oven. If you just can’t take the heat, make a raw salad with some kale, tomatoes, snap peas, corn etc. You could still use tofu. Just cut everything in bite size pieces and drizzle the miso-curry dressing with a little lemon and chopped herbs, and add the nuts or seeds for texture. No oven required. Stay cool.

Endless possibilities.

Veggie Explosion with Miso Curry Dressing

adapted from Heidi Swanson’s Super Natural Everyday 

serves 4

1/4 cup/ 60 ml extra-virgin olive oil

Scant 1/4 cup/ 2.5 oz/ 70 g white miso (I purchase mine at Whole Foods)

Scant 1 tablespoon red Thai curry paste

1 14-oz package of extra firm tofu, cut into cubes

1 large handful of small potatoes, unpeeled and cut into chunks

1 medium eggplant, cut into small chunks

1/2 of a medium zucchini, cut into strips

1 large heirloom tomato, cut into cubes

2 tablespoons fresh lemon juice (half a lemon)

1/4 cup slivered almonds

small handful of fresh basil or cilantro leaves, roughly chopped

Preheat the oven to 400 degrees F.

In a medium bowl, whisk together olive oil, miso, and curry paste.

Combine the tofu, potatoes, eggplant, zucchini, and tomato in a large bowl with all but 2 tablespoons-worth of the miso-curry paste. Use your hands to toss well, then turn your vegetables onto a rimmed baking sheet lined with parchment and arrange everything in a single layer. Roast for about 30 minutes, until everything is tender and browned. Toss once or twice along the way, after things start to brown a bit. When the veggies come out of the oven, squeeze half of a lemon over them.

Serve the veggie explosion with some toasted almond slivers, fresh basil or cilantro, and a spoonful of the remaining sauce with a little more lemon.

NOTE: You can always make a raw salad. No oven. Dressing is the same. Enjoy.

Stuffed Peppers With Quinoa, Feta & Summer Veggies

17 Jul

This weekend was filled with chicken sausages and potato salad.

This weekend was filled with a shared lunch at the Spotted Pig-the gargantuan burger with Roquefort cheese and shoestring fries, and the poached eggs with corned beef hash.

There was a cappuccino to be had at the new cafe around the corner from me, Kuro Kuma.

I wanted to squeeze in a meal at the new ramen joint nearby, Jin Ramen, but my belly just could not budge any further.

Sometimes you just have to sit back and indulge yourself. Hey, at least I was eating healthy breakfasts all weekend: I had oatmeal one day and a banana almond smoothie the next. With some plums and nectarines to fill in the gaps. So sweet and ripe, they tasted like honey!

I’m balancing things out today with loads of summer vegetables and a healthy bean and grain combo.

Holy smokes, people, do you know how good red bell peppers are for you?

Red bell peppers rank very high in Vitamin C content, with 140 mg of Vitamin C per 1/2 cup chopped red bell pepper. That’s higher than orange juice (75mg per 3/4 cup), broccoli (50mg per 1/2 cup), and strawberries (50mg per 1/2 cup).

The red color in bell peppers comes from natural plant pigments in the carotenoid family (specifically lycopene, lutein, and zeaxanthin). Lycopene is a carotenoid and an antioxidant that helps the body reduce the risk for certain types of cancer, and heart disease, in addition to helping lower blood pressure and LDL cholesterol. It is also great for protecting the tissues in your body and strengthening your immune system.

I won’t get into any more technical terms, but red bell peppers and red tomatoes pack quite the punch. Not to mention how good zucchini and corn and onion are for you. And you can be sure that the ever touted holy grail of grains, quinoa, is a steal when it comes to your health.

Once upon a time I lived in a big cooperative-living house. 2 people would cook dinner five or six nights a week for the whole house (~60 people). Stuffed peppers was an ever popular dish that was guaranteed to please a hungry household. So versatile, you could fill these gems with any kind of grain/veg./protein combo and never get bored. I was drifting down memory lane tonight while enjoying my pepper, prepared my favorite way…

The feta cheese holds its shape nicely under the oven heat, but once you pop a cube in your mouth, it just melts on the tongue into salty savory bliss. And I love how the quinoa gets slightly crunchy on top after being in the oven. Ugh, so good.

Stuffed Peppers with quinoa, feta & summer veggies

adapted from SmittenKitchen

1 cup dry quinoa

bell peppers (I used 3 peppers, but still had some quinoa salad left over, which I was happy about)

1 tablespoon olive oil

1/2 of a large onion, chopped

2 ears of corn, shaved off the cob

1-2 medium zucchini or summer squash

3 tablespoons tomato paste*** see note

1 cup halved cherry/grape tomatoes

1 15-oz can chickpeas, drained and rinsed

4 oz of feta, chopped

seasonings: salt, pepper, dry oregano (maybe 1/2 teaspoon), fresh basil (to taste)

1. Rinse the quinoa. Add the quinoa and 2 cups of water to a small pot or saucepan. Bring to a boil. Reduce the heat to a simmer, cover the pot, and let it go for about 12-15 minutes, until the quinoa is cooked (should be light and fluffy with all of the water absorbed). Set aside.

2. Preheat the oven to 350 degrees F. Halve the bell peppers and take out the seeds and membrane (I like to keep the green stem for aesthetics). Line a baking sheet with parchment and place the pepper halves face up on the sheet. Bake for 15-20 minutes, until the peppers start to soften slightly. Take the peppers out of the oven and let them sit while you prepare the filling.

3. Heat the olive oil in a large pan. Add the onion, corn, and zucchini. Cook for about 5-8 minutes until the veggies start to soften slightly. Add some seasonings (salt, pepper, herbs) to taste.

4. Turn off the heat and add the tomatoes, chickpeas, and tomato paste to the veggie mixture. Add 2 cups of cooked quinoa to the mix (save the remaining quinoa for another use i.e. muffins?!). Toss in the feta cheese.

5. Fill the pepper halves with heaping amounts of the quinoa mixture. It is ok to have some leftover mixture for nibbling on later in the week. Bake the filled peppers for another 15  minutes. Enjoy!

***Note: Don’t you just hate opening up a can of tomato paste only to use a mere few tablespoons worth? Me, too. A great tip from registered dietitian Jackie Newgent is to freeze leftover tomato paste (wrap it in a cylinder in saran) and slice it off as needed. Preventing waste in the kitchen. Love it!