Tag Archives: vegan

Vegan Chocolate Loaf with yogurt, warmed cherries, and chocolate balsamic

6 May

Processed with VSCOcam with f2 preset

Because it’s Tuesday.

Because I’m in the thick of finals (last semester of grad school!).

Because I like to eat “healthified cake” for breakfast. 

Because sometimes, I like to plate my food up fancy. 

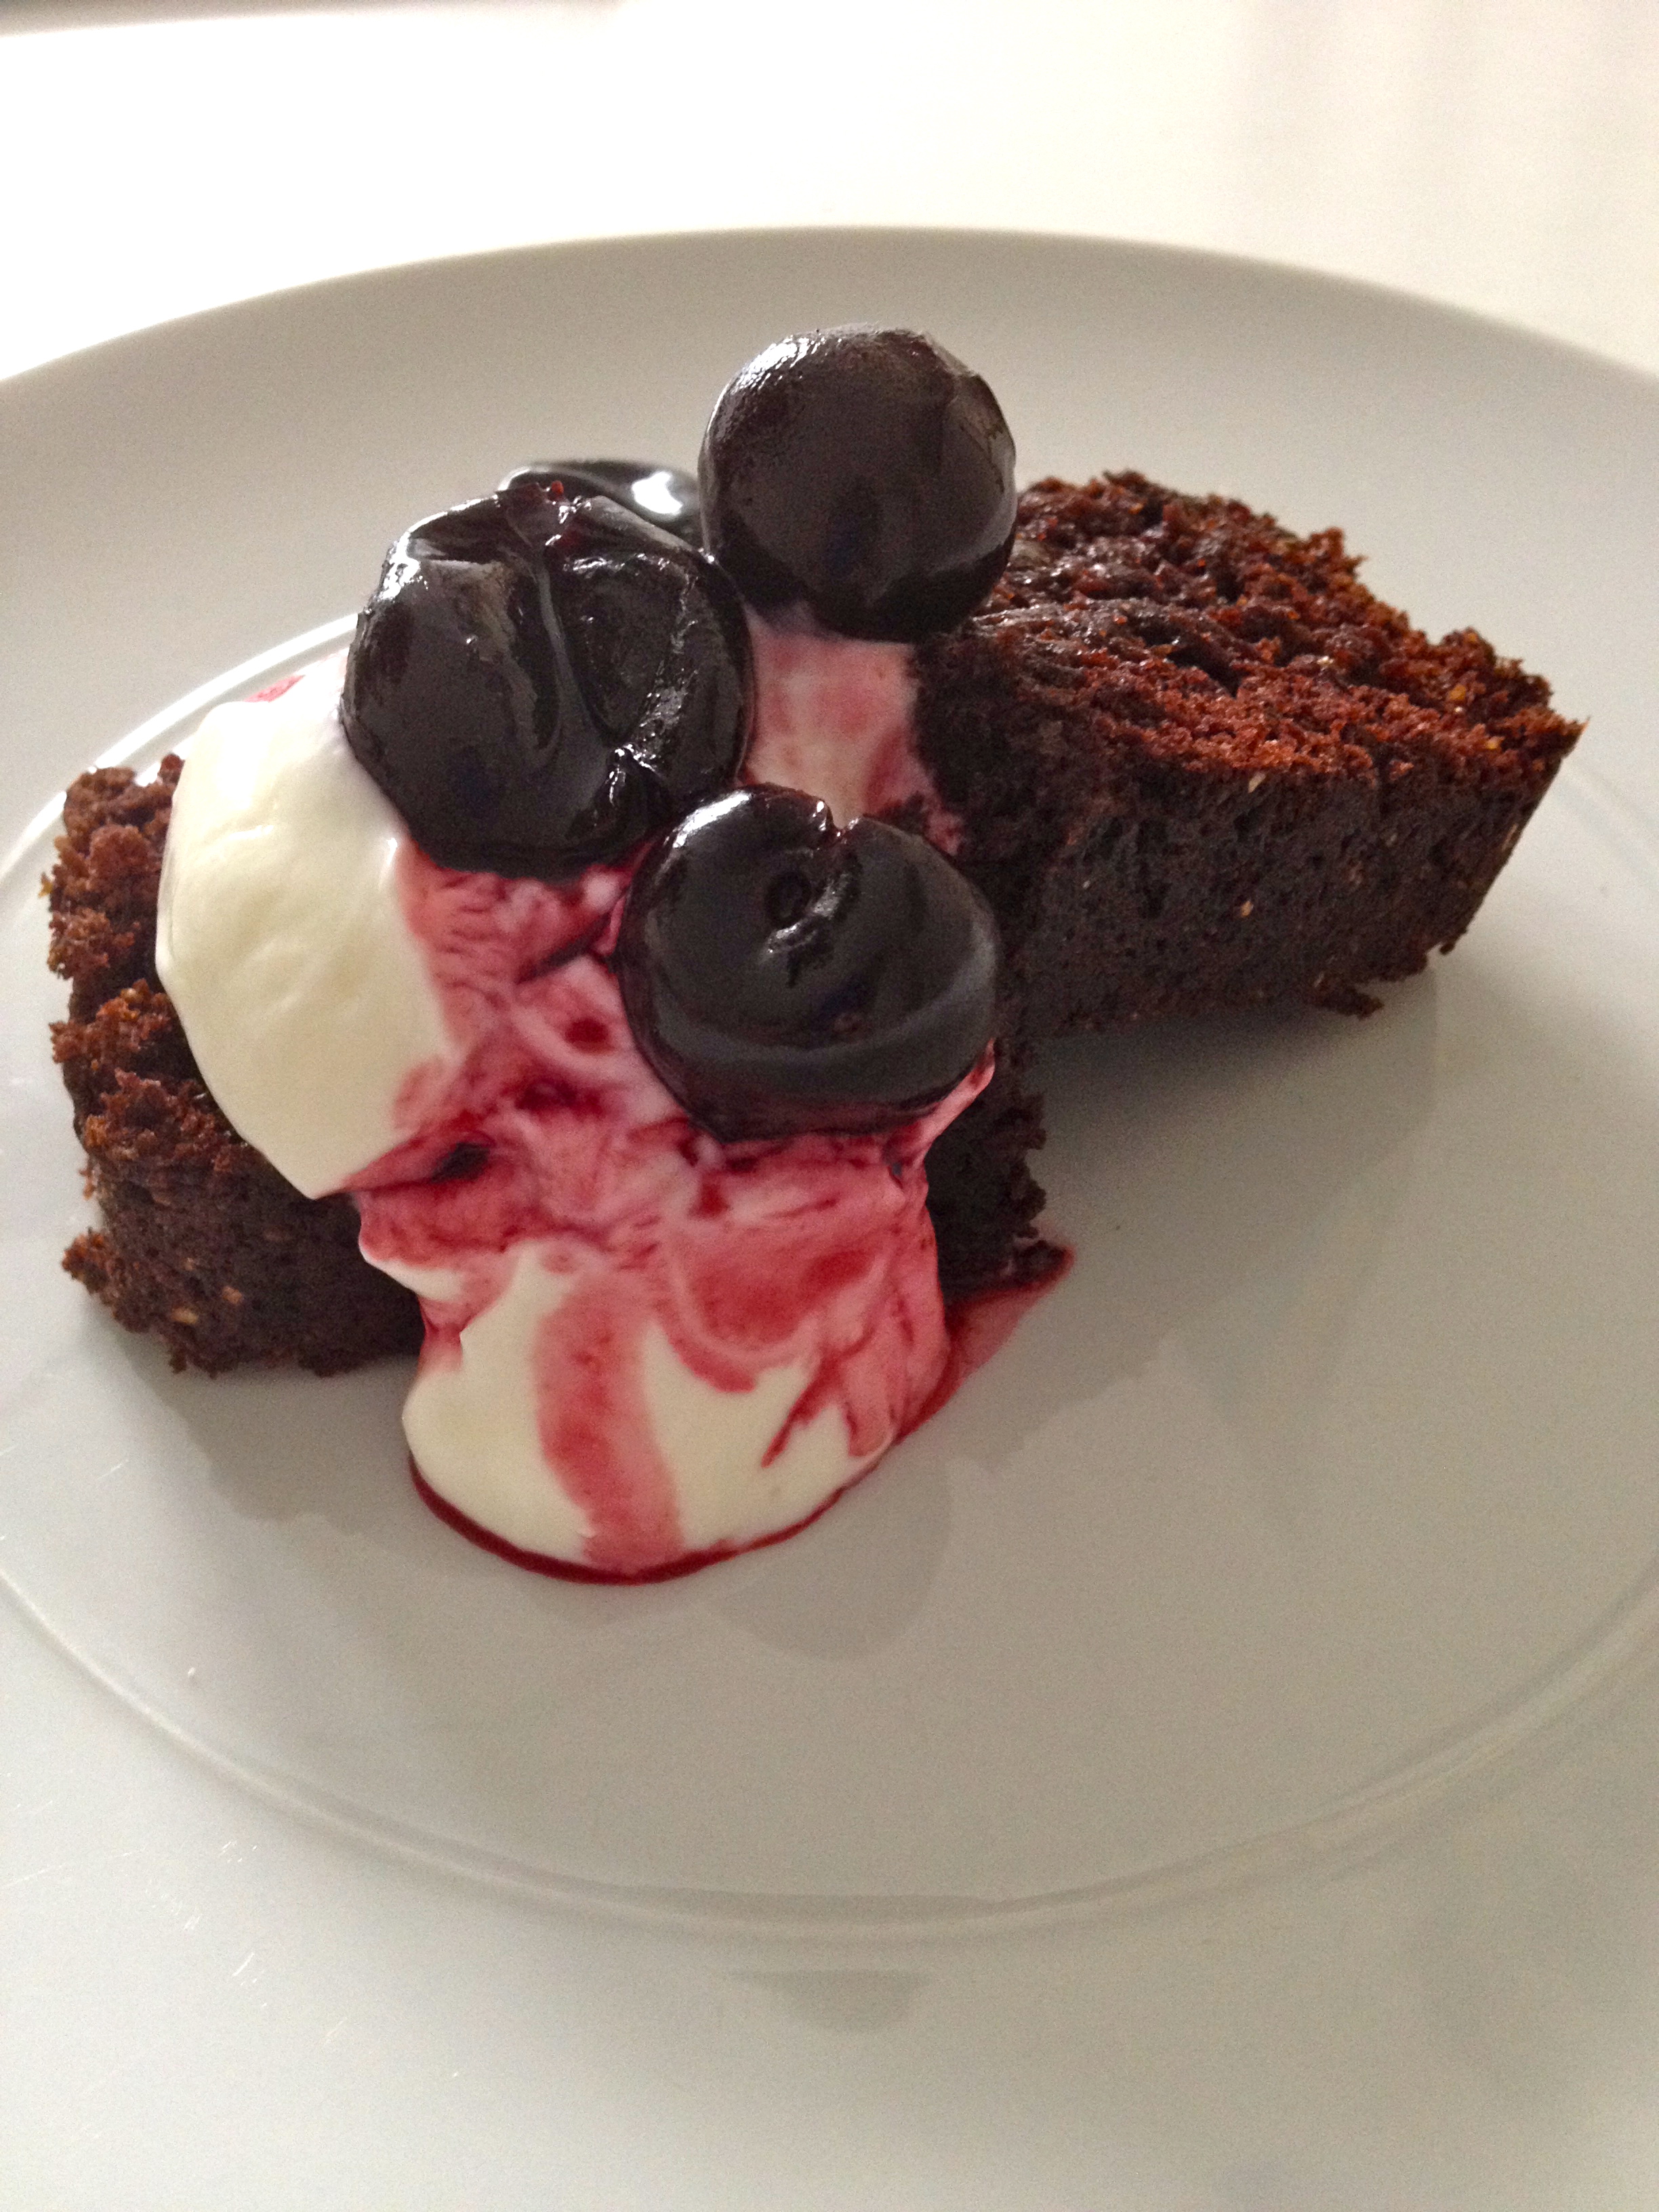
I ate a slice of this chocolate loaf for breakfast today. No shame. Vegan chocolate loaf cake with some plain, low fat yogurt, frozen cherries that were warmed in the microwave and poured on top, the juices seeping into the cake, and a final glug of chocolate balsamic vinegar that I re-discovered I had in the cabinet. This could easily be dessert.

Healthy decadence is my jam.

Nicole from CucinaNicolina and I are on the same page in terms of our mindset that life is too short not to have a slice of something sweet, especially when that sweet something is homemade, with a little bit of health mixed in. Throwing in some whole wheat flour and a sprinkling of ground flaxseeds helps make cake an acceptable breakfast in my opinion. Oh, and there’s a cup of coffee in hiding in the loaf, too. I always have a little extra from my morning French press, so this was a great excuse to use it up.

This weekend, I tasted the Brooklyn based White Moustache yogurt in sour cherry flavor. The yogurt company is a father-daughter business, and the yogurt is made from Hudson Valley Fresh whole milk and live probiotic cultures. While the price is steep, this yogurt was a real treat, and was worth every penny. Plus, you get to keep the container to re-use.

Processed with VSCOcam with f2 preset

This sour cherry combo got me craving cherries. Since cherry season is not quite here, I found some frozen cherries and just heated them up and poured them over this vegan chocolate loaf. Cherries, chocolate, and creamy yogurt were meant to be together!

Since I gobbled down my jar of White Moustache yogurt, I served the cake with my other favorite brand, Wallaby Organic Plain Low-fat Greek Yogurt. If you want to keep everything vegan, just omit the yogurt or make some sort of coconut based cream.

IMG_2475

Vegan Chocolate Loaf

adapted from Cucina Nicolina

makes 1 loaf or ~8 servings

Nicole says, “As always, replace the whole wheat pastry flour and/or spelt flour with all purpose if that’s all you have. A non-dairy milk or plain water can be swapped for the coffee, but I love the coffee note in there and would be loathe to miss it.” I used whole wheat and all purpose flour to keep things simple, and yes, I LOVED the coffee note.

1 3/4 cup whole wheat flour

1/2 cup all purpose flour

1/2 cup dutch processed cocoa powder

2 tablespoons ground flaxseeds

3/4 cup light or dark brown sugar

1/2 cup granulated sugar (I used slightly less)

1 teaspoon baking soda

1/4 teaspoon baking powder

1/2 teaspoon salt

1 cup room temperature coffee

1/2 cup extra virgin olive oil

1 teaspoon pure vanilla extract

Heat oven to 350 F. Grease a standard sized loaf pan with oil or butter (omit butter if keeping this vegan) and lightly dust with flour.

In a large bowl, whisk together flours, cocoa powder, flaxseeds, sugars, baking soda, baking powder, and salt. In a medium bowl, whisk together coffee, olive oil, and vanilla.

Dump the wet ingredients all at once into the dry and whisk until just combined. The batter will be more firm than wet.

Pour the batter into the prepared pan. Bake for 30-35 minutes, or until a cake tester inserted into the center of the cake comes out clean.

Remove from the oven and allow to cool in the pan for 10 minutes before inverting onto a wire rack to cool completely before serving.

Serve with a dollop of yogurt, some warmed cherries, and a glug of chocolate balsamic vinegar (regular balsamic vinegar would work, too). 

Homemade Snack: The Weelicious Chewy Granola Balls

8 Apr

Processed with VSCOcam with f2 preset

This is my second time making the Weelicious rice crispy balls, granola ball bites, whatever you call ’em.

After watching her adorable videos 1 and 2, I ran out to the store to buy brown rice cereal, but I spaced out and bought puffed rice instead of crispy rice. The recipe still works with puffed rice, but the texture is not as, well, crisp, without the crispy rice cereal.

I had a jar of brown rice syrup sitting in my pantry for over 2 years and never knew what to do with it until I saw these recipes. Brown rice syrup is slightly less sweet than regular sugar, and it’s great for n0-bake recipes like this because the syrup is so sticky it acts like glue. When melted together with nut butter, I wanted to lick the hot pot it smelled so good.

Add-ins are endless, but I love the combo of some dried fruit and chocolate chips. How could you not?

Balls (insert dirty joke) are indeed cuter and more fun to eat than bars. Sometimes I will just eat one after lunch to satisfy that post-meal sweet craving. Other times I pack 3-4 with me and enjoy them for a mid-day snack. Up to you.

The recipe makes about 25-30 balls (depending how much you eat in the process!). I stored about half of the bites in the fridge because they are a little crispier when cold, and I froze the other half  batch for later.

IMG_1115

 A Random Assortment: Granola Balls, PS4 Controller, Mattress, Bikes

The Weelicious Chewy Granola Balls

adapted from Weelicious

makes about 30 balls

1/2 cup nut and/or seed butter (I used a combo of sunbutter and cashew butter)

1/2 cup brown rice syrup

1 1/2 cups crispy brown rice cereal (I didn’t have any, so I used puffed rice…works fine but crispy would be better for texture)

1 cup granola (any kind you have, but I used Hot Bread Kitchen Granola)

1/4 cup dried fruit (i.e. cranberries, raisins, blueberries, chopped apricots…) and/or chocolate chips

1. Place the nut/seed butter and brown rice syrup in a small saucepan over low to medium heat and warm for 2 minutes or until it becomes smooth and combined.

2. Place the remaining ingredients in a bowl and stir to combine.

3. Pour the warm nut/seed butter mixture into the bowl with the granola mixture and stir to combine.

4. Roll into 1 inch balls (you can use a mini ice cream scooper to scoop out each portion, or a tablespoon). Alternatively, you could press the mixture into a square pan, let cool, and slice into bars.

Happy snacking!


(Vegan) Lasagna with Tofu “Garden Ricotta”

11 Mar

Processed with VSCOcam with f2 preset

Spring is around the corner, it is almost, almost here, but I still feel the slam of the cold on my face and hands every time I walk outside.

This lasagna is a transition from heavy, cheesy winter comforts to lighter, colorful spring fare. By using a tofu “ricotta” instead of actual ricotta, this pasta dish gets a lighter makeover so that we won’t have to undo the top button on our pants after eating.

I used to make tofu “ricotta” back when I was cooking for 60 students in the Berkeley co-ops. Pulse some firm tofu in a blender or food processor, add some aromatics and spices, and it turns from rubbery soy product to magical cheese-like goodness in seconds! I really like the addition of white miso paste to this version.

…and because I am flexible, I added a little grated Parmesan cheese to top off my vegan lasagna. Hey, it’s a transition, remember? A little Parmesan offers a nice salty punch without weighing down the pasta, but if you are vegan, just omit.

I also love my carbs, so a little toast with olive oil and salt is a nice crunch contrast to the lasagna.

Now, bring on the warm sunshine!

Processed with VSCOcam with f2 preset

I love lasagna, and I believe there should be a lasagna for every occasion. Check out this summer version with zucchini here. And check out this Passover matzo lasagna here.

Vegan Lasagna

adapted from Chloe’s Kitchen

Serves 6-8

**Make ahead: you can prepare the unbaked lasagna and keep it in the fridge for about 2 days before baking. 

Garden Ricotta

2 tablespoons olive oil

1 onion, chopped

3 cloves garlic

1 14-oz package firm or extra-firm tofu, drained

2 tablespoons lemon juice

1 1/2 teaspoons salt

1 1/2 teaspoons freshly ground black pepper

1 tablespoon white miso paste

3 cups fresh basil

Sauce & Assembly

2 tablespoons olive oil

8 ounces mushrooms, sliced

1 24-oz jar marinara sauce

1/4 milk of your choice *I used cow’s milk, but to keep things truly vegan use soy, almond, or rice milk

1 bunch kale, stemmed and chopped (you can also use spinach or another green)

1/2 pound no-boil lasagna noodles

Preheat the oven to 375 degrees. You will need a 9 x 13 inch-pan.

To make the Garden Ricotta: In a large skillet, heat oil over medium heat and saute onions until soft. Add garlic and cook one more minute. Remove from heat.

In the food processor, combine onions, garlic, tofu, lemon juice, salt, pepper, and miso paste. Pulse until the mixture is almost smooth but still has some texture. Add basil and pulse a few more times to incorporate it.

To make the sauce: Heat oil over medium-high heat in a large skillet (just use the same skillet you used to saute the onions). Add the mushrooms and cook until soft. Add marinara and milk. The milk should soften the acidity of the tomatoes (you can also add a tablespoon of brown sugar or maple syrup here, but I just omitted it).

To assemble and bake the lasagna: Spread a thin layer of sauce on the bottom of the prepared pan. Arrange 4 lasagna noodles across the pan. Spread half of the Garden Ricotta over the noodles. Layer half of the kale over the Garden Ricotta. Arrange 4 more noodles on top. Spread another layer of sauce over the noodles, then arrange 4 more noodles on top. Top with another layer of sauce, the remaining Garden Ricotta, and the remaining kale.

Cover the pan with foil and bake for 45 minutes, or until the noodles are cooked and the sauce is hot and bubbling. Remove from the oven and let it rest for 5 minutes before serving.

Optional: If you are not vegan, I enjoyed the lasagna with a little grated Parmesan on top before serving.

Salted Chocolate Peanut Butter Pudding (Vegan)

4 Jan

Processed with VSCOcam with f2 preset

I’m on winter break. My last winter break as a graduate student. Nuts! It is always a strange feeling to go from being super insanely busy to having a bunch of time on my hands.

So far, I’ve spent an embarrassing number of hours watching the videos on Catherine McCord’s website, Weelicious. McCord’s recipes were developed with the intention of educating kids and involving them in the cooking process. Kids love food that looks cute, but so do adults, right?!

I’m smitten by McCord’s emphasis on short ingredient lists and easy prep methods.

While this vegan pudding is not as cute-looking as rice crispy treat balls or banana dog bites, the rich, creamy taste makes up for it. I added peanut butter to the recipe because there’s nothing like a good ol’ pb + chocolate combo to make my heart melt out of my body.

It is so fun to woo non-vegans into enjoying vegan foods. I tend to say this a lot: “You would never know it was vegan if I didn’t tell you…” But really, it’s true. Silken tofu acts as the custard in the recipe, and the flavor and punch come from good-quality cocoa powder, vanilla, peanut butter, agave and salt. I’m serious, you would never know there was tofu in the pudding…if I didn’t tell you.

Six ingredients in a blender create a quick and healthy dessert. No stove required (this would be a great dorm-room recipe!). You can even eat it right out of the blender if you want to. I won’t tell. 

Brownie points: protein from the tofu, sweetness (and possibly antioxidants, depending who you talk to…) from the cocoa, and healthy fat/fiber/protein from the peanut butter. 

Processed with VSCOcam with f2 preset

Salted Chocolate Peanut Butter Pudding (Vegan)

adapted from Weelicious

1 package of silken tofu

1/3 cup unsweetened cocoa powder

1/3 cup agave nectar or maple syrup

1 tablespoon vanilla extract

3 tablespoons smooth peanut butter

1 big pinch of salt

Place all ingredients in a food processor or blender and blend until combined. Scrape down the sides and blend again to make sure everything is smooth. Sprinkle with an extra few flakes of salt and serve immediately or chilled.

Creamy Cauliflower Pasta Sauce

3 Aug

IMG_1271

I recently made the Peas and Shells Alfredo from the Smitten Kitchen Cookbook. Of course, it was outstanding, and dinner was ready by the time the shells finished boiling.

I try, however, to save a heavy pasta cream sauce for those special comfort dinners. Today’s recipe is a riff on that heavier sauce. There’s still shells, there’s still peas, but no cream! The sauce is thickened with boiled and pureed cauliflower, and wow is it good.

Cauliflower is part of the cruciferous vegetable family, along with broccoli, kale, collards, and cabbage. It is a rich source of vitamins C and K, thus providing antioxidant and anti-inflammatory benefits! You can read more about cruciferous veggies here.

To make this pasta sauce, cauliflower gets boiled and pureed in a blender with milk (you could use non-dairy milk to make the sauce vegan). Added to a saucepan with some nutritional yeast, a little garlic, salt, pepper, and a dash of hot sauce, you would never know there was a vegetable hiding in all of that goodness.

I’ve heard the buzz about making mashed cauliflower. It is supposed to be a great alternative to starchy mashed potatoes. Even Bill Clinton agrees. Maybe as the season turns to fall I will experiment with cauliflower mashes…

Until then, this cauliflower cream sauce hits the spot. I used 1% milk (cow’s milk), which allowed my sauce to still fit the healthy bill without compromising on a creamy, luxurious taste. If you still want a little more decadence, you could always stir in a small pat of butter and a grate of cheese to the sauce. I won’t tell if you won’t…

Creamy Cauliflower Pasta Sauce

adapted from Baker Bettie 

serves 8

**NOTE: I recommend preparing the sauce and saving leftovers in a tupperware.  Cook the pasta as needed, to order. It tastes fresher.

1 head of cauliflower 

2 cups of milk 

3 cloves garlic, minced

2 tablespoons nutritional yeast

salt and pepper

1 lb of pasta (I used various pasta shapes throughout the week with this sauce: shells, angel hair, and egg noodles)

vegetables of choice (I used some frozen peas and a few fresh cherry tomatoes)

optional: fresh basil, dash of red pepper flakes, pat of butter, grate of cheese…

Bring a large pot of water to a boil. While the water is heating up, chop the cauliflower into florets. Boil the cauliflower for 15 minutes, or until very tender. Strain the cauliflower.

In batches, place the cauliflower in the blender with the milk (I did this in 2 batches). Blend until very smooth. Pour the mixture into a saucepan over medium heat. Add the garlic, nutritional yeast, and salt and pepper to taste.

Bring some more water to boil and cook your pasta until al dente (if using frozen peas, add them to the boiling water during the last 2 minutes of cooking). Combine the pasta, peas and tomatoes, and sauce. Toss with your favorite accouterment and enjoy!