Archive | snack RSS feed for this section

Finding the Right Ratio: Basic Chia-Yogurt Mix

1 Oct

Processed with VSCOcam with f2 preset

I publicly announced my dabbling with chia pudding over the summer. Even though I adore chia seeds sprinkled in smoothies and oatmeal and baked goods, for a long time, I could not bring myself to adore chia pudding. Finally, after gleaning through what seemed like a zillion different variations on chia pudding and nixing the few not-so-great combos I tested at home, I found my go-to ratio that I truly do adore:

2 tablespoons chia seeds to 2/3 cup yogurt-water mix (a heaping 1/3 cup plain Greek yogurt + a scant 1/3 cup water)

I think the yogurt is really key. The thickness of the Greek yogurt provides a nice consistency, and the water loosens things ever so slightly. Mix everything in a jar the night before. The next morning, spoon the mixture into a bowl (or keep in the jar for an on-the-go breakfast) and add toppings! Coconut chips, granola, fruit, and nut butter are my go-to’s.

The berries in the picture above were frozen and I heated them in the microwave for 20-30 seconds. Sometimes I toss the berries in when they are still frozen. Different strokes.

Last month, I attended an acai bowl class at Sweetgreen taught by Ksenia of Breakfast Criminals. Her class inspired me to start “decorating” my breakfast, and I definitely feel more excited about eating when my bowl/plate looks colorful and pretty.

Processed with VSCOcam with f2 preset

I have been eating variations of my Basic Chia-Yogurt mix for the last month, at least two or three times a week, so I can now say that this ratio has been well-tested and given my seal of approval.

Sometimes I use a mix of chia, buckwheat, and hemp seeds instead of plain chia seeds. Change it up. Use the Basic Chia-Yogurt Mix as your starting ratio, then add in whatever looks good.

Basic Chia-Yogurt Mix

serves 1

The night before, mix together in a jar:

2 tablespoons chia seeds

heaping 1/3 cup plain Greek yogurt 

scant (aka slightly less than) 1/3 cup water

Stir, let it sit for 5 minutes, then stir again and place in the refrigerator overnight.

The next morning, either keep the chia-yogurt mix in the jar, or pour it out into a bowl. Sprinkle in your favorite fruity/crunchy/creamy toppings. I like a sprinkle of each of the following:

granola // coconut chips // fruit (fresh, frozen, or dried) // nut butter 

Yogurt Chia Parfaits

1 Aug

Processed with VSCOcam with f2 preset

I bought a 24-pound watermelon. Luckily, I purchased this fruit-the-size-of-a-small-child at my corner store, so I only had to carry the monster up one block. Yes, I know that smaller watermelons exist, but I wanted and I needed and I had to have a watermelon at that very moment when I walked by the store.

Besides munching on cold melon cubes right from the fridge, I am brainstorming creative ways to use my giant watermelon stash. Watermelon shrub is currently fermenting on my counter. My new smoothie crush involves frozen watermelon cubes, frozen banana chunks, milk, vanilla, and matcha green tea powder. I made No-Cook Watermelon Tabbouleh Salad and enjoyed it for dinner and lunch for a few days. The recipe is from the quarterly nutrition newsletter that I edit, The Grapevine. Find the recipe on page 19. 

Processed with VSCOcam with f2 preset

Watermelon is the epitome of a cool, juicy summertime treat. And that is just what I have been craving lately, something cool and refreshing. Since we “eat with our eyes,” it is important that my meals have lots of color in them. Watermelon’s bright pink color pairs so nicely with green foods. Notice the green cucumbers in the above photograph, and the green chia pudding in the photograph below.

These pink and green Yogurt Chia Parfaits are both fun to look at and fun to eat! Plus, chia seeds, yogurt, and watermelon are all very hydrating foods. These parfaits require a little bit of prep work, but once you have a jar of chia pudding, a container of plain yogurt, colorful fruit, and some homemade or store-bought breakfast cereal on-hand, you should be ready to roll.

Processed with VSCOcam with f2 preset

I discovered two lovely blogs this summer that both happen to be raw and vegan. Laura Miller of Sidesaddle Kitchen and Gena of Choosing Raw. Good inspiration for staying cool and creative in the kitchen.

Laura’s recipe videos are both hilarious and delicious, and her produce portraits are stunning. I made her chocolate pudding with avocado this summer, and it was a big hit around here. I also made her buckwheat breakfast cereal, which I love and highly recommend as a cereal alternative. Remember to buy raw or hulled buckwheat groats because the roasted buckwheat groats (aka kasha) have a completely different flavor and cooking requirement.

While I adore chia seeds in moderation, chia pudding has always irked me a little, with all of those tiny gummy seeds. But, since I had a few samples of matcha powder sitting in my cupboard untouched for the last six months, Gena’s matcha green tea chia pudding looked like a good way to conquer my chia pudding fears and simultaneously use up some matcha powder (the matcha powder is also good in watermelon smoothies).

I took Laura’s buckwheat breakfast cereal and Gena’s matcha green tea chia pudding and turned them into a semi-vegan, healthy, and colorful mini meal. The yogurt in these Yogurt Chia Parfaits can easily be omitted or substituted for some sort of frozen banana smoothie to make this vegan friendly.

To layer the parfaits, begin with a layer of fruit (I use a mix of cubed watermelon and quartered figs), a layer of plain yogurt, a layer of chia pudding, and a layer of buckwheat cereal mixed with granola. Repeat the layers for a full parfait. No need for exact measurements, just spoon out the layers to your liking.

IMG_3179

Matcha Green Tea Chia Pudding

from Choosing Rawmakes enough for about 4 parfaits or 1-2 servings of straight up chia pudding

I found the consistency to be a little too liquid to eat on it’s own, so I would add a touch less milk or even a scoop of yogurt to thicken it if you are going to eat it as is. Keep the portions below if you are adding this to a Yogurt Chia Parfait. 

  • 1 cup low-fat milk (I used regular, feel free to use non-dairy milk)
  • 1/2 teaspoon matcha green tea powder
  • 1/2 teaspoon vanilla extract
  • 1 tablespoon agave or maple syrup
  • 3 tablespoons chia seeds

In a blender, combine the milk, matcha powder, vanilla, and agave and blend for a few seconds until thoroughly combined. Pour the mixture over the chia seeds and stir to combine. Stir again every few minutes for the next 15 minutes. Then allow the mixture to sit for at least 1 hour (or overnight, in the fridge). Stir the mixture once more, and serve.

This chia pudding will be best within 4-5 days. Keep it in the fridge.

Yogurt Chia Parfaits

I am not giving exact portions here because you can layer these as you like. If you want more fruit, use more. If you like more chia pudding, use more. etc. etc. I like to use plain yogurt because there is already some natural sweetness in the fruit, and both the granola and the chia pudding have a little sweetener in them. 

  • Seasonal fruit-I used a mix of fresh, quartered figs and cubed watermelon
  • Plain low fat Greek yogurt- I like this brand lately
  • Matcha green tea chia pudding
  • Granola and/or homemade crunchy buckwheat groats cereal

Layer all ingredients into jars (I just use old jam jars). Begin with a layer of fruit, a few spoons of yogurt, a few spoons of chia pudding, and a layer of granola or buckwheat groats cereal. Repeat. I usually can only fit two layers into my jars.

I like to make these a day or even two days ahead. If they sit for longer, the granola may get soggy. A great on-the-go breakfast or snack!

Drink Up! Green Smoothie

2 Jul

Processed with VSCOcam with f2 preset

Well I finally gave green smoothies a whirl at home, and…they’re great!

I first started adding just a small handful of baby spinach into a smoothie, but now I’ve expanded to kale and purslane.

A few weeks ago, I got a deal at the farmer’s market: two huge bundles of greens for $5. I bought collards and kale. I cooked the collards, and used some of the kale for salads.  I washed, de-stemmed and tore the remaining kale leaves into pieces and stuck them in a ziplock bag in my freezer (my friend Brianna gave me that genius tip!). Now I have a cold green leafy veggie in my freezer for when the smoothie pangs hit (I would imagine that frozen kale is easy to toss into a soup or pasta recipe, too).

Having frozen smoothie ingredients on hand  (i.e. chopped kale, chopped banana, frozen fruit) is key to keeping things cold. Sometimes I add ice at the very end to get the smoothie extra cold, but it is not always necessary.

If you are wary of the greens, don’t worry because you can’t taste them, especially if you use strong fruits like banana or mango and a nut butter like peanut or almond. The greens just make the smoothie turn, well, green.

Tip: blend the greens with the liquid first. Get it really nice and blended before adding in the remaining fruits and accouterment. This helps decrease the leafiness of the greens. I just use a regular blender.

A half portion of this smoothie fills me up in the morning when I drink it with coffee. I also make the full serving for a light lunch before a workout. Experiment with different greens and fruits and add-ins like chia seeds. Have fun, stay cool, and drink up!

Drink Up! Green Smoothie

Makes 1 large portion, or 2 small snack-size portions

1 cup of greens (I used 3/4 cup frozen kale and 1/4 cup fresh purslane)

1 cup liquid (I used 3/4 cup low-fat milk and 1/4 cup Greek yogurt)

1 heaping cup of fruit (I used about 1 cup frozen banana pieces and 1 poached fig)

1 heaping tablespoon nut/seed butter (I used peanut butter, but almond butter is great in smoothies, too)

optional: Ice

optional: a sprinkle of chia seeds (I didn’t use any in this smoothie because purslane is high in omega-3 fatty acids)

Blend the greens and the liquid in the blender. Get it nice and blended, may take 1-2 minutes. Next, add in the fruit and the nut/seed butter and the chia seeds (if using). Blend again to incorporate. If you want the smoothie extra cold, add in a few ice cubes and blend again. You can top the smoothie with extra chia seeds if you like.

 NOTE: The full recipe, if you use nut butter, could add up to 350-400 calories, making this smoothie more of a mini meal than a snack. 

Rhubarb Pudding Cake

12 Jun

Processed with VSCOcam with f2 preset

I moved from Northern California to New York City three years ago. Determined to find a full-time job in a restaurant kitchen, I spent my first few weeks “trailing” (a fancy term for trying out) at a handful of restaurants, mostly in pastry.

Typically at a trail, I got a quick tour of the restaurant, I was assigned some kitchen prep tasks, and eventually if all went well, I was allowed on the line during service to observe and help out with some small finishing touches on the dishes.

At one of the restaurants, my task was to peel rhubarb stalks. The peels were eventually going to get candied.

Rhubarb tends to have this “skin” that can be delicately peeled off into hot pink (and sometimes light green) strands. This is not an easy task when you have an entire box of rhubarb to peel and you haven’t eaten or peed for six hours and your hands are trembling with nerves (trembling because earlier that day I incorrectly measured out the dry ingredients for a giant batch of cookies). Nonetheless, I put on a smile, bit my lip, and persevered. Trying out for a new job, after all, is not an easy task.

*Side note, I met my friend Elizabeth at that trail. She was working the line and I was allowed to observe her. I was fresh in New York, and she was the coolest, funniest, nicest person I had met since moving (and still is!), and I knew I had to keep her close. Plus, she had experience in the kitchen and could offer me advice. I never ended up working at that restaurant and she left shortly thereafter, but Elizabeth and I became fast friends.  

My back-of-the-house restaurant life has been on hiatus for the last two years as I finish up graduate school and try to become a registered dietitian.

Processed with VSCOcam with f2 preset

While I feel somewhat nostalgic for candied rhubarb tendrils, in the comfort of my own home (if you call comfort a shared apartment with three dudes), I tend to crave a more rustic dessert.

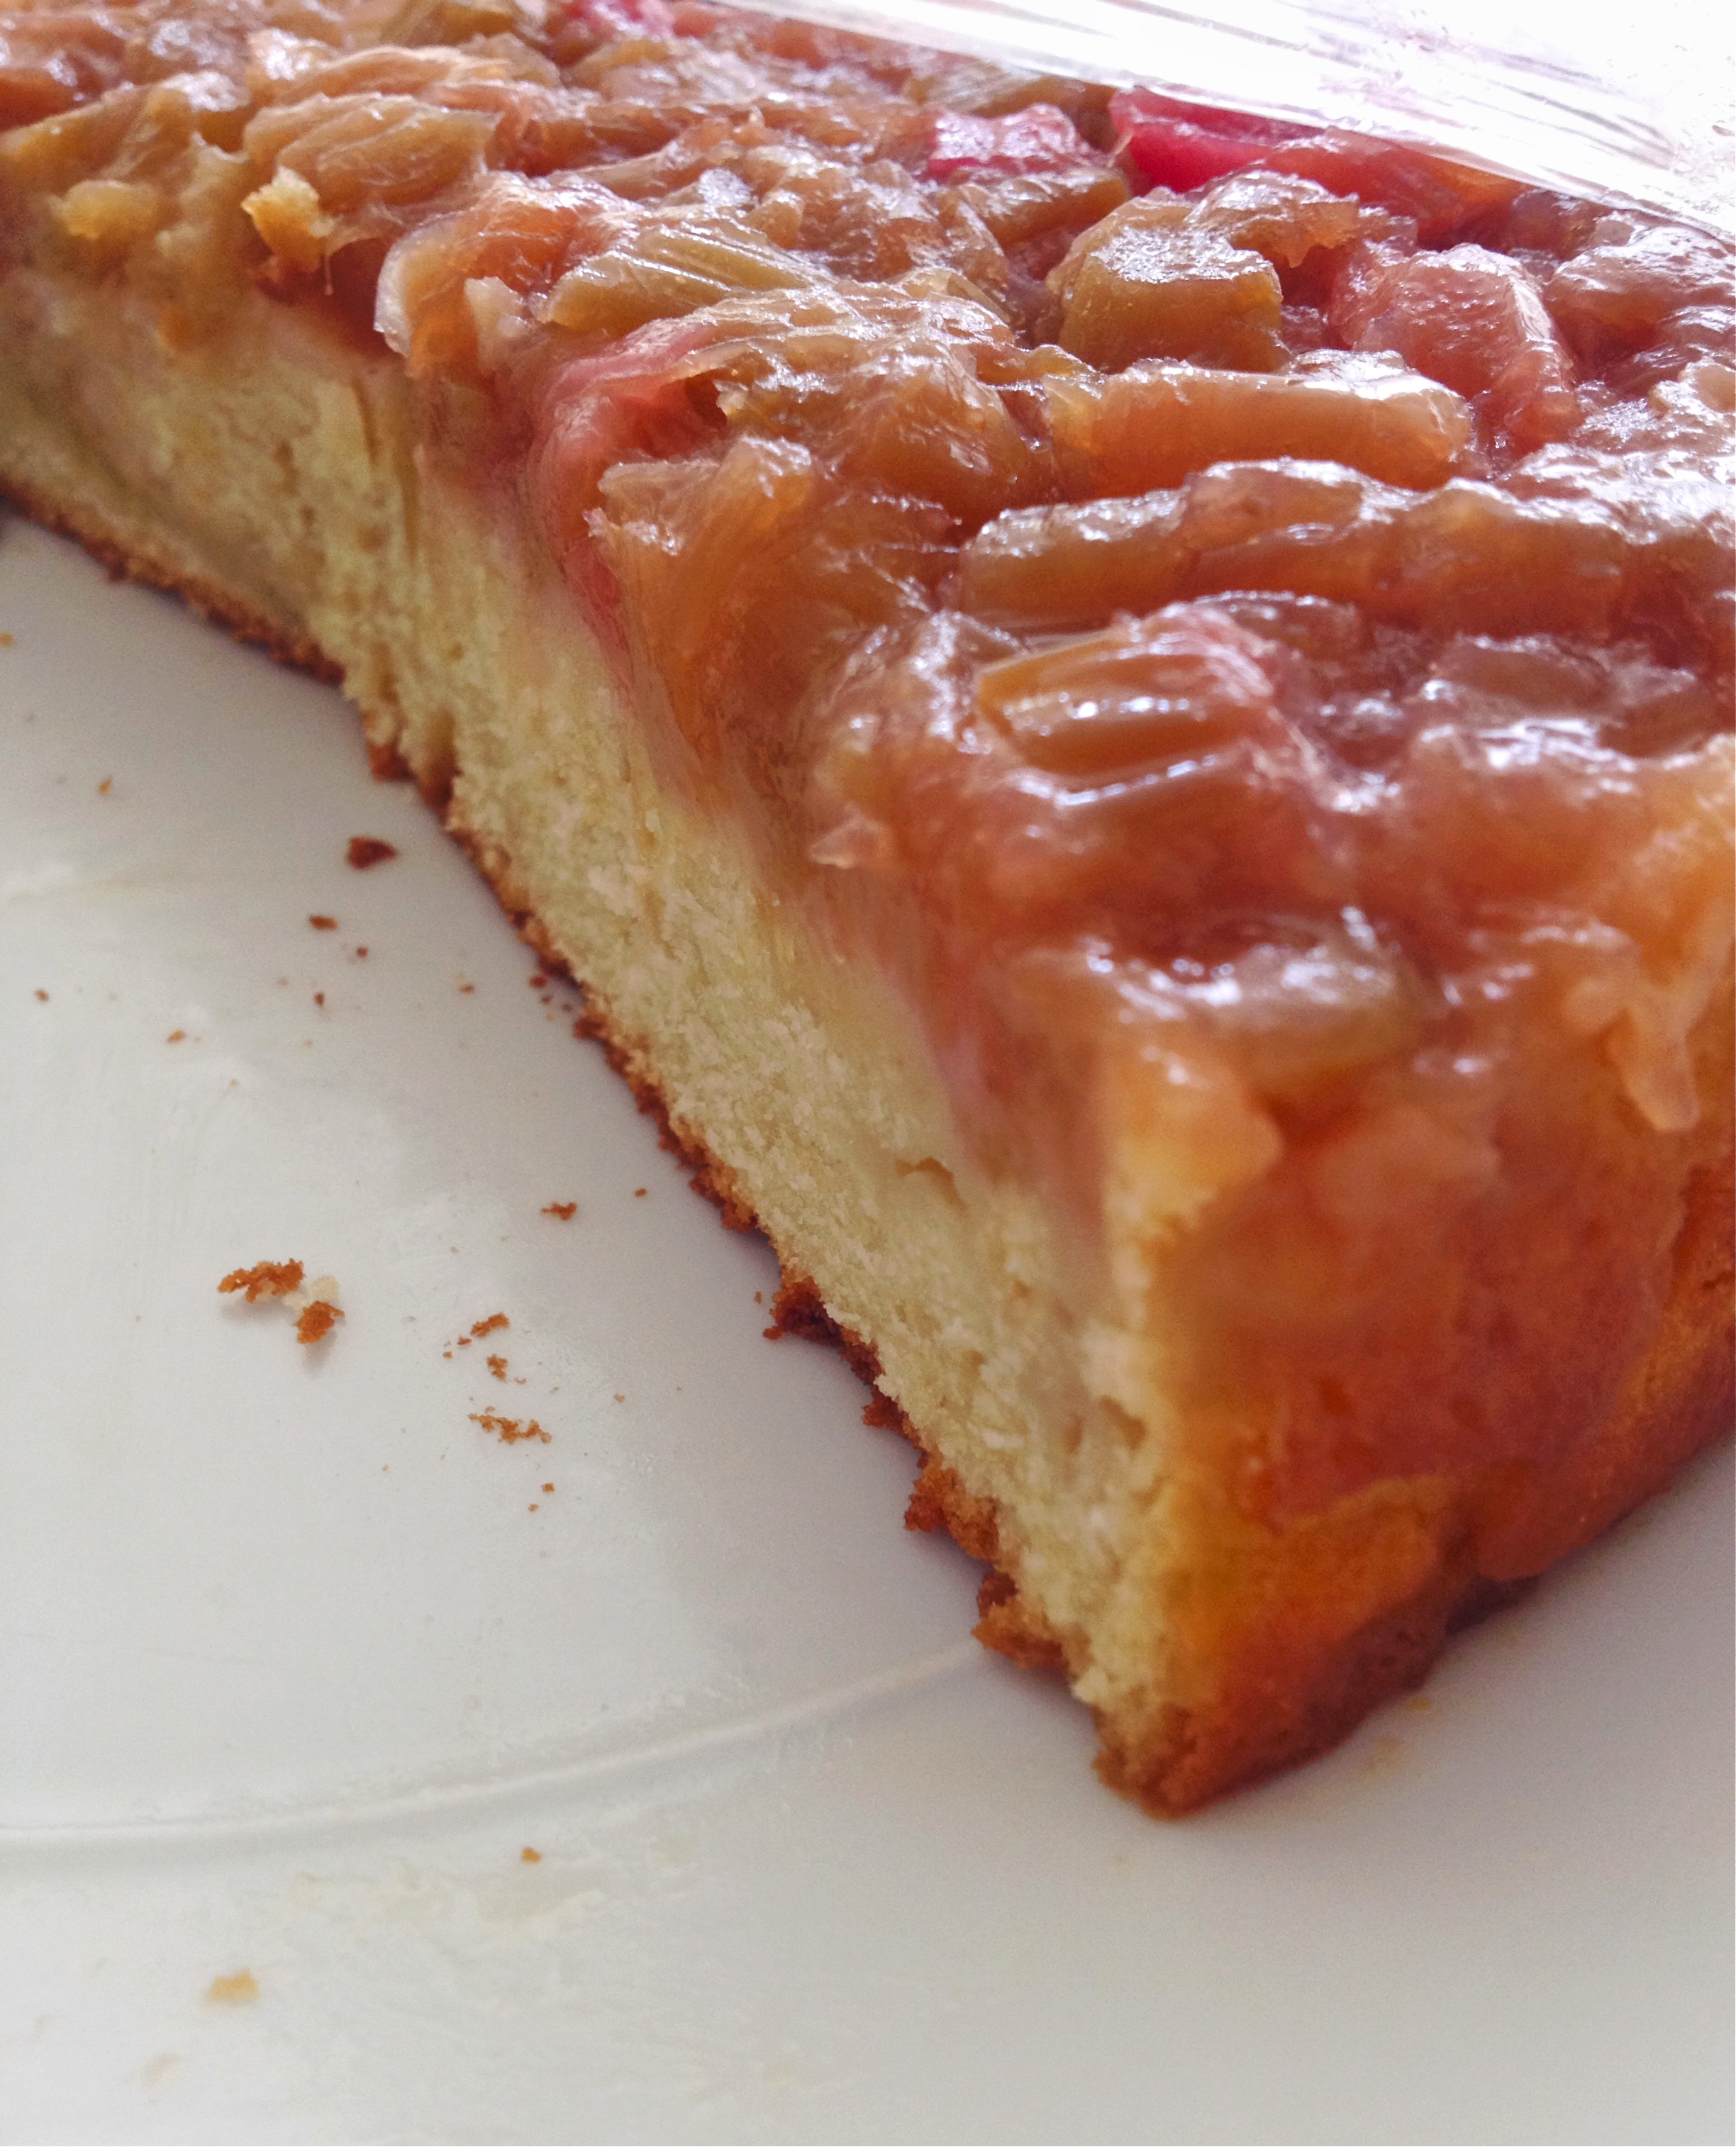
Rhubarb pudding cake fits the bill. It’s a rhubarb compote plopped on top of cake batter and baked. The rhubarb gets chopped and simmered into a compote until just soft. Fast, easy, and absolutely delicious. I did pull out my KitchenAid mixer for the cake batter, but at least I didn’t have to deal with cleaning a giant hobart mixer.

The “pudding” in the cake is created by pouring a hot, vanilla-infused rhubarb compote over a thick sour-cream (or yogurt) batter.

Processed with VSCOcam with f2 preset

To memorable restaurant experiences, to good friends, and to pink vegetables that taste like fruit. Bon Appétit!

Rhubarb Pudding Cake

adapted from Vintage Cakes

makes 8-10 servings

1 pound rhubarb, trimmed of leaves and ends, diced (~4 cups)

1 1/2 cups (10 1/2 ounces) sugar

1/4 teaspoon vanilla extract (or 1/4 vanilla bean, split lengthwise)

1/2 cup water

1 2/3 cup (8 1/3 ounces) all-purpose flour

1 1/2 teaspoons baking powder

1/2 teaspoon fine Kosher salt

1/2 cup (4 ounces) unsalted butter, at room temperature

2 large eggs, room temperature

2 teaspoons vanilla extract

1 cup (9 ounces) sour cream or plain yogurt, room temperature [I used a 6-oz container of low-fat Greek yogurt mixed with some milk to equal a cup]

Preheat the oven to 350 degrees F. Grease an 8 or 9-inch round or square cake pan or a 2 1/2-quart baking dish with butter. (I lined mine with parchment paper, too).

Make a compote by tossing together the rhubarb and 1 cup of the sugar in a medium saucepan with a lid. Add the vanilla and water, cover, and simmer over medium heat for about 10 minutes, until the rhubarb is soft but has not completely broken down, stirring occasionally. Take the compote off the heat but keep it covered so it says warm while you make the cake.

To make the cake, sift together the flour, baking powder, and salt in a bowl, then whisk the ingredients by hand to ensure they are well mixed.

In the bowl of a stand mixer with the paddle attachment, cream the butter and the remaining 1/2 cup of sugar together on medium-high speed until fluffy, about 5 minutes. As you make the batter, stop the mixer frequently and scrape the paddle and the bowl with a rubber spatula. Blend in the eggs one at a time, adding the second egg as soon as the first one has disappeared into the batter, followed by the vanilla. Blend in the flour mixture in three parts, alternating with the sour cream in two parts, so that you begin and end with the flour mixture.

Spread the batter into the prepared dish or pan and distribute the compote over the top. The compote will be quite runny, but don’t fear: all will be well once the cake has baked. Place the cake in the center of the oven and bake until the edges are firm and the center no longer jiggles, 45 to 50 minutes. Let the cake cool for about 30 minutes, then invert it onto a serving plate and cut into slices, or spoon it right out of the pan.

This cake is best the day it is made, but well-wrapped it can be stored at room temperature for up to 2 days. 

Spring Quinoa Salad with edible flowers

25 May

Processed with VSCOcam with f2 preset

Spring has sprung in New York City, and there is so much to eat!

Yesterday was my last “composting and healthy snacks” session for seniors with mild memory loss, in conjunction with The Memory Tree Program, Teachers College, and the Morningside Gardens Co-op. Read more about our first session and our Earl Grey Spiced Fruit Compote here.

The Memory Tree is New York City’s first program devoted to people with mild memory loss, and their family and caregivers.

This was the end (for now!) of a series of “Going Greener” workshops, continuing a previous project about nutrition, cooking, and farmer’s markets. The “Going Greener” project came about as a way to learn how to keep the world healthy, focusing specifically on composting and easy snacks. 

The series comprised 5 sessions, with each session consisting of a compost component, a media workshop, and a healthy snack and drink. Each week, we gave the seniors digital cameras to use so that they could document the colorful snacks and activities. We also made little youtube videos with the photographs. Check out some of the fun videos on our channel.

My main role was to find and/or develop our recipes, purchase the ingredients, and gather the necessary kitchen tools and gadgets . In other words, I was the official “Recipe Consultant.”

These were the 5 snacks and drinks:

1. Earl Grey Spiced Fruit Compote with Lemony Water

2. Carrot and Hummus “Sushi Sandwiches” with Cucumber “Spa Water”

3. Peanut Butter Oat Snack Bites with Minted Ice Cubes and Earl Grey Ice Tea

4. Mud Pudding aka Chocolate Tofu Pudding with Strawberries and Seltzer

5. Spring Quinoa Salad with Edible Flowers, Hummus Feta Toasts with Pansies, Blueberry Frozen Yogurt Bites, and Sparkling Cider

IMG_2573

Edible flowers are fun to eat and beautiful to photograph, so we planted nasturtium seeds with the intention of eating them at the final session. I took a few seeds home to plant, too! If you have never tasted an edible flower, the flavor and texture are similar to a slightly peppery lettuce leaf.

IMG_2587

The final snack (it was more of a meal this time) was a Spring Quinoa Salad. All of the veggies were from the greenmarket: radishes (did you know radishes have about as much or more potassium as a banana?!), ramps, asparagus, and baby lettuces. We also found an assortment of edible flowers: broccoli rabe flowers, radish flowers, and arugula flowers.

IMG_2586

We chopped the radishes and ramps, and shaved the asparagus into ribbons with a vegetable peeler. Then we tossed everything together with the quinoa, added crumbled feta cheese, lemon zest, and lemon juice. We scooped the quinoa onto a nice bed of lettuces and delicately topped everything with nasturtium.

We also sliced into a baguette, spread the bread rounds with hummus, and sprinkled feta and edible pansies over the top. The pansies were from a plant we bought at the greenmarket.Who knew you could eat pansies?

Before every snack or meal, we all would set the table and clink our glasses together, toasting to good food and good company. Cheers! And don’t forget to compost the food scraps.

Processed with VSCOcam with f2 preset

I didn’t get a picture of our blueberry frozen yogurt bites, but they were so easy and so good. I got inspired after seeing this recipe.

Also, if you are looking for more fun, spring veggie talk, check out this episode of one of my favorite podcasts, Spilled Milk Podcast. They talk about ramps, fiddleheads, pea shoots, and nettles.

And for more spring quinoa inspiration, check out Megan’s post on Elevating Lunch.

Processed with VSCOcam with f2 preset

Spring Salad with Edible Flowers

Quinoa is full of good-for-you protein and fiber, and it cooks in just minutes. Throw in some seasonal veggies and creamy cheese, and delicately dot with fresh herbs and nasturtium for a picture perfect spring salad! 

*This recipe is very much to your own taste. Once you have your quinoa base, throw in the suggested add-ins as you like! 

serves 4

1 cup quinoa

Seasonal veggies i.e. asparagus (shaved into ribbons), ramps or spring onions, radishes, baby lettuces…

Feta or soft goat cheese (about 2 oz. or so)

Edible flowers i.e. nasturtium, pansies, or broccoli rabe flowers/arugula flowers/radish flowers

Lemon, zest and juice

  • Rinse the quinoa and drain it. Cook the quinoa in a saucepan (2 cups water to 1 cup quinoa) for about 15 minutes or until cooked and fluffy. Put aside.
  • Chop the seasonal veggies into small pieces. If using, shave asparagus with a vegetable peeler (that way you can enjoy it raw).
  • Crumble the cheese.
  • Zest the lemon.
  • In a bowl, combine the cooked and cooled quinoa, the chopped veggies, the crumbled cheese, and the lemon zest. Squeeze lemon juice over the top and toss to combine.
  • Delicately place the edible flowers on top and serve!