Archive | lunch RSS feed for this section

Garlicky Roasted Chickpea Salad with Feta, Herbs, and Lemon

1 Jun


Roasted chickpeas with salty feta and herbs so bright they taste like sunshine.

Now that’s a salad, folks. Or an appetizer. Or a side. Or whatever you want to call it.

You can make a healthy and delicious meal for yourself and/or company just by making a bunch of little salads (and having some crusty bread on the side). You can mix and match with different types of grains and proteins, herbs and veggies to give you a natural energy boost of protein, vitamins, healthy oils, and good-for-you-herbs.

My favorite way to dress a salad is simply, with lots of cracked pepper, some lemon and olive oil, and coarse salt.

Check out these recipes that I made last year for Shaved Zucchini Salad with Parmesan and Pine Nuts and Tomato, Cucumber, and Haricot Vert Salad with Feta.

Back to chickpeas, I really like them warm from the oven as they develop a slight crunch but still have that creamy center. And I picked the mint and basil from my mom’s (small yet pleasant) herb garden.

In the words of Bon Appetit, this salad is fast, easy, fresh.

Garlicky Roasted Chickpea Salad with Feta, Herbs, and Lemon

adapted from Kayln’s Kitchen, originally from The Bon Appetit Cookbook: Fast, Easy, Fresh
4-5 servings (this recipe can easily be halved or doubled or tripled, etc.)

2 cans of chickpeas (15 oz each), rinsed and drained until any foam is gone

2 tablespoons olive oil

2 fresh minced garlic cloves

1/8 teaspoon red pepper flakes

salt and pepper, to taste

3/4 – 1 cup feta cheese, crumbled

1/2 to 3/4 cup chopped herbs (I used a combo of mint and basil)

lemon wedges

Heat oven to 375 degrees F. Mix together oil, garlic, pepper flakes, and salt and pepper. Pour into and over the chickpeas, stirring so that everything is coated. Place into a baking pan and bake for 15-18 minutes, until the chickpeas are hot and just beginning to crisp on top. Remove from the oven and let cool for 5 minutes.

While the chickpeas bake, chop your herbs and have your feta ready. When the chickpeas are ready, stir everything together in a bowl and squeeze some lemon on top, adding more salt and pepper if needed.

A Cast-Iron Cutie: Cherry Clafoutis, Round 2

22 May

Cherry season. Is upon us.

I’m bringing this beautiful cross between a custard and a pancake to an afternoon party in Napa Valley today.

Check the perfectly browned edges, please. With the lightest, airiest, subtly sweet-and- studded-with-cherry fruit-center. Now this is a pancake that’ll get you up in the morning.

While the clafoutis was in the oven, I whipped up some pasta.

Rigatoni with sauteed onions, cauliflower, and pattypan squash. Fresh pesto made in my mortar and pestle. Almonds. Cheese. I ate too much. It was worth it.

A cherry clafoutis was one of the first recipes I ever posted to my blog. 2 years ago. Dang.

Well here I go again. Cherry clafoutis, round 2.

Cherry Clafoutis

serves 8

adapted from 2 recipes: Saveur magazine and Joy of Baking/figsinmybelly

Once again, I keep the pits in the cherries for two reasons:

#1 It is easier and…
#2 The pits give the clafoutis a subtle almond flavor when baked.

Ingredients

1 tbsp. butter

2-3 cups cherries, washed and stemmed (no need to pit them)

1 tbsp. sugar

1 tbsp. vanilla extract (or 1 tsp. almond extract)

6 eggs

5 tbsp. sugar (I used brown sugar because I ran out of granulated)

1 1/4 cups milk

2 tbsp. kirsch (optional: I omitted it because I did not have any on hand)

Pinch salt

3/4 cup flour

Confectioners sugar (optional)

Preparation

1. Preheat oven to 425 degrees F.

2. In a blender or whisking by hand, combine your vanilla (or almond) extract, 6 eggs, 5 tbsp. sugar, milk, kirsch, and salt and whiz for a few seconds until blended. Then add the flour and blend for one more minute until smooth. Let the batter rest while you prepare the cherries.

3. Melt the butter in your cast iron skillet (or any oven proof skillet or pan), making sure to coat the pan and the sides very well. Once the butter starts bubbling, add your cherries, coating them and cooking for about 2 minutes. Sprinkle with 1 tablespoon of sugar and continue cooking for one more minute.

3. Pour the batter over the cherry mixture. Bake in the oven for 30 minutes. Do not open the oven midway through baking. Pull the pan out after 30 minutes, you should have a nice puffed, browned clafoutis. Let it cool for a few minutes then dust with confectioners sugar. Slice and serve.

Green n’ Yellow Risotto

19 May

I’ve been on a short cooking hiatus. I’ve been busy traveling to New York and back. I’ve been busy graduating from college. I’ve been busy hanging with the family. I’ve been busy dipping into the hot jacuzzi. I’ve been busy listening to the rain drip and the seals bark in Monterey Bay. I’ve been busy eating–eating out for every meal is exhausting. I’m ready to prepare my own meals.

Have I mentioned that I’m moving? I’m moving out. 1 week to go. I am trying to use up the miscellaneous items in my pantry. I’ve been working on using up my wheat germ. Tonight I finished up my jar of Arborio rice.

An ear of corn, a bunch of red chard, one pattypan summer squash, and a few ribbons of basil later, I had myself a fine dinner. Green n’ yellow, yellow n’ green. Creamy yet tastefully textured.

Green n’ Yellow Risotto

adopted from Alice Waters’ The Art of Simple Food (see my post on Asparagus Risotto)

Serves 4

Cut off from the stems and chop 1 bunch red chard

Slice off the cob 1 ear of corn

Thinly slice 1 large yellow pattypan squash

Set aside for later.

Melt in a heavy-bottomed 2 1/2 to 3 quart saucepan over medium heat:
2 tablespoons butter

Add:
1 small onion, diced finely
Cook until the onion is soft and translucent, about 10 minutes

Add:
1 1/2 cups risotto rice (I used Arborio)
Cook the rice, stirring now and then, until translucent, about 4 minutes. Do not let it brown.

Meanwhile, bring to a boil and then turn off:
4-5 cups broth (chicken or vegetable)

Pour into your simmering rice:
1/2 cup dry white wine

Cook, stirring fairly often, until all the wine is absorbed. Add 1 cup of the warm broth and cook at a vigorous simmer, stirring occasionally. When the rice starts to thicken, pour in another 1/2 cup of the broth and add some salt (how much depends on the saltiness of the broth). Keep adding broth, 1/2 cup at a time, every time the rice thickens. Do not let the rice dry out. After 12 minutes stir in the prepared veggies. Cook until the rice is tender but still has a firm core, 20 to 30 minutes in all. When the rice is just about done, stir in:
1 tablespoon butter (optional)
1/3 cup grated Parmesan cheese

Stir vigorously to develop the creamy starch. Taste for salt, adding more as needed. Turn off the heat, let the risotto sit uncovered for 2 minutes, and serve. Add a splash of broth if the rice becomes too thick.

Top everything off with basil leaves, cut into a chiffonade

Give me an “M” Matzo Lasagna

21 Apr

Matzo lasagna and a shot-glass full of Manischewitz wine. Good dinner. Good dinner, indeed.

Hey it’s Passover, the Jewish holiday that remembers and celebrates the Jewish people’s exodus from slavery. Good stuff. Traditionally Jews celebrate by having a big dinner called a “Seder” (Hebrew for ‘order’) where the story of this exodus from slavery is re-told. Then for 8 days it is common to refrain from any bread products except for matzo, which is an unleavened sheet of crunchiness.

You can make loads of awesome goods with matzo: matzo brei (aka matzo n’ eggs), matzo pizza (aka melted cheese and sauce atop matzo), matzo granola, matzo toffee crunch, matzo spread with butter, matzo spread with cream cheese, matzo slathered with baba ganoush (eggplant dip), etc. etc.

Tonight I give you MATZO LASAGNA. It’s just like regular lasagna but instead of lasagna noodles, I used sheets of matzo that I ran under cold water.

And let me tell ya, this is goooood stuff, especially when you turn on the broiler for the last 5 minutes of baking. Browned cheesy delight.


I sauteed some onion and dino-kale to add between the layers of sauce and cheese. Feel free to use mushrooms, spinach, summer squash, whatever you want.


If you are in a Passover rut, or just like matzo, or just like lasagna, this is the business right here.


Oh, and don’t forget the Manischewitz wine. So sweet, so delish, so much needed.

Matzo Lasagna

I’ve have been making this recipe for over 2 years. I printed it online, possibly from “The Jew and the Carrot” although I have yet to find exactly where on the website.

makes a 13 x 9 inch pan’s-worth of goodness
(8-12 servings?)

Ingredients
1 cup part-skim ricotta
2 cups non-fat cottage cheese
4 cups tomato sauce
1 onion, chopped
1 large bunch kale
Enough matzo sheets to make four layers in a 13 x 9 inch baking dish, lightly softened with water (I just ran it under the tap water for a few seconds as needed)
Grated mozzarella cheese
Salt and Pepper

Preparation
1. Preheat oven to 350 degrees F.

2. In a saute pan, brown onions and chopped kale in some olive oil and set aside.

3. In a bowl, mix ricotta, cottage cheese, and some salt and pepper.

4. Spoon 1 cup of the tomato sauce on the bottom of the baking dish. Cover with one layer of moistened matzo. Layer 1/3 of the cheese mixture, 1/3 of the vegetable mixture, and 2/3 cup of the sauce. Add some salt and pepper between each layer. Repeat twice. Cover with a final layer of moistened matzo, sauce, and mozzarella cheese.

5. Cover with foil and bake for 35 minutes, uncover and bake another 10 minutes or until thoroughly heated and cheese is melted and beginning to brown (I turned the broiler on for the last few minutes of baking). Let stand for 15 minutes before serving.

Heaven in a mazto.

Mushroom Etc. And Sausage Ragu Over Polenta

28 Mar

What a great weekend. French-style brunch by day, Scottish pub by night. Work making pastries by early morning, homework by early afternoon. Stretching in downward dog at yoga class and running out my pent-up energy in the overcast, beach-style weather.

I’ve made a mini-goal for myself. I am going to try to cook dinner BEFORE I get too hungry. That way, when I am actually hungry I will have dinner made and I won’t snack the entire time I cook.

In addition, I want to save time by prepping my fruits and vegetables right after I buy them. I put my breakfast in a tupper-ware and take it on-the-go most days of the week, so I decided to make my own fruit salad to add to my yogurt or oatmeal. With a sprinkle of cinnamon, my fruit salad was complete. Now I can just eat as much as I want out of the big bowl in my fridge whether it is with breakfast, after dinner, or as a mid-afternoon pick-me-up. I also chopped my celery and carrots into easy to eat pieces and I can just put them in a ziplock baggie to take with me for lunch.

Fresh Fruit Salad

serves 4-6

2 kiwis
1 banana
4 large strawberries
1 pear
1 fugi apple
2 teaspoons cinnamon

Chop all your fruit. Mix everything in a large bowl. Sprinkle with cinnamon and stir. Spoon some fruit salad over your morning yogurt, oatmeal, or eat it on its own. YUM!

After my grocery run this evening, I cooked up a filling, healthy, hearty dinner that made leftovers for lunch tomorrow! I took this recipe I found in a CookingLight magazine and gave it a little twist. Thus I call this a Mushroom Etc. And Sausage Ragu Over Polenta.

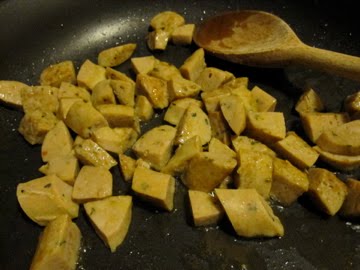
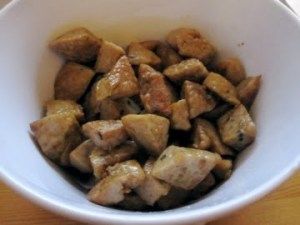
Before I started heating any pans, I made sure that I had everything that I needed for this dinner chopped and ready. Then I began sauteing my chicken sausages in a nice hot pan until browned.


Once browned, I took the sausage pieces out of the pan and set them in a bowl.


Next I sauteed some onion and once the onion got soft I added my mushrooms.

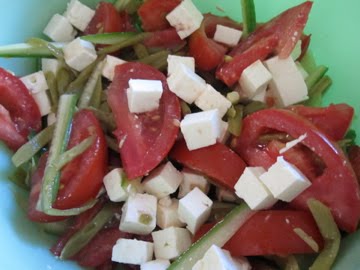
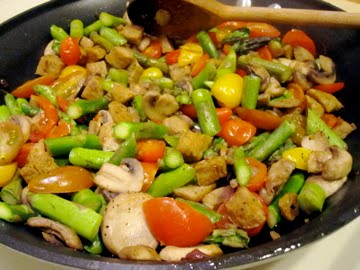
After they got nice and browned and soft, in went the garlic, followed by some chopped asparagus and halved cherry tomatoes.

While everything was simmering I was working on the gorgeous creamy polenta. Then it was time to EAT!

Mushroom Etc. And Sausage Ragu Over Polenta

adapted from CookingLight **MY ALTERATIONS ARE IN BOLDED PARENTHESES

Cook the polenta while the ragù simmers so everything will be ready and hot at the same time.

Yield: 4 servings (serving size: 1 cup polenta and 1 cup ragù)

Ingredients

  • 1 1/2 tablespoons olive oil, divided
  • 8 ounces hot turkey Italian sausage (I used about 2-3 Italian Chicken Sausages from Trader Joe’s)
  • 1/2 cup chopped onion (I used a red onion)
  • 1 pound cremini mushrooms, sliced
  • 2 large garlic cloves, minced
  • 1/4 teaspoon kosher salt, divided
  • 1 (14.5-ounce) can no-salt-added diced tomatoes, undrained (I used fresh rainbow cherry tomatoes)
  • 2 1/2 cups fat-free, lower-sodium chicken broth (I used veggie broth)
  • 1 1/2 cups water
  • 1 cup uncooked polenta
  • 4 ounces 1/3-less-fat cream cheese (I used 2 tablespoons plain yogurt, a pinch of mozzarella, and a generous grating of Pecorino cheese)
  • 1 tablespoon butter

Preparation

1. Heat a skillet over medium-high heat. Add 1 1/2 teaspoons oil to pan; swirl to coat. Remove sausage from casings and chop into bite-sized pieces. Add sausage to pan; sauté 3-5 minutes or until browned, stirring. Remove sausage from pan.

2. Add 1 tablespoon oil to pan; swirl to coat. Add onion; sauté 3 minutes, stirring occasionally. Add mushrooms; sauté 4 minutes, stirring occasionally. Add garlic; sauté 1 minute, stirring constantly. Stir in sausage, asparagus (if using), 1/8 teaspoon salt, and tomatoes; bring to a simmer. Reduce heat to medium; simmer gently for 15 minutes.

3. Bring broth and 1 1/2 cups water to a boil in a medium saucepan. Add polenta, stirring well. Reduce heat to medium, and simmer 20 minutes or until thick (mine took about 10 minutes or less), stirring occasionally. Stir in remaining 1/8 teaspoon salt, cheese, and butter. Serve with sausage mixture.

Nutritional Information

This is if you use the CookingLight recipe without my adaptations, but it should still be quite similar regarless

Calories: 428
Fat: 18.7g (sat 8.4g,mono 8.5g,poly 1.4g)
Protein: 18.2g
Carbohydrate: 46g
Fiber: 4.6g
Cholesterol: 53mg
Iron: 3.3mg
Sodium: 821mg
Calcium: 74mg