Spatchcocked Flat-Roasted Chicken

5 Apr

IMG_0925

Buying a whole chicken is a great way stretch your dollar, as it is significantly cheaper than buying the chicken parts separately. The other day, I had 2 breasts in my hands 😉 ready to go and ended up switching them out for a whole chicken because it would save me a few bucks. I bought my chicken directly from my farmer’s market vendor, so I felt reassured that the chicken lived a relatively happy life. As Deb from the Smitten Kitchen says in her cookbook, the smaller, cleaner chickens from the greenmarket really do taste incredible, and there is no need to add anything extra.

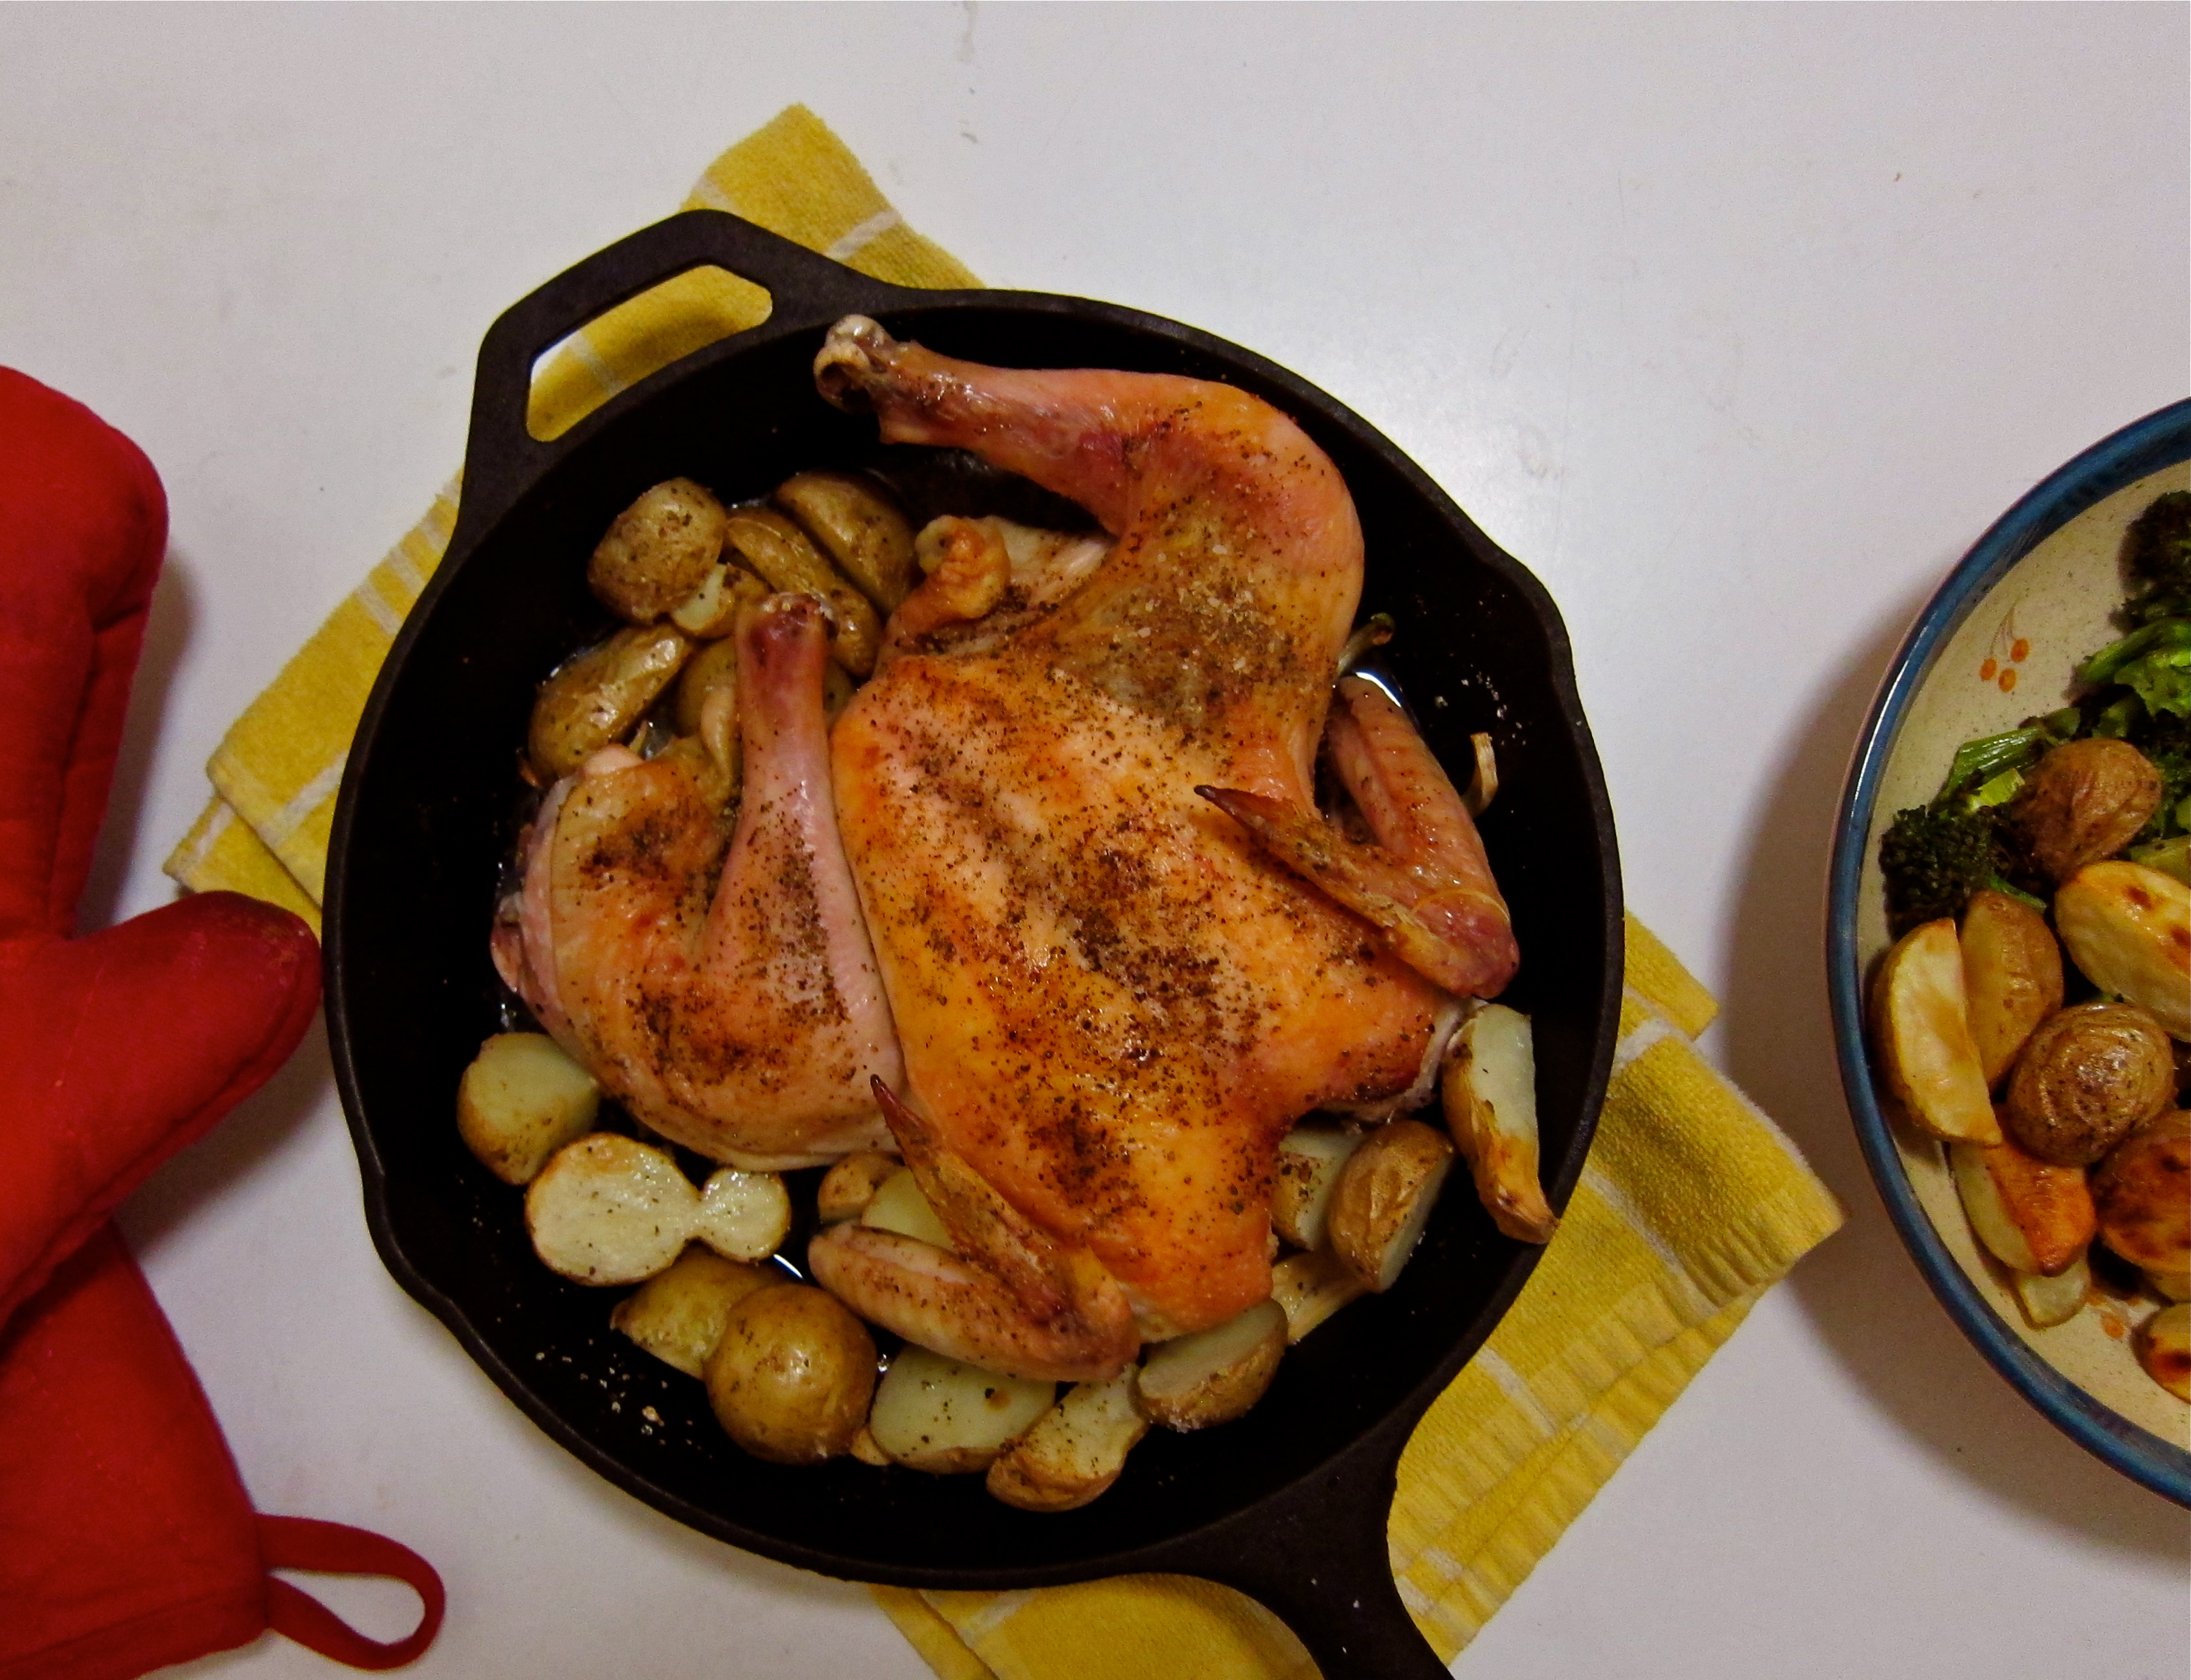
With a whole chicken at my side, it was time to start SPATCHCOCKING. I only recently heard the term while listening to Tracy talk about it on the Joy the Baker Podcast. Basically, you cut the backbone out of the chicken with your kitchen shears and lay the chicken flat in a roasting pan (check out the Adam’s spatchcocked chicken while you’re at it, and Tracy’s great pictures. Hopefully they won’t gross you out too much). Doing this allows the chicken to cook evenly in a relatively short time, and the breasts won’t overcook before the legs are ready. A great idea for holiday entertaining.

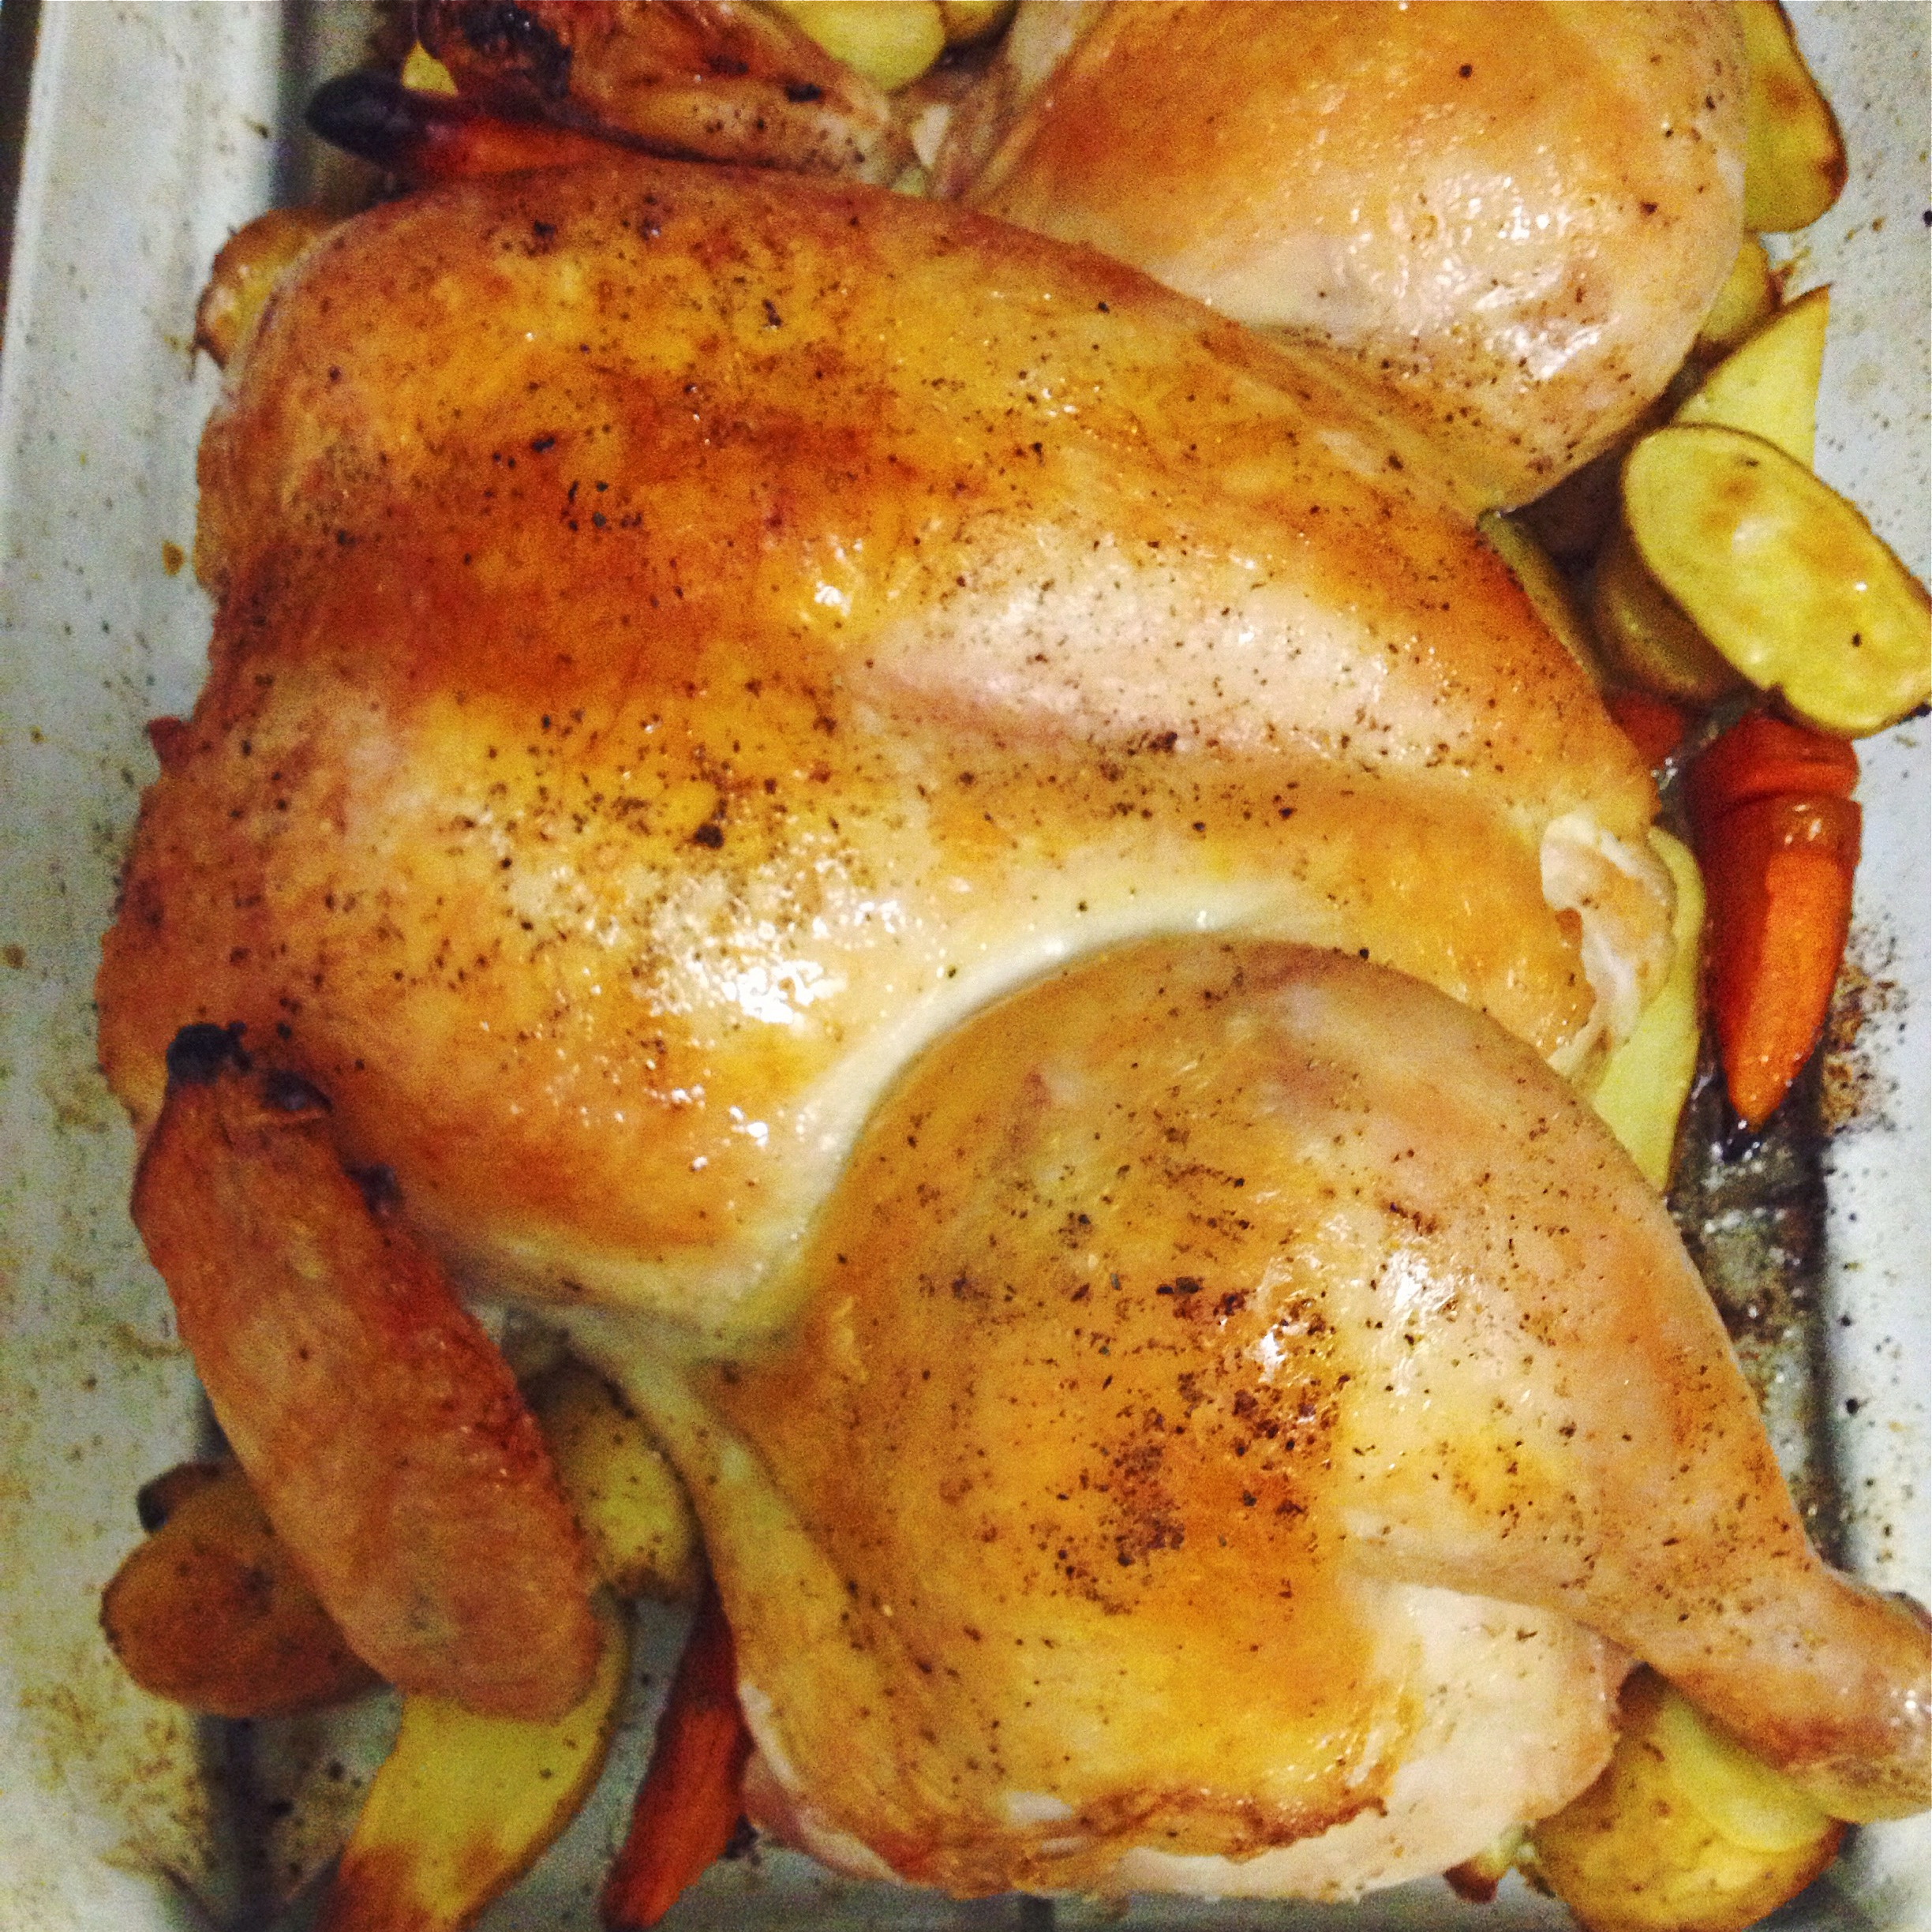
As Deb points out in the head note for this recipe, from the Zuni Cafe Cookbook, she learned to have faith that chicken skin will crisp itself in a high-heat oven, and not to load it with oils and rubs. The only oil in this recipe is used for the potatoes. The chicken skin provides all of the lubrication that the chicken needs.

From Thomas Keller, Deb learned to rain the salt down on the outside of the bird and to trust that it won’t leave the chicken too salty, just perfect. Salt is key. While it gets a bad rep. these days, salt makes a huge difference in flavoring dishes cooked from scratch.

This chicken was simple and juicy. After I few days, I shredded some of the meat and ate it with brown rice, black beans, and sautéed peppers and onions. A nice way to repurpose the leftovers.

I see a lot more spatchcocking in my future…!

IMG_0674

Spatchcocked Flat Roasted Chicken

recipe from the Smitten Kitchen Cookbook

One chicken, about 3 pounds

salt and pepper

Two handfuls of tiny yellow potatoes, washed and sliced in half

2-3 garlic cloves, peeled

2 tablespoons olive oil, for the potatoes

Preheat the oven to 450 degrees. Using a pair of sharp kitchen shears, remove the backbone of the chicken and discard it (or freeze and save it for making stock). Season the cavity generously with salt and freshly ground black pepper. Lay the chicken, breast side up, in a roasting pan (I used my cast-iron skillet), and gently pat the breast skin dry with a paper towel. Generously season the top of the bird with more salt and freshly ground black pepper. Nestle the potatoes and garlic cloves around and under the chicken, and drizzle them lightly with olive oil. Sprinkle the potatoes with salt and pepper.

Roast the chicken for 30-45 minutes, or until a thermometer inserted into the thigh registers 165 degrees. Toss the potatoes after about 20 minutes, so that they cook evenly. When the chicken has finished cooking, let it sit for about 10 minutes. Transfer the potatoes to a serving platter. Remove the legs, thighs, wings, and breasts from the spatchcocked chicken, and arrange them with the potatoes. Enjoy with another vegetable side dish for a balanced meal.

Update 9/25/14: new photo of the spatchcocked chicken baked in a pyrex. Delish!

Processed with VSCOcam with f2 preset

Healthy Carrot Breakfast Bread

2 Apr

IMG_0679

Last summer, in the blazing heat, I made an enormously decadent cream-cheese frosted layered carrot cake. It was absolutely fantastic, but sometimes I crave the challenge of making something secretively healthy (and not cloyingly sweet) that still packs that satisfying punch. In other words, I want to eat cake for breakfast and not feel bad about it.

I love a good quick-bread, especially for breakfast, slathered with nut or seed butter and washed down with a hot mug of coffee. This Carrot Breakfast Bread scratches that itch for me. It’s packed with carrots, pulsed oats, and a touch of yogurt, oil, and fruit (I used up the last of the charoset that I made for Passover). It’s sweetened with agave and chopped dates, and simply feels right to eat first thing in the morning.

I was feeling lazy (and efficient, mind you), so I used my blender to speed up the preparation time. First, I pulsed my oats in the clean, dry blender. After that I grated my carrots in there, and then I mixed my wet ingredients together in the blender. Just a few pulses and some mixing together by hand and that’s it.

Of course, if you are not a fan of unfrosted carrot cake, you could always enjoy this healthy carrot bread frosted with Love and Lemon’s cream cheese frosting. It’s all about balance.

IMG_0676

Healthy Carrot Breakfast Bread

adapted from LoveandLemons

2 cups flour, I used 1c. oat flour (pulverized oats in the blender until they turned to flour) and 1c. all-purpose flour

2 t. baking powder

1 t. baking soda

spices: 1 T. cinnamon, 1/4 t. cloves, 1 t. ground ginger, 1/2 t. nutmeg, pinch of salt

1 lb. carrots, peeled

2 eggs

1/2 cup of agave

1/4 cup canola oil or coconut oil

1/4 cup plain yogurt, I used plain, low-fat Stonyfield yogurt

1/4 cup applesauce or mashed/pureed fruit such as banana

1/4-1/2 cup dates, pitted and chopped dates

Preheat the oven to 350 degrees F. Grease and lightly dust a loaf pan with flour.

I used a blender for this recipe; you could also use a food processor. Grind your oats in the blender until they look like flour. Transfer to a bowl and whisk together the 1 cup of oat flour with the 1 cup of all-purpose or whole wheat flour, baking powder, baking soda, and spices. Set aside.

Take your peeled carrots and chop them into rough bite-sized pieces. You will need to do this next step in batches: throw a small amount of the carrots into the blender and pulse until a fine chop (not totally a puree but not giant carrot chunks…somewhere in the middle). Dump the finely chopped carrots into a large bowl. ***Note: you could also grate the carrots by hand, but I was lazy.

Next in the blender go the eggs, agave, oil, yogurt, and applesauce. Pulse for about 20 seconds until everything blends together. Pour this mixture into the carrots and stir it all together with a rubber spatula.

Add the dry mix to the wet and fold with a rubber spatula until it all comes together. Fold in the chopped dates. Dump everything into the prepared loaf pan. Sprinkle with some cinnamon and maybe a dash of sugar on top. Bake for about 50 minutes to an hour, rotating half-way through baking.

Serve for breakfast with some sunflower or almond butter and a hot mug of coffee or tea.

Easy DIY Recipe: Homemade Vegetable Stock

13 Mar

IMG_0845

For the last month or so, I have been saving my vegetable scraps in the freezer with a plan to make my very own VEGETABLE STOCK!!!

All of the carrot tops and parsnip nubs, the onion peels and fennel fronds that I normally would discard/compost are actually quality components of an unctuous stock. Thrown into a pot with a little water and good simmer on the stove, and I had my own preservative-free stock ready in an hour’s time (hands-off time!).

I froze my stock in ice cube trays, noting that 6 cubes is the equivalent of about half a cup of stock. Now I have flavor at my hands, ready-to-go whenever I am in a pinch. I see risotto in my future…

Here’s to getting one more bang for my buck.

IMG_0847

Homemade Vegetable Stock

via vegetarianventures

4-5 cups vegetable scraps (you can use them right from the freezer)

flavoring (bay leaf, Parmesan cheese rinds, herbs, salt, peppercorns…)

garlic (if you don’t already have scraps of garlic in your frozen veggie bag)

Place all ingredients in a large pot and cover with cold water (just enough so all the veggies are covered). Bring water to a boil and let simmer for an hour (don’t let it simmer for much more or it starts to lose flavor.

Strain the vegetable mixture and discard the scraps. Let cool completely and either use right away or freeze/refrigerate in quantities that will suit you best (ice cube trays was a genius idea, I also did some in pint size containers).

Store in fridge for up to 5 days and in freezer for up to 3 months.

My SNAP Challenge: Trying to Eat Healthy on a Budget

12 Mar

IMG_0840

Last week I took the SNAP challenge, spending $30 for my entire week’s worth of food. SNAP stands for Supplemental Nutrition Assistance Program. The purpose of doing this was to experience what it feels like to be food insecure and to build my appreciation for SNAP and other food assistance programs. Prior to taking the challenge, I felt like I had an advantage because I like to spend a lot of time cooking in the kitchen. A few things I was worried about were my big sweet tooth at night, and my caffeine intake.

I have never really had to restrict myself food-wise, so I had to practice a lot of mindful eating and really tried to listen to my “hunger” cues so that my food could last me the full week.

My final meal plan went as follows: I normally eat a lot of bread, but chose to get my grains by eating oats, white rice, and whole-wheat pasta. I was actually able to fit a lot of vegetables into my meal plan for the week. Fresh broccoli was cheaper than frozen broccoli, and I had a mix of green and red peppers with my rice and beans. My biggest splurge was on cottage cheese. It was the most expensive item ($3.99 for 16 oz), but I thought I would get a big protein bang for the price.

I spent a really long time at the store, comparing prices and going back and forth on whether or not to “splurge” on certain foods.

IMG_0662

Breakfast was oatmeal every day. œ cup of rolled oats with 1 cup water. I added milk after it was already cooked, and lots of cinnamon that I had at home. I also drank instant coffee, maybe slightly more than a cup each day.

Lunch everyday was black beans with white rice and sautĂ©ed peppers. 2 peppers lasted me the entire week. I probably ate œ-3/4 cup of beans and œ cup of rice at each meal.

Dinner everyday was whole-wheat rotini pasta. I took a can of crushed tomatoes and added some salt, garlic powder, roasted broccoli, and a bit of the remaining kabocha squash that I had leftover from the prior week.

**on some of my hungrier days, I had some cottage cheese with my lunch or dinner.

IMG_0665

Snacks: I would switch up what I ate for a mid-day snack and post-dinner snack, but I chose from the same few foods—banana, peanut butter, and/or cottage cheese (sprinkled with cinnamon). I purchased some cheap oranges from a NYC Green Cart and had those for snacks on 4 of the 7 days.

I ran out of cottage cheese after day 4, so for the last few days of my challenge I ate nonfat Greek yogurt that I bought at Trader Joes. Each yogurt cost $0.99 and had 14g of protein. The ingredients in the yogurt were skim milk, pasteurized honey, and live active cultures. I thought this was a pretty great deal for a healthy snack high in protein, low in sugar (relative to other yogurts, it only contained 13g) and additives, and high in potassium and calcium.

IMG_0848

Leftover food at the end of my challenge: I had SO MANY BEANS leftover. I finished the rice. I finished the pasta. There were rolled oats leftover, more than half of the instant coffee, and about œ of the peanut butter jar leftover. Everything else I finished.

I felt like I approached the challenge in a smart way, both financially and healthfully. Breakfast and lunch were my favorite meals of the day. I love oatmeal, and I actually felt healthy eating it for breakfast every day. I also did not get sick of the rice/beans/peppers for lunch, they tasted super satisfying. Eating pasta for dinner was fine, but I enjoy pasta so much (I could eat tons of it without feeling super full) that it was difficult to maintain portions to last me a full week. Buying a large can of crushed tomatoes and adding in roasted broccoli and leftover squash made a great sauce that did not have all of the preservatives that a jar of marinara might contain. I made sure not to forget to pack snacks with me this week, because I could not just run to the store and pick something up since it would inflate my budget.

I knew this before, but it really hit me this week that food is such a big part of my life. Cooking and eating are probably my favorite things ever to do; these are my hobbies, my stress relievers, my social life, and my work. I had little wiggle room for social eating out, and had to plan every meal down to a tee. Maybe cooking and eating would not be as big a part of my life (socially) if I were actually living off of SNAP benefits? Furthermore, I am a relatively tiny person who does not need much food to feel satisfied. Feeding a hungry family would also take a lot more time and energy.

I felt pretty good while on the SNAP challenge in terms of making filling, healthy meals with “real food,” but thinking about variety, if I had to continue this for a month or longer, I would feel very restricted. What if I wanted to bake something or invite a friend over for a nice meal? And the amount of time I spent comparing prices at the store felt tiring and tedious. Maybe I would get faster at price-checking if time went on, but it still feels tiring to have to tally things up very intricately. I also had to compromise on brands. White Rose was the cheapest brand I found, but none of their products are organic and the company is probably part of big industry. Supporting local businesses is more expensive, and in my everyday life I like to do this, but it is definitely a lot more of a compromise for someone on SNAP.

IMG_0169

Compounded with stress at home/work/school, taking the time to eat healthfully on a very limited budget can be taxing and sometimes get pushed to the side. You can’t just call for delivery whenever life gets busy and there is no time to cook. Everything needs to be planned to foster a healthy eating environment. While this is something that most of America probably needs to learn more of (planning meals in advance), flexibility in terms of eating is a treat.

Living in New York City is both a blessing and a curse because while food is everywhere I turn, it is also a very expensive city to live in and to eat in.

When I talked to my friends about the SNAP challenge, everyone seemed really interested and tried to think about what they would do if they were on the challenge. I am happy that my friends seemed so excited about the topic, which I think is the point of the SNAP challenge, to raise awareness about hunger and food insecurity in the US.

Related links on the SNAP Challenge:

Mario Batali’s experience

Cory Booker’s experience

A Huffington Post author’s view on the Food Stamp Diet

My classmate’s experience on the SNAP challenge + a great overview of SNAP in general

Inspiring Links for the Future of Our Food…

8 Mar

IMG_0839

Hi all,

It has been pretty busy around these parts lately. I did get a chance to hitch a ride to Vermont last weekend to go skiing for the day. Some of the most beautiful snow I have ever seen!

This week I am taking the SNAP Challenge, spending $30 on food for the whole week. More than midway through my challenge now, I am doing a lot of reflecting on food in the United States, and my personal relationship with food. More about my experience with the SNAP Challenge coming soon. Until then, I will share some inspiring links…

Planning to see this film in the next few days…A Place At the Table

New Yorkers: Some of New York’s most celebrated chefs have taken a moment to share why they feel the New Amsterdam Market should have a permanent home in the Fulton Fish Market building. Watch the video, sign the petition, spread the word, and help revive an historic New York landmark.

A powerful talk by Ann Cooper on School Food. We need to change the way we feed our children.

Harvard’s Healthy Eating Plate. A better alternative to MyPlate.

The latest Food Fight video…pretty graphic, but makes a strong point…

Los Angeles Unified School District is participating in Meatless Monday. Hooray!