Archive | vegetable RSS feed for this section

>Lemon Chicken Breast with Pan-Roasted Veggies

16 Nov

>
Leftovers for lunch. What a rare occasion these days. I mean, I do love making sandwiches, but sometimes I just crave a little variety…

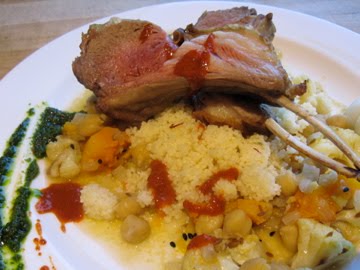
Over the weekend, I attended a cooking class in Napa Valley at Whole Foods Market where we made this totally amazing
Moroccan rack of lamb with couscous and fall vegetable ragu

(complete with harissa (red) and chemoula (green) sauces mmm):


The cooking class was part of Sprouts Cooking Club, a cooking program for children in the Bay Area. This class, however, was part of an ADULT series. (Check out their website for more info: http://sproutscookingclub.org/).

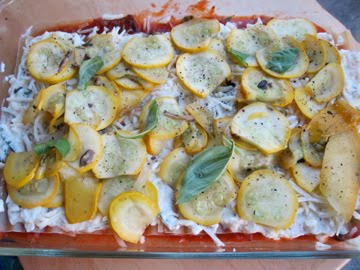
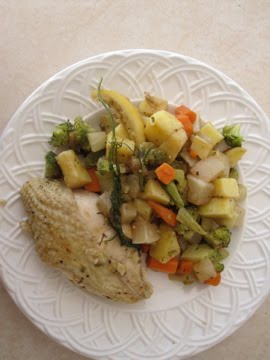
After the class, there were a ton of leftover vegetables and so I took a few home to use for my own pan-roasted vegetable recipe: fennel, beautiful green top carrots, broccoli, and turnip.

The pan-roasted veggie recipe is so simple and any vegetables can be used. I love all the colors-orange, green, yellow, white…

Pan-Roasted Veggies

Adapted from Barefoot Contessa’s Back to Basics

serves 4

4 tablespoons (1/2 stick) unsalted butter
1 white turnip, 1-inch dice
2 carrots, 1-inch dice (preferably from carrots with the greens attached)
1 large fennel bulb, diced
1 sweet potato, peeled and diced
1 head of broccoli, chopped
4 fresh sprigs if your favorite herb (rosemary or thyme are great)
1 1/2 teaspoons kosher salt
1/2 teaspoon freshly ground pepper
**I also added a splash of balsamic to my veggies at the very end!!

Melt the butter in a large (12-inch) saute pan that has a tight-fitting lid. When the butter is melted, add everything and toss with the butter. Cover the pan and cook over low-ish heat for 10 minutes. Take the lid off and stir. Cover again and continue to cook for another 5 or so minutes, until all the vegetables are tender. Taste for seasonings and serve hot.

**If you want to double this recipe, make it in 2 batches or use 2 12-inch saute pans. You want to the vegetables to brown on the bottom as well as steam in their own juices.

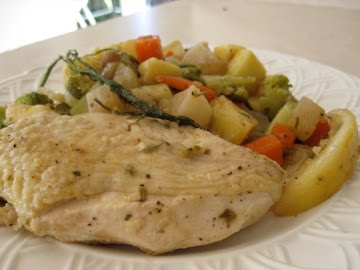
To go along with my vegetable array, I made a very simple roasted lemon chicken. Saute garlic in olive oil, add some wine, lemon zest and juice, and oregano, plop the chicken over the sauce and roast. Bam.

Leftovers for lunch. Yum yum yum. Aaaannnnd I can take a decent photo of my lunch-leftovers because during the fall/winter, natural lighting is not really feasible for dinner-time photos.


Roasted Lemon Chicken Breast

From Barefoot Contessa

serves 4

1/4 cup good olive oil
3 tablespoons minced garlic (9 cloves)
1/3 cup dry white wine
1 tablespoon grated lemon zest (2 lemons)
2 tablespoons freshly squeezed lemon juice
1½ teaspoons dried oregano
1 teaspoon minced fresh thyme leaves (I used rosemary)
Kosher salt and freshly ground black pepper
4 boneless chicken breasts, skin on (roughly 6 oz each)
1 lemon

Preheat the oven to 400 degrees.
Warm the olive oil in a small saucepan over medium-low heat, add the garlic, and cook for just 1 minute but don’t allow the garlic to turn brown. Off the heat, add the white wine, lemon zest, lemon juice, oregano, thyme, and 1 teaspoon salt and pour into a 9 X 12-inch baking dish.

Pat the chicken breasts dry and place them skin side up over the sauce. Brush the chicken breasts with olive oil and sprinkle them liberally with salt and pepper. Cut the lemon in 8 wedges and tuck it among the pieces of chicken.

Bake for 30 to 40 minutes, depending on the size of the chicken breasts, until the chicken is done and the skin is lightly browned. If the chicken isn’t browned enough, put it under the broiler for 2 minutes. Cover the pan tightly with aluminum foil and allow to rest for 10 minutes. Sprinkle with salt and serve hot with the pan juices.

>Gastronomically-Inspired Jewelery: Cute as a Cucumber, Cool as a Corn

19 Oct

>Ohmygosh are these cute or what?! Gahhh, I am so in love with my new purchases!!! Corn and cucumber earrings. eeeee

Last Sunday was the 8th annual Spice of Life festival held in North Berkeley. Albeit the rain was pouring down on us, my two girlfriends and I gallivanted along and made the most of our afternoon.

We were strolling along when all of a sudden we spotted the cutest jewelery vendor, Carolyn Tillie was selling wearable food jewelery!!!!! She had everything from fruits and veggies (the broccoli and artichoke earrings were my next pick) to sushi, cupcakes, and French macarons. My oh my what a tough choice. I ultimately chose the cucumbers and the corn. My friend Michelle and I are obsessed with eating cucumbers these days, English and Persian are our favorite kinds. Crunchy crispy hydrating yum, our favorite way to munch on cucumbers is dipped in hummus.


And I chose the corn earrings to be…for lack of a better word, corny. They are like baby corns on my ears.


Carolyn Tillie’s jewelery
is made from a combination of gashapon (Japanese gumball machine toys), dollhouse miniatures, or actual food products (her bean jewelery was made from real beans) which have been individually hand painted with a water-and impact-resistant protective coating. The food bits are set with 14k gold or sterling silver.

After fawning over my exciting new purchases, I headed over to the paella food vendor to get myself some grub…

Ahh, what a great ending to a great day. Now this is comfort food!

La la la la la lasagna!!!!!!!!!!

16 Sep

(NOTE: All of the photos are taken of the lasagna before it was baked…)

When your housemate eats five pieces of your lasagna for dinner, that must mean you made a pretty darn good meal (or maybe he was just pretty darn hungry). Either way, lasagna is a sure way to please hungry housemates and taste buds alike.

Lasagna is so hearty and you can make it however you like with all of your favorite ingredients. You can make it totally vegetarian, totally cheesy (I used a triple threat of cheeses in mine), totally meaty (sausages, ground meat, bacon…), and even totally vegan (making tofu “ricotta” is so fun).

Start with a layer of sauce, then noodles, then cheese, then veggies, then more sauce, then noodles, then cheese, then veggies, then more sauce, more noodles, more cheese oh my! I don’t even measure how much of everything I put in and I always confuse my layering order. Honestly, though, anyway you layer, it will come out awesome, guaranteed. I mean, you just can’t go wrong with all of those yummy ingredients.

I made vegetarian lasagna with fresh spinach, yellow summer squash, mushrooms, onions, fresh basil, tomato sauce, and 3 cheeses: Parmesan, mozzarella, and ricotta. I combined my ricotta with some fresh-ground nutmeg, the fresh basil leaves cut into pieces, and 2 eggs to make it really smooth and rich.

This lasagna in particular offers a lovely array of color-green, red, white, yellow…Unfortunately I was too caught up in/too busy eating the crispy browned cheesy topped noodle dish to take a nice photo of the finished product. So go try it for yourself and you will understand why I am such a sucker for those browned cheesy bits.

La la la la la lasagna!!!!!!!!!!

Ingredients

1-2 yellow summer squash, thinly sliced

1 onion, sliced thinly

mushrooms, sliced

1 jar of prepared tomato sauce + 1 small 8 oz can of plain tomato sauce (or homemade sauce, that would be awesome!)

1 lb of ricotta cheese

1/2 teaspoon freshly grated nutmeg

salt and pepper

fresh basil, cut into thin strips or ribbons

2 eggs

1 package of oven-ready lasagna noodles (or regular lasagna noodles, par-boiled)
fresh spinach

salt and pepper

more fresh basil

grated mozzarella cheese

grated Parmesan cheese

1. In a saucepan, saute the yellow summer squash in olive oil until just cooked. Add salt and pepper. Put into a bowl and set aside.

2. Drizzle some more olive oil in the now empty pan and saute the onions until cooked and translucent. Add the mushrooms and cook. Add the tomato sauce and simmer for a few minutes.

3. Make your ricotta mixture. Add the nutmeg, fresh basil ribbons, salt, pepper, and 2 eggs to the ricotta and stir until blended.

4. Preheat the oven to 375 degrees F. In a pyrex (13 in), layer a thin amount of your tomato sauce with mushrooms. Then place a few noodles in a single layer over the sauce. Spread on 1/2 of the ricotta mixture. Throw on some grated mozzarella. Add the yellow squash, salt, pepper, and fresh basil. More tomato sauce. Noodles. Ricotta mixture then mozzarella. Fresh spinach. More sauce. More mozzarella and Parmesan for the top so you get a nice crispy brown top.

(or just layer it however you like)

5. Bake, covered with foil, for about 35-40 minutes. Take off the foil and bake for another 15 minutes. Take it out of the oven and let it stand for about 10-15 minutes before cutting and serving.

>Fun in the Garden + Salmorejo: Spanish Tomato and Bread Soup

11 Sep

>
Just the other day, I spent some quality time in the garden with my great friends Michelle and Natasha. Natasha’s family lives in beautiful Napa Valley, California. Natasha planted a vegetable garden over the summer, and we came back to give it the love that it deserves.


It felt like we had struck gold, in the form of tomatoes. She planted sweet 100s, a cute little cherry tomato that tastes unbelievably sweet. I could not stop popping them in my mouth, it was like a little burst of sweetness every bite!

Oh my goodness so many tomatoes, it was almost overwhelming!

And, check out the ginormous squashes:

Those squashes were about as long as my torso. And heavy, too!

So it has been 2 days since we picked the tomatoes, and most of them were already starting to go bad today. You really got to pick ’em and eat ’em quick. I sorted through the beauties and separated them from the good ones to make Salmorejo, a Spanish tomato and bread soup from the Andalucian region, specifically Cordoba.

This soup literally took 10 minutes, and involved no cooking! Just throw the tomatoes, some bread (crusts removed), garlic, a piece of bell pepper, and a drizzle of olive oil into a blender then strain it through a fine mesh sieve. The soup is meant to be served chilled. It is a type of gazpacho, a smoother, almost creamier type of gazpacho. The bread helps to achieve that creamy feel and it helps to thicken the soup as well. You can save the crust of the bread to toast and serve as little dippers for the soup.

I ground up some fresh black pepper in and over the top of my soup. Mmm.

Salmorejo

adapted from BakingBites

serves 1 (but can be easily multiplied)

1 lb of tomatoes (any kind you like, I was lucky to have some from the garden)
1 4-inch piece of baguette, crusts removed
1/4 piece of bell pepper
1 garlic clove
1/2 tablespoon sugar
salt and pepper, to taste
1/4 cup olive oil

Combine everything except for the olive oil in the blender. Blend at high speed until smooth. With the blender running, stream in the olive oil. Add more salt and pepper if needed. Strain through a fine mesh sieve and refrigerate until chilled.

The soup can be prepared one day in advance and stored in the refrigerator.

**NOTE: You can save your bread crusts, toast them, and serve with the soup.

>Asparagus Risotto

8 Sep

>
“Listen to the sounds the risotto makes as it cooks. The crackling sizzle of the rice tells you it’s time to add the wine, which makes a gratifying whoosh; and the bloop-bloop of the bubbles popping signals that it’s time to add more broth.”

-Alice Waters, The Art of Simple Food

There are so many great foods out there, but risotto definitely holds a special place in my heart. Risotto oozes comfort food, with its creamy texture and beautiful soft colors. And it goes perfectly with a nice cold glass of wine. What a delightful dish to welcome in a cool fall day. Oh, and check out my snazzy red bike in the background…it’s my new fun (and functional) toy!

Back to risotto, what exactly makes it taste so creamy when there is no actual cream in the recipe? Starch. Yep. Alice Waters says: “Risotto is made from starchy short-grain rice (it looks much plumper than other varieties of rice), which, when moistened with successive additions of stock, gains concentrated flavor and a distinctive saucy texture.” The most well-known risotto rice is called Arborio rice, although many other varieties are used in Italy: Vialone Nano, Baldo, and Carnaroli.


Yes, when you make risotto, the whole process takes about 45 minutes standing more or less on-guard, stirring occasionally and adding broth a little bit at a time. You have to give your rice some love, otherwise it won’t love you back, and I’m not just saying that to be cute. It’s actually quite relaxing to make risotto, it’s one of those sort of mindless tasks that just feels good.

I chose to make my risotto with onions, asparagus, and Parmesan cheese. Simple and fantastic. But really, you can throw whatever you feel like in your risotto: mushrooms, seafood, sausages, tomatoes, beans, fresh herbs, citrus juice and zest…

The basic idea of risotto is to saute an onion (or shallot, garlic, leek…), add the rice for just a few minutes to let it get all nice and roasty toasty (it should turn translucent but should not start to color or brown), and then pour in a bit of wine for some fruity acidity. White wine is typical, however red wine or beer can be substituted. Once the wine evaporates, broth or stock is added, slowly over a longish period of time. The final touches involve grated cheese of course! Oh yes, and some good company with which you can share this wonderful meal.

Asparagus Risotto

from Alice Waters’ The Art of Simple Food

4 servings

Snap off the ends of:
1 pound asparagus
Cut the spears on the diagonal into 1/4-inch pieces. Set aside for later.

Melt in a heavy-bottomed 2 1/2 to 3 quart saucepan over medium heat:
2 tablespoons butter

Add:
1 small onion, diced finely
Cook until the onion is soft and translucent, about 10 minutes

Add:
1 1/2 cups risotto rice (I used Arborio)
Cook the rice, stirring now and then, until translucent, about 4 minutes. Do not let it brown.

Meanwhile, bring to a boil and then turn off:
5 cups broth (chicken or vegetable)

Pour into your simmering rice:
1/2 cup dry white wine

Cook, stirring fairly often, until all the wine is absorbed. Add 1 cup of the warm broth and cook at a vigorous simmer, stirring occasionally. When the rice starts to thicken, pour in another 1/2 cup of the broth and add some salt (how much depends on the saltiness of the broth). Keep adding broth, 1/2 cup at a time, every time the rice thickens. Do not let the rice dry out. After 12 minutes stir in the cut asparagus. Cook until the rice is tender but still has a firm core, 20 to 30 minutes in all. When the rice is just about done, stir in:
1 tablespoon butter
1/3 cup grated Parmesan cheese

Stir vigorously to develop the creamy starch. Taste for salt, adding more as needed. Turn off the heat, let the risotto sit uncovered for 2 minutes, and serve. Add a splash of broth if the rice becomes too thick.