Savory Summer Galette

5 Aug

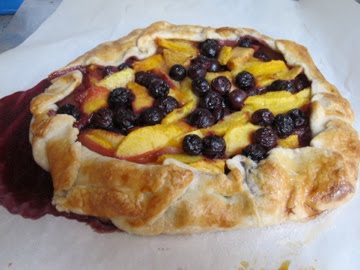
Remember the blueberry and summer peach galette that I made last week? The recipe makes enough dough for 2 tarts, and since the dough is not sweet, it can be used for either (or in my case, both) sweet and savory tarts. When I was making my fruit tart, I stuck the other dough in the freezer for later use.

I used the second dough to make a savory galette, my filling consisting of pretty much whatever ingredients I had on-hand at the time at home. After rolling out my dough, I spread a thin layer of olive tapenade along the bottom. Then I chopped some red and yellow cherry tomatoes from the garden in half and added a touch of salt and pepper.

My next layer was tiny chopped pieces of zucchini, followed by some Parmesan cheese slivers and feta cheese cubes. I piled everything in the middle of my dough and drizzled a touch of olive oil on top for a nice finish.

This is like a pizza pie…but better (well, different…!).

You can use any vegetable or filling idea that you want! Try experimenting with different cheeses i.e. ricotta, a smoky gouda, soft goat cheese, a rich brie…Try caramelizing onions and adding walnuts and lemon zest. Maybe do a fig and honey galette. Or potato, fontina, pancetta, and rosemary. Yes, herbs! Basil, rosemary, oregano, parsley. Crack an egg of the whole thing and bake it up! Oo la la, the possibilities are endless.

Savory Summer (or whatever season it happens to be…) Galette

For the dough:
Use your dough from this recipe

Filling:
(note: measurements are just estimated here…cook with your gut)
-2 tablespoons olive tapenade
2 cups of cherry tomatoes, sliced in half
1 small zucchini, roughly chopped into tiny pieces
salt and pepper
-3 tablespoons Parmesan cheese, shaved or grated
-4 oz. feta cheese, cubed
extra virgin olive oil, for drizzling
-1 egg, lightly beaten

Let the dough warm up at room temperature for 15 minutes or so and preheat the oven to 400 degrees F. Roll out the dough on a lightly floured surface into a rough circle about 12 inches in diameter and about 1/8 inch thick. Transfer the pastry to a baking sheet lined with parchment paper and refrigerate while preparing the filling.

Prep all of your veggies and sprinkle them with salt and pepper. Take the dough out of the refrigerator and spread the middle with the olive tapenade, leaving a 1 1/2 inch border around the circumference of the dough. Pile your tomatoes and zucchini in the center on top of the olive tapenade. Sprinkle the Parmesan cheese and then the feta cheese on top. Drizzle a little olive oil over the filling.

Fold the dough over up over the filling, and brush the rim of the dough lightly with beaten egg.

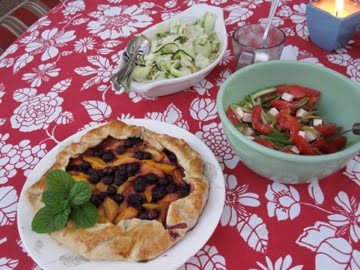
Bake in the lower part of the oven for 45-50 minutes, until the cheese is lightly browned and the pastry is golden brown and slightly caramelized at the edges. Slide the tart off the pan to cool on a rack. Slice and serve!

>Lemon Ice Cream with Graham Cracker Crumbs

2 Aug

>
No, I did not buy this ice cream from the corner store. Yes, I made this ice cream from scratch with real lemons, some quality dairy products, a touch of sugar, and lots of love. And I added crumbled graham cracker crumbs (I used Trader Joe’s whole wheat cinnamon graham crackers) to this ultimate lemon ice cream just because, well, what the heck, right?!

Lemon ice cream with graham cracker crumbs. Eaten out of some fancy china, eaten out of the container, or eaten straight from the ice cream maker…it’s just that good…


Lemon Ice Cream with Graham Cracker Crumbs

adapted from Tartlette

Finely grated zest of 3 lemons
1/2 cup fresh lemon juice
3/4 cup sugar or 2/3 cup agave nectar
pinch of salt
4 egg yolks
1 cup milk
2 cups heavy cream

cinnamon graham crackers or gingersnaps, broken into tiny bite-size pieces

In a non-reactive bowl, mix the lemon zest, juice, sugar, and salt. Refrigerate 1-2 hours to blend flavors.

Pour your 2 cups of cold cream into a bowl or bucket and set a fine mesh strainer over the top.

In a large bowl, slightly beat the egg yolks to break them up. Heat milk to a bare boil in a large heavy saucepan. Pour the milk over the eggs, stirring constantly, and return combined mixture to the saucepan and gently heat until the mixture slightly starts to thicken and coats the back of a spoon.

Pour through the fine mesh strainer into the cold cream.

Set the milk and cream mixture over a larger bowl of ice water until cold. Refrigerate until completely chilled. Combine the milk/cream mixture with the lemon slush mixture. Spin in the ice cream maker according to the manufacturers instructions. In the last few minutes of churning, add your graham cracker crumbs.

>Blueberry and Summer Peach Galette with Homemade Vanilla Bean Ice Cream

1 Aug

>
Oh baby, look at that oozing berry juice spilling out of the galette!!!!!!!!!!!!!!

Light, summery, refreshing, beautiful. This fruit galette is just heaven– beautiful blues and purples from the blueberries and reds and orange colors from the peaches. The thin flaky crust serves as the perfect bed for the sweet juicy fruit. Paired with some dang good homemade vanilla bean ice cream, all I have to say is “mmm mmm mmm mmm mmm!”


A galette is a thin, free-form open-face tart. The dough is not sweet and can be used for savory tarts as well as dessert. Once you make the dough, the filling is your choice, pretty much anything goes.

…I am at a loss for words. Just make it, eat it, share it, enjoy it.

Blueberry and Summer Peach Galette

adapted from Alice Waters’ In the Green Kitchen

6 to 8 servings

This recipe makes enough dough for 2 tarts. The dough will keep in the refrigerator for 2 days or in the freezer for several months

2 cups unbleached all-purpose flour
1/2 teaspoon salt (omit if using salted butter)
12 tablespoons (1 1/2 sticks) cold unsalted butter
1/3 to 1/2 cup ice-cold water

3-4 medium peaches
1 cup of blueberries
sugar
1 egg

If making the crust by hand: Measure the flour and salt (if including) into a bowl. The butter should be cold and firm, but not hard. Cut into 1/4-1/2 inch cubes and put about half of it into the bowl. Work it into the flour with your fingertips, lightly rubbing and breaking the flour-coated pieces of butter into small bits, until the mixture is roughly the texture of oatmeal or cornmeal. Add the rest of the butter and work it quickly into the dough until the pieces of butter are about half of their original size. Dribble the water into the dough while tossing the mixture with a fork. Keep adding water only until the dough begins to clumo and hold together when you squeeze a handful. You may not need the full 1/2 cup. Divide the dough into two and gather each part into a ball. Wrap each ball in plastic and flatten it into a disk. Let the dough rest, refrigerated, for an hour or so (I like to do it the night before…). You may want to freeze the second disk of dough for future use.

If you are using an electric mixer: Just follow the above directions but instead of using your fingers to incorporate the butter, use your fingers to turn on your mixer (use the paddle attachment).

When ready to make the tart: Let the dough warm up at room temperature for 15 minutes or so and preheat the oven to 400 degrees F. Roll out the dough on a lightly floured surface into a rough circle about 12 inches in diameter and about 1/8 inch thick. Transfer the pastry to a baking sheet lined with parchment paper and refrigerate while preparing the fruit.

Peel and slice the peaches (or whatever fruit you use) and toss with 1 to 2 tablespoons of sugar. I added blueberries to this, too. Freely pile the fruit in the center of the dough, leaving a 1 1/2-inch border of dough around the whole circumference. Fold the dough over up over the fruit, and brush the rim of the dough lightly with beaten egg. Sprinkle sugar over the dough and fruit; use more or less, depending on the tartness of the fruit.

Bake in the lower part of the oven for 45-50 minutes, until the fruit is tender and the pastry is golden brown and slightly caramelized at the edges. Slide the tart off the pan to cool on a rack. Serve warm or at room temperature–with softly whipped cream or homemade ice cream, if you like.

Some notes:

If you are using juicy stone fruits such as peaches, nectarines, apricots, and plums: to help absorb the juices sprinkle a mixture of 2 tablespoons sugar, 1 tablespoon flour, and 1 tablespoon ground almonds (optional) on the pastry before topping with the fruit.

Apple galette is delicious when you spread the rolled-out dough with apricot jam before arranging the apples on top. After baking, brush the apples with warm apricot jam for a beautiful glaze.

Dinner at Home: Simple, Summery, and Seasonal Steak and Salads

31 Jul

After two months of stop and go (but mostly go) traveling, from Europe back to the USA and down to Argentina and back, I admit, it’s nice to be home. It is nice to be home and see my family and eat dinner outside in the backyard on a warm summer evening.


The menu? Simple, summery, and seasonal:

-Mom’s steak on the grill
-Grilled fresh tomatoes from the garden with Parmesan cheese
-Leftover crispy oven-baked chopped potatoes
-My tomato, cucumber, and hericot vert salad with feta cheese
-My shaved zucchini salad with Parmesan and pine nuts


For dessert? Blueberry and Summer Peach Galette with Homemade Vanilla Bean Ice Cream: Say it, just say it. I know, I am incredible.


The tomato, cucumber, and hericot vert salad with feta cheese can be made in 10 minutes or less. The salad was inspired by my stay in Paris with my good friend Alex. The salad requires no dressing; I like to emphasize the sweet flavor of the produce and the salty cheese. The salad is perfect for summer.

And yes, I used canned green beans, but hey, they’re French-style! I quite like how soft and thin the green beans are. So sue me. They taste great, even if they are from a can.


Tomato, Cucumber, and Hericot Vert Salad with Feta Cheese

serves 4, more or less

Ingredients
3 tomatoes, preferably from the garden
2 Persian cucumbers
1 can of French-style green beans or hericot vert
1/2 block of Feta cheese, cut into cubes or crumbled

Directions
1. Slice the tomatoes into wedges and put them into a salad bowl.
2. Slice the cucumbers in half the long way and again in half along the equator. Very thinly slice the cucumbers into a julienne. Put into the salad bowl.
3. Open the can of hericot vert and drain. Add to the salad bowl.
4. Toss the cubed or crumbled cheese into the salad.
5. Eat and enjoy.

The shaved zucchini salad is another lovely and light treat that epitomizes summer elegance and simplicity. No cooking necessary. I absolutely love all of the textures and flavors going on–long, thin zucchini ribbons contrasted with tiny crunchy nuts, delicate slivers of cheese, and a salty tangy dressing.


Shaved Zucchini Salad with Parmesan and Pine Nuts
From
Bon Appetit Magazine August 2010

Ingredients

Dressing:
1/3 cup extra-virgin olive oil
2 tablespoons fresh lemon juice
1 teaspoon course kosher salt
1/2 teaspoon freshly ground black pepper
1/4 teaspoon dried crushed red pepper

Salad:
2 pounds of medium zucchini, trimmed
1/2 cup coarsely chopped fresh basil
1/4 cup pine nuts, toasted
Small wedge of Parmesan cheese

**RECIPE NOTE: I did not have fresh basil on hand (I know, shame on me) so I just omitted it. I also added some fresh sliced avocado because, well, I love avocados and why not?!

Directions

Whisk oil, lemon juice, salt, pepper, and pepper flakes in a small bowl to blend. Set dressing aside.

Using vegetable peeler or V-slicer and working from top to bottom of each zucchini, slice zucchini into ribbons (about 1/16 inch thick). Place ribbons in a large bowl. Add basil and nuts (and avocado if you are like me). Drizzle the dressing on and in the salad. Using the vegetable peeler, shave strips from the Parmesan wedge over the salad.

Some Odds n’ Ends From Amsterdam

30 Jul


Amsterdam in June feels like February in California–COLD. Thus, after an afternoon of meandering throughout town, a tall glass of hot chocolate was in order.


My buddy Sam and poked our heads into the closest cafe to grab a glass of the good stuff and a warm safe-haven from the chilly weather.

Sam modeling with the hot chocolate

Since I was only in Amsterdam for one day, I did not have a chance to taste all of the typical Amsterdam dishes such as: raw herring, Dutch pancakes (similar to a French crepe), poffertjes (much smaller than Dutch pancakes, and they are puffed and served with butter and powdered sugar) and licorice. I did, however, taste stroopwafels. Oh stroopwafels, how I love thee.


Two buttery thin waffle cookies sandwiched together with a layer of thick syrupy honey molasses. Oh man, so freaking yummy. Very dense though, upon eating more than one stroopwafel, you can definitely feel your belly get heavy.

I also went to the Heineken Brewery, where I got at least 3 beers to sample. I participated in a beer tasting where the “expert” taught me a bit about foam and presentation of the beer. Also, I learned that the beer is actually 95% water and the rest is a combination of hops, barely, and yeast. I got to go into a room that simulated the experience of a beer being bottled–the room shook and we got splashed a bit. Silly, kitschy, fun.

Speaking of silly, kitschy, and fun…I went on a “booze cruise” with my traveling group and yes, it is what you think it is. A lovely little cruise along the canals of Amsterdam complete with endless wine and beer. To kick off the cruise, we were given little bottles of Flugel.


According to this website, “Flugel combines vodka with the taste of black currant and the energy boost of guarana, B vitamins, and caffeine. This “healthy” vodka is currently available in The Netherlands, Belgium, and France. It is targeted to youth partygoers. The tiny 20ml bottle is actually the size of your palm, and could be easily concealed inside a pocket. The Flugel contains 10 percent alcohol by volume.”

Oh, and we also got to munch on these yummy little pastry snacks while sipping on our wine, beer, and Flugel…

A captured moment: the blonde bombshells with their drinks and pastry snacks 

For dinner, we ate at a floating Chinese restaurant, the Sea Palace. Honestly, I was quite disappointed. Ok, the decor was nice but I was not impressed with the food at all. It just did not get me excited and it tasted sub-par. The rice was super buttery, too, which I do not usually expect from a Chinese style rice, even for fried rice. I guess I am just spoiled with good Chinese food back in the U.S.? Oh well, it was an experience nonetheless.


Stepping outside of Amsterdam for a morning, we visited the quaint village of Edam. We visited a cheese and clog shop, two very significant symbols for this town and for the Netherlands in general.

First, this adorable woman gave us an overview of how they make their cheese…(we got to taste like 10 different cheeses, too!).

And boy oh boy did it smell strongly of cheese in there!


Then, this studly man demonstrated the skillful art of clog-making. He makes it look so easy.


Stylish, eh?
There were clogs everywhere used for everything including cigarette ashtrays!
The town of Edam was small but lovely. Cheese n’ clogs aside, I had a spectacular day riding “granny bikes” around the village.