>Make-Up Artist For Food?

1 Oct

>


Photo from this website

Today in my community nutrition class, we learned about food marketing, specifically towards children. This video clip (http://www.youtube.com/watch?v=fUjz_eiIX8k) was shown at the start of the lecture.

What do you think? Is this simply food art? Or is it more? What message is this sending?

Or should I just shut up and get a job as a food make-up artist (aka food-stylist)?

Or should I just shut up and go get a burger?

Fun Fact (from the rumor mill, but most likely true in some/many cases): Did you know that food stylists will enhance their strawberries with lipstick, will pour glue over cereal instead of milk and will replace ice cream with shortening mixed with sugar?! Yikes…and yuck!

Buttermilk Pound Loaf with Yogurt, Honey, and Strawberries

29 Sep

>

Oh haaay honey, let’s be delicious together!
My cake likes to talk out-loud sometimes. That’s just how it is.

This cake knows what she likes. She likes to be cut into big, thick slices to show that she is the boss. She also appreciates the little sweet things like a drizzle of honey. Slivered strawberries make this doll pop. And some thick creamy yogurt goes right in step with her silky-smooth crumb.

Nothin’ better than taking a huge bite of cake hot out of the oven.


Buttermilk is one of my favorite ingredients to use in a baked good. I mean, come on…buttermilk pancakes, buttermilk donuts, buttermilk fried-chicken, BUTTERMILK POUND CAKE!

Another one of my favorite cakes showcasing buttermilk is Joy’s buttermilk avocado pound cake: satisfying and green!


Buttermilk Pound Loaf

“moist with butter and not too sweet”

from the Hummingbird Bakery Cookbook

makes 8-10 slices

1 stick unsalted butter, at room temp

1 2/3 cups sugar

3 eggs

1 1/2 cups all-purpose flour

1/2 teaspoon baking soda

1/2 teaspoon salt

1/2 cup buttermilk

1/4 teaspoon pure vanilla extract

Grease and dust with flour a 9 x 5-inch loaf pan. Preheat oven to 325 degrees F.

Put the butter and sugar in a freestanding electric mixer with a paddle attachment and cream until light and fluffy. Add the eggs one at a time, mixing well and scraping any unmixed ingredients from the side of the bowl with a rubber spatula after each addition.

Sift the flour, baking soda, and salt into a separate bowl. Add one-third of the flour mixture to the butter mixture, followed by half of the buttermilk. Mix well. Repeat this process, then finish with the remaining flour mixture. Stir in the vanilla extract. Mix well until all the ingredients are well combined.

Pour the batter into the prepared loaf pan and smooth over the top. Bake in the preheated oven for about 35-40 minutes (mine actually took slightly longer cooking time), until golden brown and the cake bounces back when touched. Let the cake cool slightly in the pan before turning out onto a wire rack to cool completely.

Homemade Vanilla Bean Ice Cream

24 Sep


I have been meaning to post this recipe for a while now. Vanilla bean ice cream. Homemade. Rich and creamy and dotted with little bean flecks. The absolute perfect thing to go with a homemade galette or a homemade pie.


Did I mention this is rich and creamy and utter heaven? A double dose of vanilla, from the pod and the extract, allows for the ultimate vanilla flavor.

Oooooo and the consistency is spot on with this recipe. It does not get all hard and icy in the freezer. It stays nice and soft, but not too soft. Mmm gimme gimme gimme!!!!!!!!

Vanilla Bean Ice Cream

from David Lebovitz’s Ready for Dessert

makes about 1 quart

1 cup whole milk
pinch of salt
3/4 cup sugar
1 vanilla bean, split lengthwise
2 cups heavy cream
5 large egg yolks
3/4 teaspoon vanilla extract

In a medium saucepan, warm the milk, salt, and sugar, stirring to dissolve the sugar. Scrape the seeds from the vanilla bean and add them to the saucepan, then drop in the pod. Cover, remove from heat, and let steep for 30 minutes (sometimes I just get lazy/impatient and don’t steep for a long time…eh, my ice cream still comes out amazing).

Pour the cream into a medium bowl and set a mesh strainer across the top.

Reheat the milk mixture until it’s warm. In a separate bowl, whisk the egg yolks, then gradually add some of the warm milk mixture, whisking constantly as you pour. Pour the warmed yolks back into the saucepan (this is called “tempering”). Cook over low heat, stirring constantly and scraping the bottom of the pan with a heatproof spatula.

Pour the custard through the mesh strainer into the heavy cream. You can rinse your vanilla pod and save it to use again in another recipe.

Stir in the vanilla extract. Set the bowl containing the custard over a larger bowl of ice water. Stir the custard until cool, then cover and refrigerate until thoroughly chilled. Freeze the chilled custard in an ice cream machine according to the manufacturer’s instructions.

Fig Galette aka Figs in my Belly (For Real)

20 Sep


Once upon a time there was a dinner party. After dinner the guests ate dessert. A beautiful purple dessert. A purple dessert with a nice golden flaky crust. Warmed and topped with homemade vanilla bean ice cream. Now that’s a dinner party!

Fig Galette in the making:

Oh, yes, and there was also a lovely yellow nectarine galette:


I used this recipe for my dough. For the fig galette, I spread the bottom of the dough with raspberry jam, topped it with my sliced fresh figs, and then sprinkled a touch of sugar over the top. Super easy, and the result is just gorgeous.

La la la la la lasagna!!!!!!!!!!

16 Sep

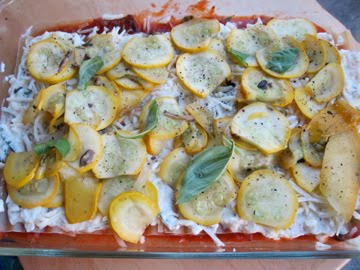
(NOTE: All of the photos are taken of the lasagna before it was baked…)

When your housemate eats five pieces of your lasagna for dinner, that must mean you made a pretty darn good meal (or maybe he was just pretty darn hungry). Either way, lasagna is a sure way to please hungry housemates and taste buds alike.

Lasagna is so hearty and you can make it however you like with all of your favorite ingredients. You can make it totally vegetarian, totally cheesy (I used a triple threat of cheeses in mine), totally meaty (sausages, ground meat, bacon…), and even totally vegan (making tofu “ricotta” is so fun).

Start with a layer of sauce, then noodles, then cheese, then veggies, then more sauce, then noodles, then cheese, then veggies, then more sauce, more noodles, more cheese oh my! I don’t even measure how much of everything I put in and I always confuse my layering order. Honestly, though, anyway you layer, it will come out awesome, guaranteed. I mean, you just can’t go wrong with all of those yummy ingredients.

I made vegetarian lasagna with fresh spinach, yellow summer squash, mushrooms, onions, fresh basil, tomato sauce, and 3 cheeses: Parmesan, mozzarella, and ricotta. I combined my ricotta with some fresh-ground nutmeg, the fresh basil leaves cut into pieces, and 2 eggs to make it really smooth and rich.

This lasagna in particular offers a lovely array of color-green, red, white, yellow…Unfortunately I was too caught up in/too busy eating the crispy browned cheesy topped noodle dish to take a nice photo of the finished product. So go try it for yourself and you will understand why I am such a sucker for those browned cheesy bits.

La la la la la lasagna!!!!!!!!!!

Ingredients

1-2 yellow summer squash, thinly sliced

1 onion, sliced thinly

mushrooms, sliced

1 jar of prepared tomato sauce + 1 small 8 oz can of plain tomato sauce (or homemade sauce, that would be awesome!)

1 lb of ricotta cheese

1/2 teaspoon freshly grated nutmeg

salt and pepper

fresh basil, cut into thin strips or ribbons

2 eggs

1 package of oven-ready lasagna noodles (or regular lasagna noodles, par-boiled)
fresh spinach

salt and pepper

more fresh basil

grated mozzarella cheese

grated Parmesan cheese

1. In a saucepan, saute the yellow summer squash in olive oil until just cooked. Add salt and pepper. Put into a bowl and set aside.

2. Drizzle some more olive oil in the now empty pan and saute the onions until cooked and translucent. Add the mushrooms and cook. Add the tomato sauce and simmer for a few minutes.

3. Make your ricotta mixture. Add the nutmeg, fresh basil ribbons, salt, pepper, and 2 eggs to the ricotta and stir until blended.

4. Preheat the oven to 375 degrees F. In a pyrex (13 in), layer a thin amount of your tomato sauce with mushrooms. Then place a few noodles in a single layer over the sauce. Spread on 1/2 of the ricotta mixture. Throw on some grated mozzarella. Add the yellow squash, salt, pepper, and fresh basil. More tomato sauce. Noodles. Ricotta mixture then mozzarella. Fresh spinach. More sauce. More mozzarella and Parmesan for the top so you get a nice crispy brown top.

(or just layer it however you like)

5. Bake, covered with foil, for about 35-40 minutes. Take off the foil and bake for another 15 minutes. Take it out of the oven and let it stand for about 10-15 minutes before cutting and serving.