Archive | savory RSS feed for this section

Soba Bowls with Tea-Poached Salmon

1 May

IMG_0529

I had a great meal last weekend at cocoron in Manhattan’s Lower East Side. cocoron is a soba shop, serving up noodle bowls both hot and cold. I had the warm vege oroshi soba, which was a simple steaming bowl of soba noodles with vegetables: daikon radish, watercress, ginger…perfect with a side of spicy kimchi and cabbage with a miso-sesame dressing.

Slurping up a big bowl of noodles screams comfort, and I am on such a soba kick right now. My one qualm with soba noodles is how sticky they get when I make them at home. They are so starchy and end up mushing together. Now I know that I need to rinse them after draining to take off the excess starch.

IMG_0528

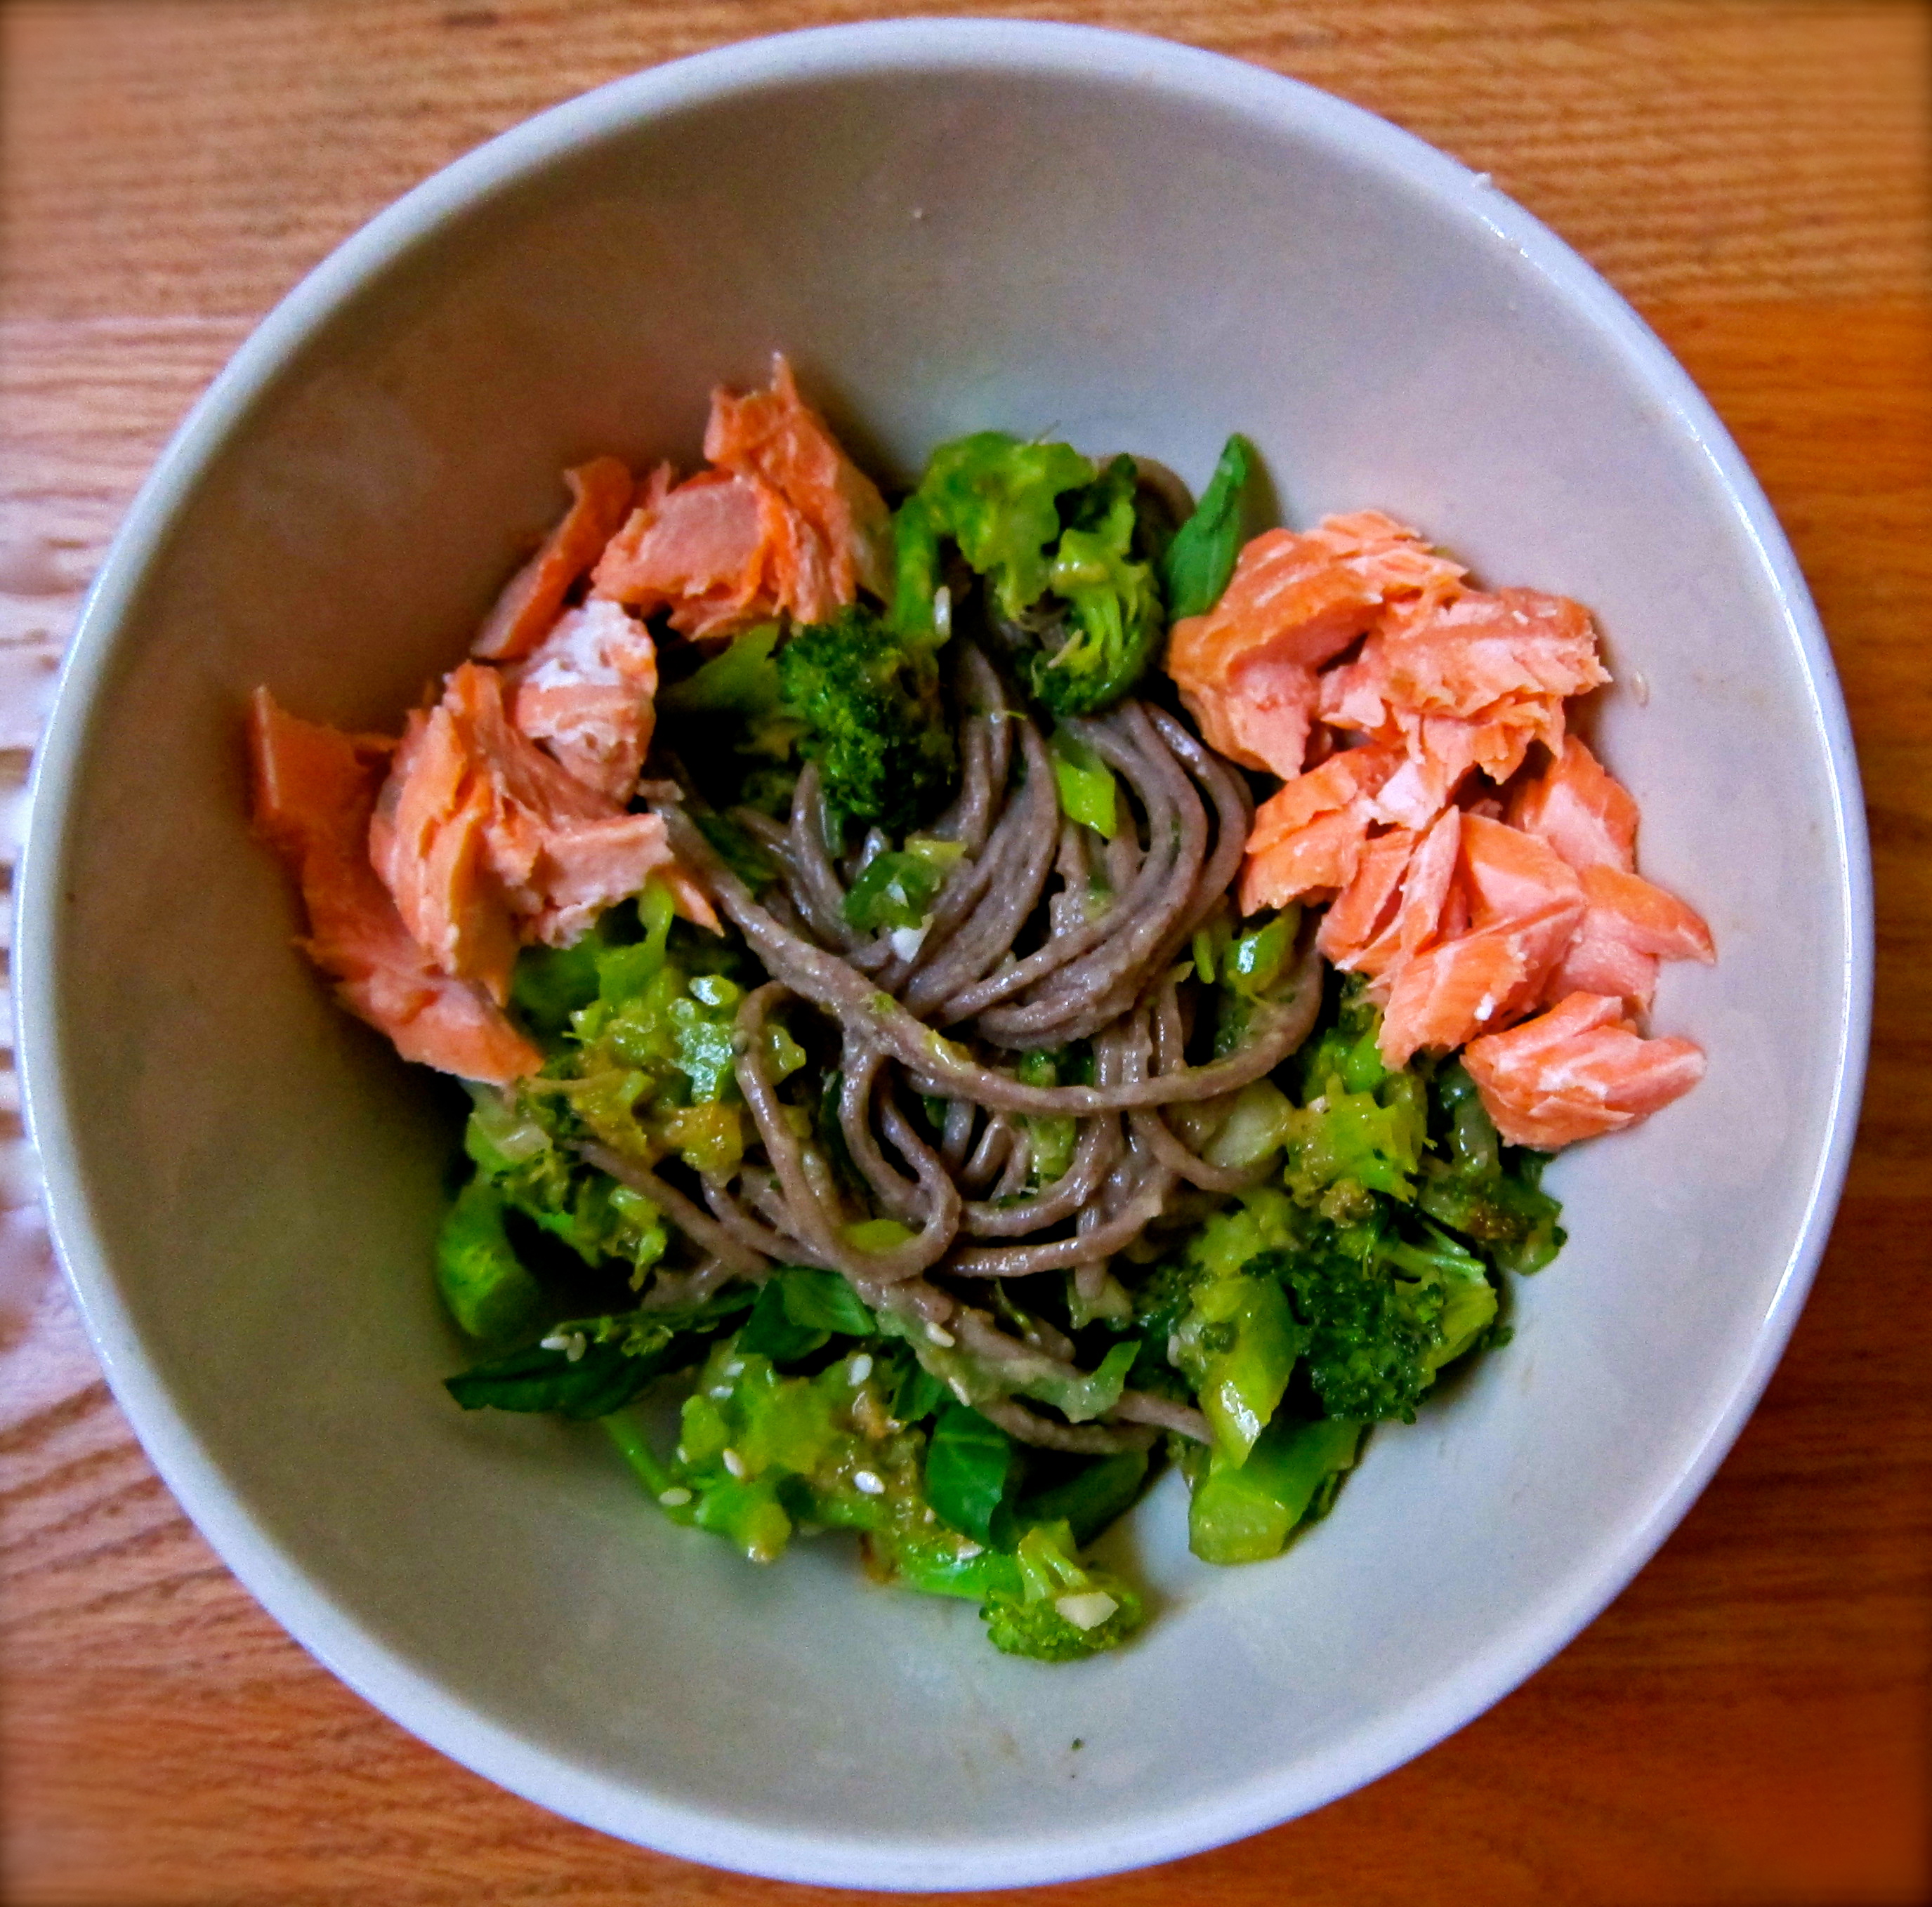
I remember when I first got the Sprouted Kitchen‘s cookbook late last summer, this Soba Bowl with Tea-Poached Salmon caught my eye immediately. It was the first thing I made from the cookbook, and after making it again tonight, I knew I had to share the recipe here.

Tea is a great medium for poaching and making sauces. I know Jackie Newgent is a big fan of using tea in her recipes, and I used it in the Rigatoni Bolognese that I posted about a few weeks back.

IMG_0527

This recipe looks a bit involved, but there are really just 3 parts: roasting broccoli, poaching the salmon, and preparing the sauce. All of this happens simultaneously, so the meal really comes together quite quickly. I think broccoli goes great with this type of dish, but if you prefer to use another seasonal vegetable, maybe asparagus or bok choy or sautéed greens, feel free. If you can’t find soba noodles at your store, you can use spaghetti or rice noodles. And to make the meal vegetarian, simply omit the fish or poach some tofu…

Soba Bowls with Tea-Poached Salmon

adapted from the Sprouted Kitchen Cookbook, serves 4

Sauce:

3 tablespoons toasted sesame oil

2 tablespoons tahini

2 tablespoons agave nectar

grated zest and juice of 1 lime

3 tablespoons tamari or soy sauce

2-inch piece of fresh ginger, peeled and grated

Broccoli:

1 bunch broccoli or other seasonal vegetable

2 teaspoons extra-virgin olive oil

1 clove garlic, minced

pinch of salt

Salmon:

3 bags green tea

1 tablespoon peppercorns

1/2 cup mirin or dry white wine

1 pound wild salmon fillet

Putting it all together:

1 (8-9.5-ounce) pack soba noodles

4 green onions, thinly sliced

1/4 cup white or black sesame seeds

Directions:

Preheat oven to 425 degrees F.

Make the sauce: In a small bowl, whisk together the sesame oil, tahini, agave nectar, lime zest and juice, tamari, and grated ginger until smooth. Set aside.

Roast the broccoli: Cut the broccoli into small florets, including some of the stems. Toss the broccoli with the olive oil, garlic, and salt and spread on a baking sheet. Roast for 15 minutes, then remove from the oven.

Poach the salmon: In a saucepan, bring 1 cup water to a gentle simmer. Turn the heat down to low, add the tea bags and peppercorns and steep for 3 minutes, then discard the tea bags. Add the mirin to the poaching liquid. Gentle slide in the salmon, skin side down. Cover, and cook until the salmon is just barely cooked in the middle, 8-10 minutes, depending on the thickness of the fillet. If in doubt, it is better to undercook the salmon a bit rather than overcook it. Remove the salmon to a plate and flake it with a fork. Set aside.

Putting it all together: Bring a large pot of salted water to a boil. Cook the soba noodles according to package instructions or until al dente. Drain the noodles. In a large bowl, toss together the warm noodles, broccoli, dressing, green onions, and sesame seeds. Divide the noodles among bowls and top with a portion of the salmon. Serve.

IMG_0493

Cornbread Casserole (aka “Tamale Pie”)

14 Apr

IMG_0695

Casseroles. Not too much effort to prepare, and they can yield multiple servings. So great for feeding a crowd, or a smattering for many days.

Kind of like a smoothie (here me out…), a casserole can pack in a lot of healthy (or not so healthy…up to you) foods into a meal. We’ve got carbs (cornbread!), veggies, and protein (beans and/or meat and cheese) all in one. Some of my other favorite casseroles include: lasagna and matzo lasagna.

I fondly remember my college days, living in a co-op house with 60+ students, where this sort of cornbread topped casserole dish was in heavy rotation (along with “lentil loaf,” homemade pizza nights, and giant pasta-bakes…).

This type of meal is a great week night throw-together that I imagine would please a family with young kids or teenagers, too. Perfect on it’s own, or maybe with a light side salad.

IMG_0698

The best part about this type of casserole is that you really do not need a recipe except for maybe the cornbread topping. I just threw in a handful or this and that, with some dashes of “tex-mex” style spices. This was my “kitchen sink” casserole; a great way to use up the odds and ends laying around from the week.

My casserole had a thinnish layer of cornbread on top…but if you really love cornbread, you may want to double the proportions for the recipe below. Or feel free to whip up your favorite cornbread recipe and just plop it on top of the veggie mixture before baking.

IMG_0700

Cornbread Casserole (aka “Tamale Pie”)

loosely adapted from NYTimes

bakes up in a 3-qt casserole dish

Filling:

1 onion, chopped

2-4 different kinds of veggies, chopped (I used zucchini, mushrooms, spinach…)

optional: 2 pre-cooked chicken sausages, chopped (or ground beef/turkey)

about 2 cups of black beans (or pinto, or kidney, or black-eyed peas…)

1 cup of tomato sauce or crushed tomatoes

spices: cumin, chili powder, salt, pepper (no need to measure, just add some dashes to taste)

optional: some chopped chili in adobo sauce (from the can)

Topping:

3/4 cup cornmeal

1 tablespoon flour

1 tablespoon sugar

1 1/2 teaspoons baking powder

pinch of salt

1 egg

1/3 cup milk

1 tablespoon vegetable oil

grated cheese (optional)

Preheat the oven to 425 degrees F.

In a large skillet, heat some oil and add the onion, veggies, and sausage. Cook until the onions start to soften and everything starts turning slightly golden brown. Add the black beans, tomato sauce, and spices. Simmer for 5-10 minutes more. Pour the mixture into a casserole dish.

To make the corn bread: Whisk together the dry ingredients (corn meal/flour/sugar/baking powder/salt) in a bowl. In a separate bowl, whisk together the egg, milk, and vegetable oil. Add the wet to the dry. Loosely cover the veggie mixture with the corn bread topping. The topping may disappear slightly into the veggie mixture but will rise during baking and form a layer of corn bread. Optional: add some grated cheese on top before or mid-way through baking. Bake until the corn bread is brown, 20 to 25 minutes.

French Lentil Soup

7 Apr

IMG_0689

When it comes to legumes, I almost always think of beans, too often forgetting about lentils (shame on me). Lentils are so easy to make and provide a great source of plant-based protein, fiber, iron, and magnesium.

This soup is great for a light lunch or dinner, or even a mid-day snack. After a quick chopping session, everything gets thrown into a pot and simmers for an hour. This provides time for you to get other things done, allowing the soup to be left alone except for a little stir here and there.

Flipping throughAlice’s In the Green KitchenI was reminded of her “green kitchen manifesto:”

green kitchen manifesto

I understand that sometimes these tips are easier said than done, and that location and income are huge factors that affect the desire and ability to keep a green kitchen. Try focusing on 1 or 2 of these components, and see where that takes you…

IMG_0683

I purchased my French lentils in the bulk section of my local health food store. Aren’t they beauties? These girls are hold their shape nicely when cooked, and pack such a comforting flavor.

The soup is great on it’s own with some toast or pita. You can also serve it with fluffy brown rice or quinoa. A few dabs of yogurt or a drizzle of aged balsamic vinegar add some oomph. Or even a poached egg right on top, the yolk dripping right into the broth…

French Lentil Soup

4-6 servings

adapted from Alice Waters’ In the Green Kitchen

1 tablespoons olive oil

2 carrots, peeled and diced (I used 1 carrot and 1 parsnip)

1/2 onion, peeled and diced

2 celery stalks, diced

2 1/2 teaspoons kosher salt

3 garlic cloves, peeled and crushed

1 cup French green lentils, rinsed

7 cups of water or vegetable stock

Fresh ground pepper

Heat a large saucepan or soup pan over medium-high heat and add 1 tablespoon of the olive oil to coat the bottom of the pan. Add the carrots, onion, celery, and 1 teaspoon of salt and cook for about 5 minutes, until the vegetables begin to dry and soften. Reduce the heat to medium-low and cook for 5 minutes more, stirring occasionally, until the carrots are tender and the onion translucent. Add the garlic and cook briefly to release the aroma.

Add the lentils and stir while adding the water/stock and remaining 1 1/2 teaspoons salt. Increase the heat to high, bring to a boil, then reduce the heat to low and simmer for 1 hour, stirring occasionally, until the lentils crush easily and have a creamy texture. Mash some of the lentils in the pan using a whisk or a quick go with the immersion blender to thicken the soup slightly. Season with pepper. Taste and add more salt if needed.

Spatchcocked Flat-Roasted Chicken

5 Apr

IMG_0925

Buying a whole chicken is a great way stretch your dollar, as it is significantly cheaper than buying the chicken parts separately. The other day, I had 2 breasts in my hands 😉 ready to go and ended up switching them out for a whole chicken because it would save me a few bucks. I bought my chicken directly from my farmer’s market vendor, so I felt reassured that the chicken lived a relatively happy life. As Deb from the Smitten Kitchen says in her cookbook, the smaller, cleaner chickens from the greenmarket really do taste incredible, and there is no need to add anything extra.

With a whole chicken at my side, it was time to start SPATCHCOCKING. I only recently heard the term while listening to Tracy talk about it on the Joy the Baker Podcast. Basically, you cut the backbone out of the chicken with your kitchen shears and lay the chicken flat in a roasting pan (check out the Adam’s spatchcocked chicken while you’re at it, and Tracy’s great pictures. Hopefully they won’t gross you out too much). Doing this allows the chicken to cook evenly in a relatively short time, and the breasts won’t overcook before the legs are ready. A great idea for holiday entertaining.

As Deb points out in the head note for this recipe, from the Zuni Cafe Cookbook, she learned to have faith that chicken skin will crisp itself in a high-heat oven, and not to load it with oils and rubs. The only oil in this recipe is used for the potatoes. The chicken skin provides all of the lubrication that the chicken needs.

From Thomas Keller, Deb learned to rain the salt down on the outside of the bird and to trust that it won’t leave the chicken too salty, just perfect. Salt is key. While it gets a bad rep. these days, salt makes a huge difference in flavoring dishes cooked from scratch.

This chicken was simple and juicy. After I few days, I shredded some of the meat and ate it with brown rice, black beans, and sautéed peppers and onions. A nice way to repurpose the leftovers.

I see a lot more spatchcocking in my future…!

IMG_0674

Spatchcocked Flat Roasted Chicken

recipe from the Smitten Kitchen Cookbook

One chicken, about 3 pounds

salt and pepper

Two handfuls of tiny yellow potatoes, washed and sliced in half

2-3 garlic cloves, peeled

2 tablespoons olive oil, for the potatoes

Preheat the oven to 450 degrees. Using a pair of sharp kitchen shears, remove the backbone of the chicken and discard it (or freeze and save it for making stock). Season the cavity generously with salt and freshly ground black pepper. Lay the chicken, breast side up, in a roasting pan (I used my cast-iron skillet), and gently pat the breast skin dry with a paper towel. Generously season the top of the bird with more salt and freshly ground black pepper. Nestle the potatoes and garlic cloves around and under the chicken, and drizzle them lightly with olive oil. Sprinkle the potatoes with salt and pepper.

Roast the chicken for 30-45 minutes, or until a thermometer inserted into the thigh registers 165 degrees. Toss the potatoes after about 20 minutes, so that they cook evenly. When the chicken has finished cooking, let it sit for about 10 minutes. Transfer the potatoes to a serving platter. Remove the legs, thighs, wings, and breasts from the spatchcocked chicken, and arrange them with the potatoes. Enjoy with another vegetable side dish for a balanced meal.

Update 9/25/14: new photo of the spatchcocked chicken baked in a pyrex. Delish!

Processed with VSCOcam with f2 preset

Easy DIY Recipe: Homemade Vegetable Stock

13 Mar

IMG_0845

For the last month or so, I have been saving my vegetable scraps in the freezer with a plan to make my very own VEGETABLE STOCK!!!

All of the carrot tops and parsnip nubs, the onion peels and fennel fronds that I normally would discard/compost are actually quality components of an unctuous stock. Thrown into a pot with a little water and good simmer on the stove, and I had my own preservative-free stock ready in an hour’s time (hands-off time!).

I froze my stock in ice cube trays, noting that 6 cubes is the equivalent of about half a cup of stock. Now I have flavor at my hands, ready-to-go whenever I am in a pinch. I see risotto in my future…

Here’s to getting one more bang for my buck.

IMG_0847

Homemade Vegetable Stock

via vegetarianventures

4-5 cups vegetable scraps (you can use them right from the freezer)

flavoring (bay leaf, Parmesan cheese rinds, herbs, salt, peppercorns…)

garlic (if you don’t already have scraps of garlic in your frozen veggie bag)

Place all ingredients in a large pot and cover with cold water (just enough so all the veggies are covered). Bring water to a boil and let simmer for an hour (don’t let it simmer for much more or it starts to lose flavor.

Strain the vegetable mixture and discard the scraps. Let cool completely and either use right away or freeze/refrigerate in quantities that will suit you best (ice cube trays was a genius idea, I also did some in pint size containers).

Store in fridge for up to 5 days and in freezer for up to 3 months.