Archive | dinner RSS feed for this section

(Vegan) Lasagna with Tofu “Garden Ricotta”

11 Mar

Processed with VSCOcam with f2 preset

Spring is around the corner, it is almost, almost here, but I still feel the slam of the cold on my face and hands every time I walk outside.

This lasagna is a transition from heavy, cheesy winter comforts to lighter, colorful spring fare. By using a tofu “ricotta” instead of actual ricotta, this pasta dish gets a lighter makeover so that we won’t have to undo the top button on our pants after eating.

I used to make tofu “ricotta” back when I was cooking for 60 students in the Berkeley co-ops. Pulse some firm tofu in a blender or food processor, add some aromatics and spices, and it turns from rubbery soy product to magical cheese-like goodness in seconds! I really like the addition of white miso paste to this version.

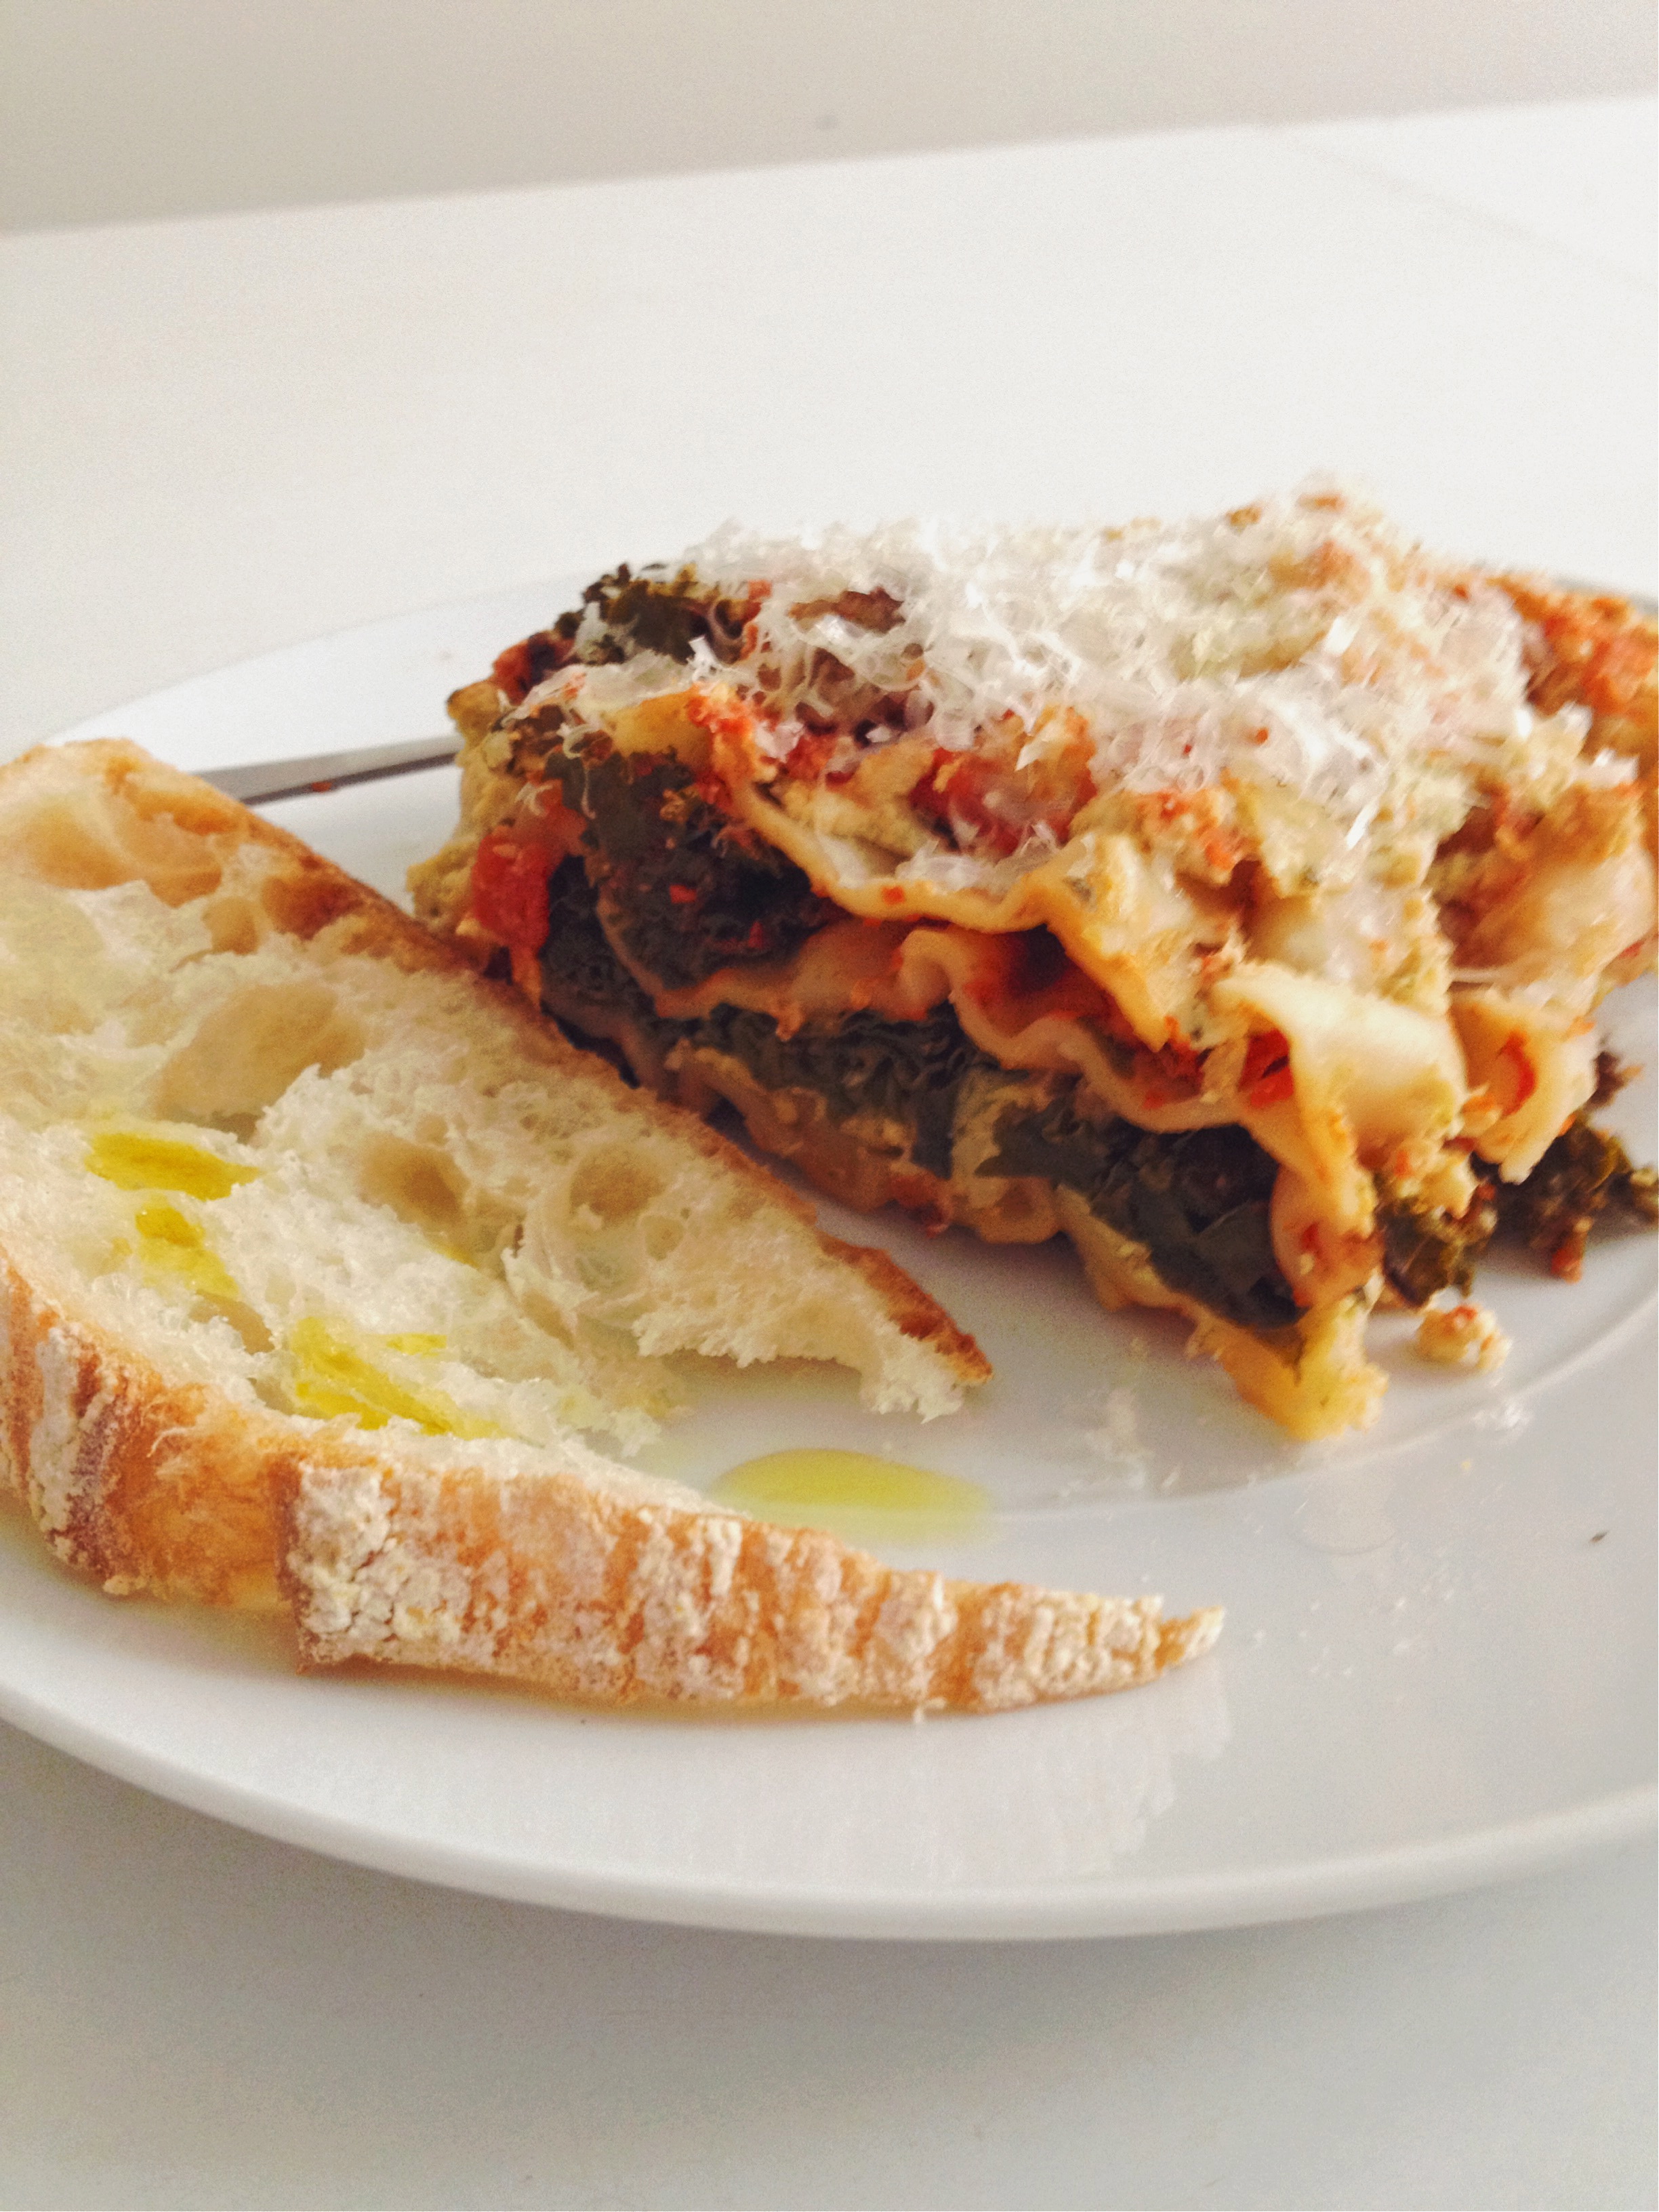
…and because I am flexible, I added a little grated Parmesan cheese to top off my vegan lasagna. Hey, it’s a transition, remember? A little Parmesan offers a nice salty punch without weighing down the pasta, but if you are vegan, just omit.

I also love my carbs, so a little toast with olive oil and salt is a nice crunch contrast to the lasagna.

Now, bring on the warm sunshine!

Processed with VSCOcam with f2 preset

I love lasagna, and I believe there should be a lasagna for every occasion. Check out this summer version with zucchini here. And check out this Passover matzo lasagna here.

Vegan Lasagna

adapted from Chloe’s Kitchen

Serves 6-8

**Make ahead: you can prepare the unbaked lasagna and keep it in the fridge for about 2 days before baking. 

Garden Ricotta

2 tablespoons olive oil

1 onion, chopped

3 cloves garlic

1 14-oz package firm or extra-firm tofu, drained

2 tablespoons lemon juice

1 1/2 teaspoons salt

1 1/2 teaspoons freshly ground black pepper

1 tablespoon white miso paste

3 cups fresh basil

Sauce & Assembly

2 tablespoons olive oil

8 ounces mushrooms, sliced

1 24-oz jar marinara sauce

1/4 milk of your choice *I used cow’s milk, but to keep things truly vegan use soy, almond, or rice milk

1 bunch kale, stemmed and chopped (you can also use spinach or another green)

1/2 pound no-boil lasagna noodles

Preheat the oven to 375 degrees. You will need a 9 x 13 inch-pan.

To make the Garden Ricotta: In a large skillet, heat oil over medium heat and saute onions until soft. Add garlic and cook one more minute. Remove from heat.

In the food processor, combine onions, garlic, tofu, lemon juice, salt, pepper, and miso paste. Pulse until the mixture is almost smooth but still has some texture. Add basil and pulse a few more times to incorporate it.

To make the sauce: Heat oil over medium-high heat in a large skillet (just use the same skillet you used to saute the onions). Add the mushrooms and cook until soft. Add marinara and milk. The milk should soften the acidity of the tomatoes (you can also add a tablespoon of brown sugar or maple syrup here, but I just omitted it).

To assemble and bake the lasagna: Spread a thin layer of sauce on the bottom of the prepared pan. Arrange 4 lasagna noodles across the pan. Spread half of the Garden Ricotta over the noodles. Layer half of the kale over the Garden Ricotta. Arrange 4 more noodles on top. Spread another layer of sauce over the noodles, then arrange 4 more noodles on top. Top with another layer of sauce, the remaining Garden Ricotta, and the remaining kale.

Cover the pan with foil and bake for 45 minutes, or until the noodles are cooked and the sauce is hot and bubbling. Remove from the oven and let it rest for 5 minutes before serving.

Optional: If you are not vegan, I enjoyed the lasagna with a little grated Parmesan on top before serving.

Ellie Krieger’s Korean Beef and Broccoli Stir-Fry

19 Feb

Processed with VSCOcam with c1 preset

Here’s a hot, spicy stir-fry to get you through the week. Korean Beef and Broccoli Stir-Fry. Three stand-out ingredients make this recipe great: lots of broccoli, lean sirloin and crunchy, spicy kimchi.

Broccoli is such a good vehicle for soaking up all the juicy sauces and spices of a stir-fry. The broccoli gets steamed in the microwave to keep the recipe fast and healthy.

I put my money on the table for a nice cut of sirloin from the farmer’s market. I got it from Sawkill Farm in Red Hook–totally worth the few extra dollars for this beautiful piece of meat. If you are trying to keep things lean, sirloin is the way to go. Generally, if the name of the cut has the word “loin” or “round” in it, it is a lean cut.

Every time I eat kimchi at a restaurant, I love it, so why haven’t I thought to use it home?! You can buy kimchi at most markets now, and I definitely want to try making it myself one day.

Note that the recipe calls for low-sodium beef broth. I’m not usually a fan of beef broth because I don’t like how most of them taste. Instead, I used water with a dash of soy sauce. I’m just giving you options if you are like me and get fussy for good beef broth.

This stir-fry hit the spot for me this week. Serve it over rice, and you’ve got healthy restaurant-style food in the comfort of your own home.

Processed with VSCOcam with c1 preset

I am obsessed with Ellie Krieger’s latest cookbook, Weeknight Wonders. It is definitely helping me get out of my rut in the kitchen. So far I made her pork tenderloin with fennel and grapes, warm bulgur salad with feta and grapes, simple meatballs marinara with spaghetti, a variation of her tuna and white bean salad, and her earl grey spiced fruit compote. I am excited to try more of her 30-minute recipes.

Ellie Krieger’s Korean Beef and Broccoli Stir-Fry

from Weeknight Wonders

makes 4 servings

1 head of broccoli

1 pound beef sirloin, trimmed of all visible fat (I used slightly less, a 0.7 pound cut)

2 tablespoons canola or olive oil, divided

1 onion

3 cloves garlic

1 1/4 cups store-bought kimchi (10 ounces)

1 cup low sodium beef broth (I used 1 cup water + 1 tablespoon soy sauce)

1 tablespoon + 1 teaspoon cornstarch

1 teaspoon chili-garlic sauce

Cut the large stems off the broccoli, peel them, then slice them into 18-inch-thick coins. Cut the top into florets about 2 inches in diameter. Place the broccoli, with the water still clinging to it from washing it, in a microwave-safe dish. Cover tightly and microwave on high power until just crisp-tender, about 4 minutes. (Alternatively, you can steam the broccoli in a pot on the stove for 4 minutes).

Thinly slice the beef against the grain into 1/4-inch-thick strips. Heat 1 tablespoon oil in a very large skillet or wok over medium-high heat. Add the beef and brown until just cooked through and slightly browned, about 2 minutes per side. (I like to use tongs here). Transfer to a plate.

Meanwhile, thinly slice the onion and garlic and roughly chop the kimchi. After transferring the beef to the plate, add the remaining 1 tablespoon oil to the skillet, then add the onions and cook until softened, about 6 minutes. Add the garlic and cook for 1 additional minute.

While the onions are cooking, add whisk together the broth (or water + soy sauce if using), cornstarch, and chili-garlic sauce until the cornstarch is dissolved.

Add the broth mixture to the pan, turn the heat to high, and cook, stirring, until the liquid begins to thicken, 2 to 3 minutes. Stir in the beef with any accumulated juices, broccoli, and kimchi and cook until just warmed through, 2 minutes more.

Serving size: 1 1/2 cups

Calories: 330; Total Fat 13g (Sat Fat 2.5g, Mono Fat 6.5g, Poly Fat 2.3g); Protein 33g; Carb 21g; Fiber 6g; Cholesterol 50mg; Sodium 660mg

Butternut Squash Bake + Kale Chips

11 Feb

Processed with VSCOcam with f2 preset

Last night, I had a spontaneous dinner with my new housemate and his girlfriend. We were cooking two separate dinners, and just decided to combine them and dine altogether at our little table.

I contributed this butternut squash bake and some kale chips and nice salami, and they contributed a hearty spinach salad, some cheese and bread, and cheap “wine” from our nearby corner store. They are from France and Switzerland, and had never eaten butternut squash or kale chips before, so it was fun to introduce them to some of my favorite vegetables.

I love that we don’t have wine glasses and that our cutlery and plates don’t all match. I’m all about not matching.

I’ll admit that most nights, I cook dinner and watch a television show while I eat. It was a nice change to sit at a table and schmooze with the people I share an apartment with.

Processed with VSCOcam with f2 preset

This is the kind of recipe where all I want to do is pick off the crispy cheesy topping. I was dining with company, though, so I had to restrain myself!

This squash bake was super simple, and you could use any variety of winter squash. The natural sweetness of the butternut squash and onion with a light cheesy mix keeps the dish healthy but still full of decadent flavors. You will need to reserve about an hour of time to complete the recipe, but most of it is hands-off as the squash bakes. I also made this earlier in the day and just reheated it when time came to eat dinner, so it is a good make-ahead.

Serve the squash bake with some sautéed greens or kale chips for a nice color contrast!

Butternut Squash Bake

adapted from Jackie Newgent’s 1,000 Low Calorie Recipes

makes 4-6 servings

1 medium butternut squash, peeled, seeded, and cut into 1/2-inch cubes (I had a very large squash so I had to use a bigger baking dish)

1 onion, cut in half and thinly sliced

1 tablespoon extra-virgin olive oil

2/3 cup milk (I used 1% lowfat milk, you can also use soy or almond milk)

2 teaspoons cornstarch (or arrowroot)

1 large egg

1/2 teaspoon salt

1/4 teaspoon fresh ground pepper

pinch of cayenne or old bay

1/3 cup grated fontina or white cheddar

1/3 cup breadcrumbs (I made my own with some old sourdough; bake in the oven until toasted and blend to fine crumbs)

1/3 cup grated Parmesan cheese or Asiago

Preheat the oven to 425 degrees F.

Combine the cut squash and onion in a baking dish (Newgent recommends a 2-qt dish, but I used a 3-qt pyrex because I ended up with a lot of squash). Drizzle and toss with the olive oil. Bake for about 25-30 minutes, until the squash is tender all the way through.

Meanwhile, whisk together the milk and cornstarch. Whisk in the egg, salt, pepper, and spice. Set aside.

Stir the squash-onion mixture. Sprinkle with the fontina/cheddar cheese and evenly pour in the milk mixture. Sprinkle the top with the breadcrumbs, Parmesan/Asiago cheese, and an extra pinch of cayenne/old bay. Roast until the squash is tender the cheese coating is crisp and golden brown, about 20 minutes.

Let stand for 10 minutes to complete the cooking process, and serve.

Approximate nutrition facts per 1 cup serving: 240 calories, 12g total fat, 4.5g saturated fat, 0g trans fat, 65mg cholesterol, 530mg sodium, 27g total carbohydrate, 6g dietary fiber, 8g sugars, 9g protein

Kale Chips

1 bunch of kale, stemmed and torn into pieces (or enough to fit a baking sheet)

1-2 tsp. olive oil

salt

Preheat the oven to 350 degrees F.

Lay the kale on a baking sheet. Drizzle with olive oil and sprinkle with salt. Bake for about 10-15 minutes, until it is crisped but still greenish. Be careful not to overdo it or you will get burnt pieces.

“Creamy” Chicken Barley Soup

17 Jan

IMG_1058

You know that area right underneath your nostrils? Mine is red and dry because I have been blowing my nose for almost a week now. Yuck. Colds are the worst. I still have energy to go about my usual business, but I’m just a snotty, gross mess.

Alas, chicken soup.

Processed with VSCOcam with f2 preset

Funny enough, a few days into the snotty sickness that has been permeating my apartment, I received an email from my boyfriend’s mom with a recipe for a fantastic chicken barley soup. Must have been mother’s intuition that we needed comfort.

This “Creamy” Chicken Barley Soup is heartier than the typical clear-broth chicken soup. Blending some of the broth with cooked potato, onion, celery, and garlic lends a creamy texture without any cream. If your favorite kitchen tool is an immersion blender, raise your hand! Makes life so easy.

Adding a little barley to the soup offers a nice contrast, a bite of texture. Barley is a great source of whole grain, it is rich in fiber and protein, and it turns the soup into its own meal.

I used a homemade turkey stock for this soup. It is so easy to freeze a bunch of leftover odds and ends of vegetables and prepare a quick stock. After I made a vegetable stock, I strained it, and then added it back to a pot with the neck and giblets I had in the freezer from my Thanksgiving turkey. There’s some good dark meat on the neck of a turkey, so don’t throw the neck away! Prepare your stock the day before if you want to get ahead.

So I had turkey stock in my chicken soup. No big deal. If you are short on time, you could just use water instead of stock, and add salt. Or buy stock. Either way.

Note that you could buy pre-cooked chicken, but I found it very easy to just toss two breasts (save the bones for stock if you want!) in the oven while I was preparing the rest of my ingredients.

“Creamy” Chicken Barley Soup

Recipe from Lucy, by way of Jackie

This makes a LOT of soup, about 10 servings (you could freeze extras, bring some to a friend, or halve the recipe)

2 T butter or oil
2 onions, chopped
6-7 celery sticks, chopped
2 cloves garlic, minced
1 1/2 C russet potatoes, diced
2 large carrots, diced
1/2 C pearl barley
8 -9 C stock (I made my vegetable stock, strained it, and added the neck and giblets that were in my freezer from Thanksgiving and simmered for ~1hour)
2 bay leaves
1/2 C white wine
2 bone-in chicken breasts (or slightly less than 2lbs), pre-cooked and shredded (see below for how to cook)
salt and pepper to taste

First, cook your chicken breasts. Preheat the oven to 350 degrees F. Place the chicken breasts skin side up on a parchment-lined sheet pan. Rub with olive oil, sprinkle with salt and pepper, and roast for 35 to 40 minutes, until done (165 degrees F). When the chicken is cool enough to handle, discard the skin and bones (save the bones in your freezer for stock), and shred the meat. Cover and set aside.

Meanwhile, in a large stockpot melt butter (or oil) and saute onions, celery, garlic until soft.

Next, add potatoes, 6 – 7 C chicken stock, and thyme. Cook until potatoes are soft (15- 30 min), then use an immersion blender or transfer 3/4 of the mixture to a blender and blend until smooth.

Return this mixture to the pot, add the carrots, barley and bay leaves.  Cook partially covered for 30 minutes. Add more stock for a soupier soup. When barley is tender, add wine and chicken, salt and pepper to taste. Cook for a few more minutes to warm up the chicken.

Mushroom Pepperoni and Mozz. Pizza with Mike’s Hot Honey

20 Dec

Processed with VSCOcam with f2 preset

Me, hovering over the stovetop to snap a picture before I dive into the pizza

There’s a bottle of Mike’s Hot Honey sitting on my desk. Honey spiked with vinegar and chiles.

This spicy honey begs to swirled on cheesy pizza and if there’s bits of oven-toasted cured meat, even better. (For more food pairings, look here).

Processed with VSCOcam with f2 preset

I made a quick, no-knead dough with a mix of bread flour and whole wheat flour. Olive oil and a dash of cornmeal go onto the baking sheet before the dough to get a nice crust with color and texture.

The dough recipe makes enough for two pizza pies.

Sauce, fresh mozz, mushrooms, pepperoni, Parmesan, fresh oregano. Top with lots of honey. Enjoy with a big salad (whoops, not pictured, but this meal definitely calls for a big salad).

I had extra toppings leftover, so I just toasted some regular, whole wheat bread, spread it with the toppings, and popped it in the oven for 10 minutes. Another easy option if you don’t want to make the dough recipe.

IMG_1728

Mushroom Pepperoni and Mozz Pizza with Mike’s Hot Honey

For the dough recipe, I used Joy’s version, which was based on Tracy’s version, which was originally from Jim Lahey’s book (it makes enough for 2 pizzas. You can freeze one or save it for the next day). I found the dough to be very shaggy. It ended up working, though, so just let it do it’s thing. I had to knead it one or two times to get it how I wanted.

**NOTE: This dough recipe needs about 2.5 hours to do it’s thing before it can go in the oven. Give yourself enough time if you are making your own dough.

Toppings (for 1 pizza): 

3/4 cup sauce

3-4 oz ball of fresh mozzarella, sliced

4 oz mushrooms, sliced

1/8 pound thin sliced pepperoni, cut into wedges or strips (I found pepperoni at the Whole Foods Deli, from Chestnut Valley Charcuterie)

1/2 cup Parmesan, shredded or grated

Toppings after the oven: fresh oregano, red pepper flakes, spicy honey

Directions: 

Preheat oven to 450-500 degrees F.

Oil a 13×18-inch rimmed baking sheet with olive oil, and sprinkle cornmeal over the oil. Place the 1 of the 2 dough balls on the pan and stretch and press the dough out into a flat rectangle.  If the dough springs bag as you’re pressing it out, simply wait five minutes to allow the dough to rest and then try again.  The dough should be very thin. If the dough tears, don’t worry, just press it back together.

Top the dough with sauce, cheeses, mushrooms, and pepperoni.

Bake for 15 to 20 minutes until the edges are charred and bubbling.  Remove from the oven.  Allow to cool for a few moments then slice and top with fresh oregano, red pepper flakes, and spicy honey.  Serve immediately, with a big salad.