Archive | breakfast RSS feed for this section

How to Poach an Egg

20 Nov


“When food is poached, it cooks delicately over the gentlest heat; not a bubble breaks the surface of the liquid in the pan”

–Alice Waters, The Art of Simple Food

The first time I ever ate a poached egg was two years ago at Café Fanny, one of my favorite breakfast spots in Berkeley.

In lieu of attempting to emulate Café Fanny’s picture perfect poached eggs, I purchased an egg poacher. I found, however, that simply pouring an egg into a low-sided sauté pan works best.

Now be warned. The whole egg poaching thing takes a bit of practice to master. I am still in the process of tweaking and refining my technique.

Ok here we go.

Poached Eggs a la Alice Waters and Julia Child
[Oeufs pochés]

Ingredients:
Egg (or eggs)
Water
Vinegar
Salt and Pepper

Step one. Crack an egg into an individual cup or bowl. Be careful not to break the yolk.


Step two. Fill a pan with water about 2 to 3 inches deep; add a large splash of vinegar. Let it come to just below a simmer: very hot, but without any bubbles breaking the surface (as you can see some of my bubbles broke the surface—c’est la vie).


Step three. Hold the cup right at the level of the water and carefully slide the egg in. This gentle entry into the water will help the egg keep its shape. Immediately and gently push the white over the yolk with a wooden spoon for 2-3 seconds (I omitted this part…just decided to have my yolk exposed this time around). After a minute you can gently stir the water to discourage the egg from sticking to the bottom of the pan. Lower the heat if the water starts to simmer.


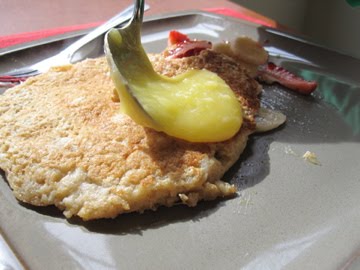
Step four: The egg will take about 3-5 minutes to cook, depending on your egg. The white will be set but the yolk still soft. Test for doneness by gently lifting the egg with a slotted spoon and pressing it gently with your finger to feel how set the white and the yolk are.

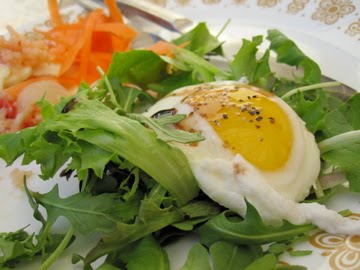
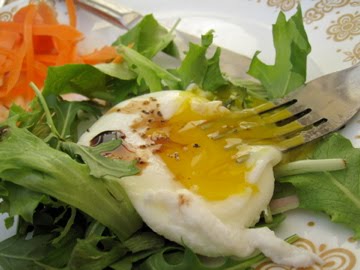
Step five: Carefully remove the cooked egg with a slotted spoon. Sprinkle with salt and pepper.

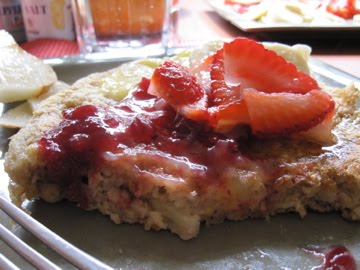
*I chose to drizzle with balsamic vinegar and place my egg over a nice green salad for a quaint lunch. A delicately poached egg atop a hearty slice of lightly buttered toast is also a favorite of mine! Yum!

**You can poach a few eggs at a time. The same recipe applies. When cooking for a crowd, freshly poached eggs can be kept for a few minutes in a bowl of cool water while another batch is being cooked.

Browned Butter Banana Nut Muffins

1 Nov

Browned Butter. You are my hero. You are the apple of my eye, the sunshine in my sky, the secret to my magic!

Yes, magic, I create magic. Magic in the kitchen. Seriously. You know when you walk into a café or a bakery and see a gorgeous display of pastries and you think, “Wow, whoever makes these is a genius, literally a holy person?” Well, that person is now officially me.


Every week I look forward to waking up at 6 am (on Friday and Saturday mornings, mind you) to spend my day amongst my good friends Butter, Flour, and Sugar to create pastries and desserts just for you! The smile on your face when you ask for a nibble of that cookie or a taste of that little donut hole, glazed and sprinkled, just makes my day! Really, you should see yourself—when you take that first bite your eyes light up like you were a kid again! It’s great. Really, really great.


Anyway, back to browned butter. And muffins. And Sunday morning breakfast. And sunshine, on November 1st!


I made these muffins a few months ago with fresh summer blueberries and boy oh boy were they addicting! I ate 3 in just one day! Muffin overdose (but totally worth it, mmm).

This morning I needed to make muffins. It was just one of those days—a muffin day. Since fresh blueberries were not around today, I decided to use chopped bananas and toasted walnuts instead.

So now after making both a blueberry and banana nut version, tons of add-in ideas are flying around inside my head, etching to get out:

  • Lemon rosemary muffins (inspired by a lemon rosemary pound cake; any herb/flavor of choice will do…lavender, lemon verbena, fresh ginger, basil?)
  • Fresh and dried cranberry combo (Dried cherries sound yummers, too! Maybe some slivered almonds and white chocolate chips?)
  • Persimmon pulp muffins
  • Roasty butternut squash muffins
  • Chunks of avocado…and…raspberry? (I don’t even know if this would really work but it sounds so good in my head…)

Ok Stephanie, enough. Focus. Browned Butter. Bananas. Toasted Walnuts. Fresh vanilla beans. Crumb topping. Enough said. Go make these muffins.


Browned Butter Banana Nut Muffins (Infinitely adaptable)

Makes 12 muffins

Ingredients:
7 Tablespoons unsalted butter

1/3 cup milk (I used 2 % this time)

1 large egg

1 large egg yolk

1 teaspoon vanilla extract (I used the seeds of half a vanilla bean…I love those bean flecks!)

1 1/2 cups all-purpose flour

3/4 cup sugar

1 1/2 teaspoons baking powder

3/4 teaspoon salt

2 cups chopped bananas (I used 3 large bananas)

about a cup of toasted walnuts

For the Topping:
3 Tablespoons cold, unsalted butter, cut into little cubes

1/2 cup all-purpose flour

3 1/2 tablespoons sugar

Directions:
1. Preheat oven to 375° F. Grease a muffin tin or line it with paper or foil liners.

2. Melt butter in a small saucepan over medium heat. Keep an eye on the butter. Melt and cook down the butter until little brown bits appear in the pan. Once the butter stops crackling or “singing,” it will begin to brown fairly quickly. Keep a close eye. Remove from heat.

3. Toast the walnuts.

4. Whisk milk, egg, yolk, and vanilla bean seeds until combined. Slowly add the brown butter and stir to combine (careful not to cook the eggs).

5. Whisk together flour, sugar, baking powder, and salt in a medium bowl. Add milk and butter mixture all at one and stir gently to combine.

6. Gently but thoroughly fold in the bananas and walnuts and the batter among muffin cups and spread evenly. (You can use an ice cream scoop to plop the batter in the muffin cups!)

7. To make the topping: combine all of the ingredients in a bowl and rub together with your fingertips until crumbly. Sprinkle evenly over the batter in the cups.

8. Bake until golden and crisp and a wooden pick inserted into the center of a muffin comes out clean, about 20 minutes.


Oh yah, and here is a picture of browned butter. It is a really ugly picture but trust me, this stuff is GOLDEN! Those little brown bits are where all the flavor is at!

Homemade English Muffins

23 Oct


I did it! I made English muffins from scratch!

They were even poofy and had the little holes in the center, just like the store-bought kind—but better of course! I think that I exclaimed, “Oh! These are soooo cute!” at least 10 times while I was making them.


Growing up, my mom used to toast me an English muffin spread with butter before school. Oh memories…

What’s not to love about puffy, light, and fluffy English muffins?! Split in half, perfectly toasted, and spread with the topping of your choice (butter, jam, cheese, honey, peanut butter, lemon curd…), these griddle-cooked buns are just a dream!


One of the many perks of living in a house with sixty people is that we have access to a huge industrial kitchen complete with two ovens, six stovetop burners, and a large griddle. When I was ready to cook these little guys I just plopped them onto the hot griddle and bam! Done in just minutes!


Simple, on-hand ingredients and no kneading necessary! What more could I ask for?!

Check out the foamy yeast, water, sugar mixture! It’s aliiiivvvvvveeee!


And here is the dough after the 40 minute rise!

Very sticky!

I made two versions of these English muffins—in one I used nonfat milk and the other batch I made vegan and used soymilk (both tasted great, I could barely tell the difference). If you want to get fancy you could mix in cinnamon and raisins, or maybe you are feeling festive and want to toss is some pumpkin puree!

As a nice finishing touch, you could dust the muffins with some cornmeal for added texture!

English Muffins
Adapted from BakingBites

Makes 10-12 muffins

1/3 cup water, warm (110F)
1 tbsp sugar
2 1/2 tsp active dry yeast
1 cup nonfat milk (or soymilk), slightly warm (100-110F)
3/4 tsp salt
2 cups all purpose flour

  • In a large bowl, whisk together water, sugar and yeast and let mixture stand for 10 minutes, until slightly foamy (my mixture got super foamy; it was totally awesome!).
  • Using a wooden spoon, stir in remaining ingredients and mix until smooth (At this point, if you want, you can add in whatever mix-ins your heart desires–raisins, pumpkin puree, chocolate chips…).
  • Cover with plastic wrap and set aside for 40 minutes.
  • Heat a griddle/nonstick frying pan over medium/medium-high heat (water dropped on the griddle evaporates very quickly). Lightly grease with cooking spray.
  • Drop dough by scant 1/4 cupfuls onto greased surface and cook until medium brown on the bottom. The top with look set and the sides will appear somewhat dry. The exact time depends on the temperature of your griddle and the size of your muffins, but expect this to take several minutes. Flip over and cook 2nd side until brown.
  • Cool on wire rack for at least 15 minutes or until completely cool.
  • When ready to serve, split muffins with a fork and toast. Serve with butter, jam, or any topping of your choice.

Luscious Lemon Curd

22 Oct

Lemon curd is my new favorite breakfast/dessert condiment.

A fruit curd is similar to a fruit custard, except it is made without milk or cream. Lemon curd is a classic spread for toast, muffins, scones or pancakes. I like to spoon it over plain yogurt, too.

For a more dessert-like treat, pour homemade curd into a tart or pie shell and bake it in the oven until set. Curd can also be used as a filling for cookies, cakes or pastries, or swirl it into freshly churned ice cream or whipped cream!


I can eat it this stuff by the spoonful. It is just *~so.darn.good.~* I love the sweet and sour combination of lemons and sugar mixed with the creaminess of good ol’ butter.


I wanted to make lemon curd since the beginning of summer, and finally got around to it last Friday. It was so easy and delicious that I made it again on Sunday.

The process is like a science experiment. Sugar, lemon zest, eggs, and lemon juice get heated in a bowl over a pot of simmering water. The eggs cook slowly, thickening the mixture into a custard. Once thick, the custard gets strained through a fine sieve. Add a little butter for extra silky smoothness.

To go with the curd, my friends and I made pancakes. Really hearty and oaty ‘cakes, and topped with a triple threat of spreads—maple syrup (duh!), lingonberry jam (similar to a cranberry), and homemade lemon curd!!!!!! With walnuts and bananas mixed into the batter…YUM-O!


Four great friends and a lovely Sunday morning noon breakfast. Kelly made the pancakes. Sara cut up the fruit and made the mimosas. I threw together some lemon curd. Sara’s brother Sam got to eat with us in exchange for helping Sara with her physics homework and fixing the toilet 🙂

Sunday breakfast. Let’s do it again. And again. And again.

Luscious Lemon Curd

Adapted from Kiri, head pastry chef at Pizzaiolo Restaurant

This recipe is almost too easy! I memorized it immediately after the first time I made it! You do not have to be super exact with all of the measuring. Just go with the flow.

Makes about 1 ½ to 2 cups

Ingredients

½ cup sugar
lemon zest
2 eggs
¼ cup of fresh lemon juice (about 2-4 lemons)

4 Tablespoons of butter
Directions:

1. Place the sugar and the lemon zest in a heatproof metal bowl (the zest will infuse the sugar with lemony goodness!).

2. Crack your eggs in a separate bowl.

3. Measure out the lemon juice and set aside.

4. Place your bowl of sugar over a small pot of simmering water. Add the eggs and the lemon juice.

5. Whisk the mixture over the simmering water until it thickens, about 10-12 minutes.

6. When thickened, take the bowl away from the heat and add the butter, stirring until melted.

7. Strain your lemon curd through a fine mesh strainer (or chinois if you’re fancy).

8. Let it cool slightly and enjoy!

Store leftovers in the refrigerator.

Presenting…Crumb-tastic, Make Me Weak in the Knees, Bursting with Glory BLUEBERRY MUFFINS!

3 Aug

Oh Berkeley…how I love thee…

I am currently sitting at an outdoor café next to a woman who is feeding her large colorful bird while simultaneously typing on her laptop and drinking coffee…

Last week I received an anonymous love note from the man at the carwash. He called me “princess!”…

Yesterday I was reading Julia Child’s My Life in France when a man approached me and proceeded to tell me about how he is not only the “KING of the Macarena dance” but that he is also a self proclaimed “vegequarian” (equivalent of a pescetarian—one who mainly eats vegetarian but also eats fish and other fishy products)…

I attempted to go to the Berkeley Kite Festival last weekend but turned around once I saw that I had to pay 10 dollars to park to see a bunch of kites flying in the sky…

More importantly…


I baked these blueberry muffins yesterday and have already eaten 4 of them in the past 20 hours! I had to have one fresh out of the oven. Then I ate another one a few hours later for dessert. This morning I had one for breakfast, but I couldn’t eat just one, so then I ate another one right after!


By golly, these precious treats are the best blueberry muffins I have ever tasted! Hands down.

Now friends, this is really a surprise to me because I am the queen of making disappointing blueberry muffins. They usually come out too chewy and grainy…too small…too ugly…not enough blueberry…bleh

These muffins, however, are just golden! They are PACKED with fresh bursting blueberries!


The tops are puffed to perfection and overflowing with crumb topping goodness!


I think I spent a good 30 minutes just scraping the leftover bits from the muffin tin and eating them! The browned butter in these muffins really kicks it up a notch, too!

Browned Butter Fresh Blueberry Muffins
adapted from JoytheBaker
makes 12 muffins
Ingredients:
7 Tablespoons unsalted butter

1/3 cup milk (I used nonfat)

1 large egg

1 large egg yolk

1 teaspoon vanilla extract

1 1/2 cups all-purpose flour

3/4 cup sugar

1 1/2 teaspoons baking powder

3/4 teaspoon salt

2 cups fresh blueberries (I ended up only using 1 ½ cups because I ate the other ½ cup in the process!! Oops!)

For the Topping:
3 Tablespoons cold, unsalted butter, cut into little cubes

1/2 cup all-purpose flour

3 1/2 tablespoons sugar

Directions:
1. Preheat oven to 375° F. Grease a muffin tin or line it with paper or foil liners.

2. Melt butter in a small saucepan over medium heat. Keep an eye on the butter. Melt and cook down the butter until little brown bits appear in the pan. The crackling will subside and butter will begin to brown fairly quickly after that. Keep a close eye. Remove from heat.

3. Whisk milk, egg, yolk, and vanilla until combined. Slowly add the brown butter and stir to combine (careful not to cook the eggs).

4. Whisk together flour, sugar, baking powder, and salt in a medium bowl. Add milk and butter mixture all at one and stir gently to combine.

5. Gently but thoroughly fold in the blueberries and divide the batter among muffin cups and spread evenly (I used an ice cream scoop to plop the batter in the muffin cups!).

6. To make the topping: combine all of the ingredients in a bowl and rub together with your fingertips until crumbly. Sprinkle evenly over the batter in the cups.

7. Bake until golden and crisp and a wooden pick inserted into the center of a muffin comes out clean, about 18-20 minutes.

8. Mmm mmm good!