So…I got married in October 2017 (!). It was a blast, and one of the highlights from the wedding was making all of the desserts. I wanted to document what I did so that I can look back and remember my method. And maybe this will inspire/help some of you out there who are interested in baking for a big party.
It was actually quite doable and fun. Using the FREEZER and prepping over a week before the big event was a huge help. Also helpful was having an excel doc or google sheets doc to organize the planning and do some math conversions.
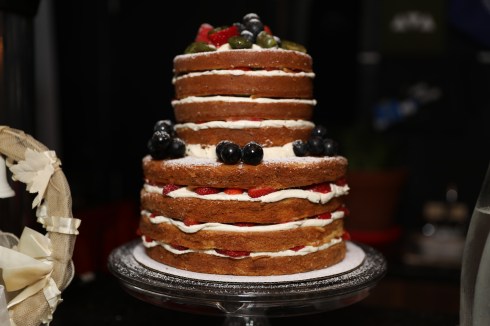
I tried to keep the desserts simple – no fondant or excessive frosting or design. I also tried to keep with traditions and did a tiered cake for a fancy look, and I had the same cake in sheet pan form to make it easier to serve the masses. My favorite types of desserts are classic, simple, and homemade looking. So I went for the naked cake look (frosting between cake layers only) for the main cake.
Here’s what I made (guest count was ~70-ish people):
- A 2-tiered (a 6-inch tier and a 9-inch tier), 4-layer each Yellow Cake with Swiss Meringue Buttercream and Fresh Fruit (yellow cake recipe from the Joy the Baker Homemade Decadence Cookbook and Swiss Meringue Buttercream from Martha Stewart)
- Notes:
- There was quite a bit of math involved here. First, I did a lot of research. I found this post from the Smitten Kitchen very helpful. Scroll all the way to the bottom where she talks about “How to Scale Up Cake Sizes, For Weddings and Beyond.”
- This article from Food52 was also helpful.
- I froze the cake tiers and transferred them to the fridge the day before. It is easier to frost cakes when the layers are very cold.
- I made a double batch of the buttercream for both my cake tiers and the sheet cake. And yep, you can freezer buttercream. Just defrost at least 1 full day before, then bring to room temp and gently re-whip in the mixer to return to baseline consistency.
- For frosting technique, I watched a lot of youtube videos. This one in particular had great technique for frosting and layering the tiers. But ultimately I went very simple and did a layer of buttcream and spread with an offset spatula, then added some sliced strawberries and placed a cake layer on top so the frosting would peek out the sides.
- For layering the cake tiers, I used straws. See the youtube video link above.
- Notes:
- A single layer 12×18 inch Yellow Sheet Cake with the same Swish Meringue buttercream and fruit piled in the center
- Because this was such a large cake and my freezer was full, I baked this cake the day before the wedding.
- My Grandma Renée’s Poppyseed Bundt Cake x 2 (recipe is actually from the can of Solo poppyseed filling)
- I made these 1 week before the wedding and froze.
- I defrosted the cakes on the Wednesday before (3 days before). My grandma insists that this cake always tastes better when it is a few days old.
- 3 types of cookies, double batch of each recipe. I portioned the first 2 cookie recipes using a #70 scooop (1/2 oz portion) and I used a fluted round decorative cutter in the smallest size for the lavender shortbread.
- Vegan Salted Chocolate Chip Cookies (Ovenly’s recipe)
- Chewy Molasses Cookies (Bon Appetit’s recipe)
- Lavender Shortbread Cookies (KitchenAid’s recipe)
- Notes: the first 2 cookie recipes were made and portioned into balls ~2 weeks before the wedding and baked off right from the freezer 2 days before the wedding. The lavender shortbread dough was made and portioned into disks ~2 weeks before then defrosted in the fridge 3 days before and rolled/cut/baked 2 days before the wedding.
- A bowl of Pastry Cream
- This recipe was spontaneously made just for fun the day before and to use up leftover egg yolks (the Swiss Meringue Buttercream requires a lot of egg whites) (recipe from The Kitchn)
Here’s a shot of the dessert spread, featuring my grandparent’s wedding cake topper from their wedding and the bouquet that my sister-in-law put together. My husband’s aunt helped create the signage for the desserts.

A close-up of my grandparents’ cake topper. So cool that they saved it.

Some of the cookies!
Left – > right: testers of all three cookies (you have to test and taste!); lavender shortbread; vegan salted chocolate chip cookies


And here I am at the venue, putting the cake tiers on top of each other, filling in the space with the rest of the frosting and decorating with fruit and powdered sugar.

I have no regrets about making my own wedding desserts. A few takeaway tips:
- Make recipes you have made before, or do some test recipes to make sure you like what you will be serving.
- Clear out your freezer and prep most of your stuff the week before the week before the wedding.
- Do note that you will need a LOT of flour, sugar, butter, eggs, vanilla, etc. Start organizing on your excel sheet early to see ingredients you will need.
- Make sure you have the cake pans, parchment paper and corresponding cardboard cutout circles for transporting cakes. A stand mixer is very helpful. A kitchen scale helps for weighing ingredients and a rotating cake stand helps for frosting, but both are optional. Find a large box for transporting on the day of.
- Depending on how you like to bake (solo or with others), you can enlist help from friends or family members as needed. I preferred some of the work on my own, but was happy to have company for some parts, too.
For those that have questions, I am happy to help as best I can.


Leave a comment