Lindsey Shere’s “Chez Panisse Almond Tart,” Tasted at Pizzaiolo Restaurant

3 Oct


I should be studying. Biochemistry.

Instead I sit, fantasizing about this almond tart.

I have been thinking about making this tart for a long time, using Chez Panisse co-founder and former executive pastry chef Lindsey Shere’s recipe. Many restaurants have used her recipe–Oliveto and Pizzaiolo (both in Oakland, CA) to name a few.

You can make this as a tart or turn the recipe into a Christmas bar cookie and add dried cherries, chocolate chips, … you name it!

I tasted this tart for the first time today at Pizzaiolo and have not stopped thinking about it since. The texture of slivered almonds is so wonderful! The flavor of the tart takes the almond-y-ness and enhances it with a caramel-like mixture of cream and sugar. Yes! Life is good.


Did I mention how much I LOOOVEE slivered almonds? Arranged in layers all atop the buttery crust, I like to pick off each nut sliver one by one. Ahhh, don’t you just want to reach for the computer screen pick off an almond sliver?!


To find the recipe for Lindsey Shere’s Almond Tart, purchase Chez Panisse Desserts or check out David Lebovitz’s blog.

>Bugs "Bundt-y" Carrot Cake

29 Sep

>
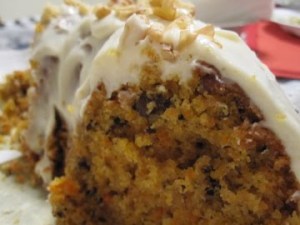
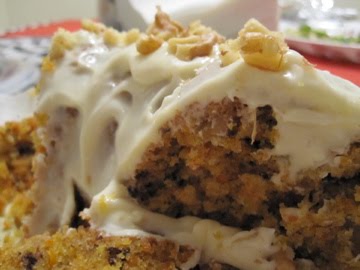
Two years ago I took a reading and composition class and had this great connection with my graduate student instructor (GSI). She baked a cake for the students on the last day of class. Carrot cake. Wow was that good! I had to have the recipe. The cake was so moist and spicy, and there was not an overwhelming amount of frosting–just enough to complement the cake flavor!


Not only did she give me the recipe, but also she recommended that I go to Tartine Bakery to sit and people watch over a good cup of coffee and a pastry. Tartine is now one of my favorite hot spots in the Mission District of San Francisco.

Ok. And get this. She recommended that I read this book called “Julie and Julia” about a woman who cooks her way through Julia Child’s famous cookbook, Mastering the Art of French Cooking. The book exhibits lots of humor and a few botched culinary experiments along the way. I had already read the book and LOVED it! Just this summer, I saw the MOVIE “Julie and Julia,” attended a birthday party at a local bookstore for Julia Child (we ate cake, sang “Happy Birthday,” and talked about food/cooking), and purchased Mastering the Art of French Cooking. I even have a master plan to be Julia Child for Halloween!!! Eeee soo excited!

Anyway, back to cake. Carrot cake, that is. Since the two years that she gave me the recipe, I have made this cake many times and it ALWAYS turns out great—definitely a crowd pleaser and a great “gift” to bring to a dinner party.


One of my favorite parts about the cake is that the recipe calls for fresh ginger! The ginger flavor adds such a nice “je ne sais qua” to the cake (ok, I admit, I was trying to find a good way to use my new favorite French phrase du jour!). FYI “je ne sais qua” is an idiomatic expression that one might say when thinking about something (or someone) special that you just can’t quite put into words…a charm, a special enchantment…


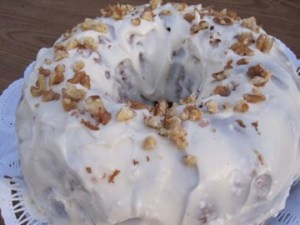
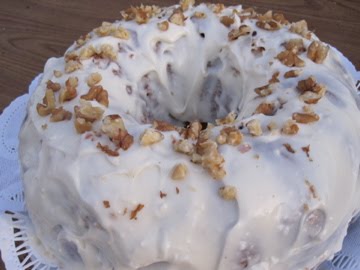
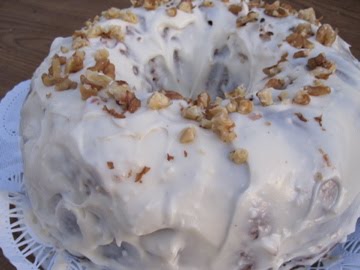
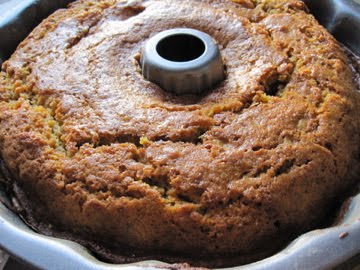
Carrot cake is typically baked in layers with globs of cream cheese frosting sandwiched between each layer as well as on the top and sides. Both my GSI and I think it is just so much darn easier to bake the whole shebang in a bundt pan and do a nice thin layer of frosting just on the outside.


Remember to TOAST your nuts! That is key. Whether you use pecans or walnuts (walnuts are my personal fave), toasted nuts are a blessing, really just a dream come true. Mixed in with that moist cake-y, carrot-y, ginger-y goodness…mmmm mmm mmmm!


I baked this cake in my friend’s old-school oven. We literally had to light the oven with a match and we pretty much guestimated the temperature. It was definitely tricky. Although cute and vintage-esque, I would recommend using a trust-worthy oven with a more reliable temperature setting. But hey, this made the afternoon exciting and kept us on our toes. I mean, every day you should do something risky, and this risk was totally worth it!


Bugs “Bundt-y” Carrot Cake
adapted from my GSI who adapted it from Martha Stewart

Makes 1 bundt cake (or 1 four-layer cake), serves 10 to 15

Ingredients

* Unsalted butter, for pans
* 3 cups all-purpose flour, plus more for pans
* 1 cup walnut halves
* 1 1/3 pound large carrots, peeled (I just eyeball the amount…)
* 3 large eggs, room temperature
* 1/3 cup nonfat buttermilk (I have used plain Greek yogurt before and it works just as well)
* 1 teaspoon pure vanilla extract
* 2 cups sugar
* 1 ½ cups vegetable oil
* 1 ½- 2 tablespoons freshly grated ginger (depending on how spicy you like it)
* 2 teaspoons baking powder
* 1 teaspoon baking soda
* 1 teaspoon salt
* 1 teaspoon ground cinnamon + 1/4 teaspoon freshly grated nutmeg and 1/4 teaspoon ground cloves

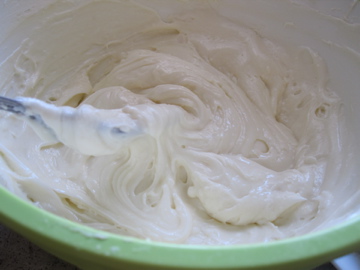
* Cream Cheese Frosting
* 1 stick of butter, room temperature
* an 8 oz block of cream cheese (I used ½ nonfat and ½ regular), softened
* powdered sugar (about 2 cups)
* pinch of salt
* a few drops of vanilla

Directions

1. Heat oven to 375°F. Butter a bundt pan (or two 8-by-2-inch round cake pans). Dust pans with flour, and tap out any excess. Set pans aside. Spread nuts in a single layer on an ungreased baking pan, and toast in the oven until lightly golden, about 7 minutes. Remove pan from oven, and let stand until completely cool. Reduce temperature to 300°F. Finely chop nuts, and set aside.

2. Peel the carrots and place in a food processor to yield about 3 cups of grated carrots.

3. Peel the ginger (I like to use a metal spoon) and use a microplane (one of my favorite tools!!) to grate the fresh ginger.

4. Place carrots, eggs, buttermilk, vanilla, sugar, vegetable oil, and ginger in a large bowl; whisk until well combined.

5. In a medium bowl, whisk together flour, baking powder, baking soda, salt, cinnamon, nutmeg, and cloves. Using a rubber spatula, fold the flour mixture into the carrot mixture until combined. Fold in the toasted nuts.

6. Pour the batter into the bundt pan (or divide between the two cake pans), and bake until a cake tester inserted into the middles comes out clean, about 50 minutes to 1 hour. Remove pan from oven, and transfer to a wire rack to cool, 15 minutes. Turn cake out onto rack; let stand until completely cool.

7. To make the frosting, blend butter and cream cheese until smooth. Add powdered sugar and continue to whisk until soft and there are no lumps. Add vanilla and salt.

8. Once the cake is cool, frost. Garnish with something aesthetically pleasing. I used walnuts. Refrigerate until ready to eat, if you can even wait!

>Roasted Eggplant Spread on Crostini

25 Sep

>
Fun Fact: An eggplant is actually a berry.

I know, sounds crazy, right? Typically thought of as a vegetable, the eggplant really is just a large bulbous purple berry.

Now don’t get me wrong, I probably would not mix this kind of berry in with my cereal…but I definitely would roast it in the oven and puree it with some tomatoes, roasted garlic, onions, and lemon juice and then spread it on crostini. Ooo la la finger food!!

Roasting the eggplant whole is easy. Are you ready? Take the eggplant, plop it on a sheet tray as is (no oil needed), put it in the oven at 350°F, and in about 60-75 minutes you’ve got one soft and roasted berry!

Next. Roasted garlic. Yes. Chop the end off a head of garlic. Drizzle with olive oil. Wrap in foil. Bake for an hour (any temp. from 350-450°F will do).

These two ingredients—roasted eggplant and garlic—make this sumptuous eggplant spread sing on the toasted baguette!

Finger food is just too fun! Who needs forks and knives: the phalanges are our natural utensils!!

Once again, I made this for my 60-person co-op and multiplied the recipe by 8. Touché!

Roasted Eggplant Spread on Crostini
Adapted from Goodthingscatered

Makes about 30 slices

Ingredients:
1 medium eggplant
2 tomatoes, chopped and peeled
1/2 medium red onion (feel free to use white onion or shallots)
Roasted garlic (use about half a head, maybe the whole thing if your feelin’ good!)
1 Tbsp olive oil, plus more for crostini
1 Tbsp fresh lemon juice
1 tsp kosher salt
1 tsp freshly ground pepper

1 baguette, preferably sourdough, sliced
2 scallions, white and light green portion thinly sliced

optional:
1/4 c. cilantro
1/4 c. pitted kalmata olives

Directions:
1. Preheat oven to 350°F and place eggplant on a lined baking sheet.

2. Place baking sheet into oven and roast until eggplant looks wilted and skin is easily pieced with a fork, about 60-75 minutes.

3. Meanwhile, cut off the tip of the head of garlic, drizzle with olive oil and wrap in foil. Throw this in the oven with the eggplant (It will take approximately the same time to cook as the eggplant).

4. Remove eggplant and garlic from oven and cool completely. If you prefer, peel the eggplant. If not, go for the rustic feel and leave the peel on.

5. In the bowl of food processor, combine tomato, red onion, garlic and olive oil. Pulse to process until well combined.

6. Add eggplant (cilantro, olives), lemon juice, salt, and pepper and pulse until ingredients are roughly chopped to the consistency of a salsa (about 4-5 pulses) and set aside.

7. Preheat oven to 450°F and place baguette slices onto baking sheet. Brush each slice lightly with olive oil.

8. Place baking sheet into oven and bake until edges are lightly golden, about 10 minutes.

9. Remove from oven, place a spoonful of eggplant spread onto each slice and place on serving platter.

10. Top with sliced scallions and serve. FINGER FOOD!! Woo hoo!

Hearty Grain Soup With Beans and Greens

18 Sep


This is my all-time favorite soup to make. It takes very little time and is so healthy and wholesome. It is a great winter soup that will warm your heart on a chilly day. Even in 80 degree weather, this soup proves to be a winner with its mixture of color and fresh flavor combination!

You can use any grain that you have on-hand: barley, brown rice, quinoa, kasha…Same goes for the beans–I prefer kidney beans but you can use a mixture of kidney, black, garbanzo, white beans…

I have made this soup at least 6-10 times and it never disappoints. One time, I accidentally used 3 times the amount of rice and rather than cry/freak out/kick and scream (which I did a bit of at first), I transformed the soup into risotto! Brilliant, just brilliant! Continue reading

Challah Bread

18 Sep

IMG_3895
Rosh Hashanah, the Jewish New Year, is just around the corner. To celebrate, I made 8 loaves of this comforting, traditional egg-bread known as “challah.”

The smell of warm homemade bread just fills the whole house and makes everyone smile! Crisp and browned on the outside, soft and doughy on the inside, loaded with raisins and topped with seeds, this bread will make you hoot n’ challah.

Growing up, my mom’s best friend would invite my family over for dinner and her homemade challah bread was always a huge hit! I dedicate this post to her for inspiring me to make yummy, yummy Jewish food!
IMG_3896
Usually when I make challah bread, I throw all of my ingredients in a bread machine and let it do all the kneading for me. Easy peasy.

This time, however, I had no bread machine and kneaded the dough with my super human arm strength. Actually, it was very easy and came out better than my bread machine challah because I could control how much it really “needed to be kneaded (hehe)!”

Here is some dough in the process of rising! So light and fluffly!

In order for challah to be challah and not just egg-bread, you must tear off a small walnut-size piece of dough and say a blessing. Ok, repeat after me:

“Baruch ata Adonoy, Eloheinu melech ha-olam, asher kidishanu bimitzvo’sav, vitzivanu lihafrish challah min ha-issa.Blessed are You God, King of the Universe, Who made us holy with His commandments, and commanded us to separate challah from the dough.”

Got it? Ok. Thought so. Good.

IMG_4953

My 60+ housemates gobbled these loaves up!

Also on the menu this evening was:

The Silver Palate’s Chicken Marbella (chicken with prunes, olives, artichoke hearts, oregano, and white wine)
-Beet salad with shallots, feta, and red wine vinegar
Hearty bean soup with barley, kale, and tomatoes
-Sautéed green beans

Boy am I stuffed!

IMG_3897

Hoot n’ Holla Challah (Egg Bread)

Adapted from SmittenKitchen
Time: about 1 hour, plus 2 1/2 hours’ rising
Yield: 2 loaves (multiply the recipe by 4 if cooking for 60 hungry college students)

1 ½ packages active dry yeast (1 1/2 tablespoons)
1 tablespoon plus ½ cup sugar
½ cup olive or vegetable oil, plus more for greasing the bowl
5 large eggs (1 is used at the end for egg wash)
1 tablespoon salt
8 to 8 ½ cups all-purpose flour
½ cup raisins per challah, if using
Poppy and/or sesame seeds for sprinkling.

1. In a large bowl, dissolve yeast and 1 tablespoon sugar in 1 ¾ cups lukewarm water.

2. Whisk oil into yeast, then beat in 4 eggs, one at a time, with remaining sugar and salt. Gradually add flour. When dough holds together, it is ready for kneading.

3. Turn dough onto a floured surface and knead until smooth (~ 5-10 minutes). Clean out the bowl and grease it, then return dough to bowl. Cover with plastic wrap, and let rise in a warm place for 1 hour, until almost doubled in size (Dough may also rise in an oven that has been warmed to 150°F then turned off). Punch down dough, cover and let rise again in a warm place for another half-hour.

4. To make a 4-braid challah, take half the dough and form it into 4 balls (take off a little tiny piece for the blessing and bake it with your loaves but DO NOT eat it). With your hands, roll each ball into a strand about 12 inches long and 1 ½ inches wide. Place the 4 in a row, parallel to one another. Pinch the tops of the strands together. (***At this point, if you decide to use raisins or chocolate chips, you can put them into the middle of each strand, pinching the strands closed to make sure the raisins are not too exposed to the outside).

4 ½. Move the outside right strand under 2 strands. Then take the second strand from the left and move it over one to the right. Take the outside left strand and move it under 2. Move second strand from the right over one to the left. Start over with the outside right strand. Continue this until all strands are braided. Tuck the ends underneath. Make a second loaf the same way.

5. Grease a cookie sheet and sprinkle with cinnamon and cornmeal. Place braided loaves on the cookie sheet with at least 2 inches in between. Spray saran wrap with cooking spray and cover the loaves. Let rise another hour.

6. Preheat oven to 375°F and brush loaves with beaten egg. Sprinkle bread with seeds, if using (I HIGHLY recommend the seeds).

7. Bake in middle of oven for 30 to 40 minutes, or until golden. I like my challah bread served with a sprinkle of salt and some roasted garlic!