Chicken Marbella

4 Jan

Chicken Marbella. A classic dish from the Silver Palate Cookbook, definitely one of my favorite go-to references for a good ol’ American meal.

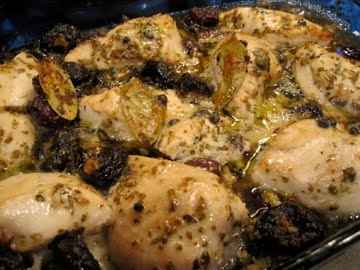
Whether you are a chicken novice or a chicken expert, you simply cannot go wrong with Chicken Marbella. Marinated overnight (or for a few hours) with olives, prunes, capers, oregano, Bay leaves, garlic, olive oil, and red wine vinegar, the chicken soaks up all of the sweet, salty, herby flavors. And the best part? Right before you bake the chicken, you sprinkle with brown sugar and pour a dry white wine all over and around the bird. Bellissimo!

My mom is the queen of making dry chicken, so it will always be my goal to NOT make dry chicken. Whatever it takes, as long as the bird is under my watch, it must not be dry.

One trick that I learned to prevent drying out the chicken is to first pound out your breasts. This helps to tenderize the meat and also keeps the pieces the same width all around so they cook evenly. Another key to prevent your chicken from being dry is to find a good marinade and to marinate overnight. Your chicken and your marinade must get to know each other very well if you want them to cooperate.

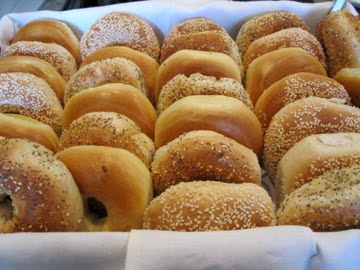
I like to serve this chicken with a nice grain–rice, couscous, risotto, quinoa, barely…, some sort of roasted veggie assortment or sauteed spinach, and fresh bread (check out my challah bread!). This chicken also goes very well with my hearty grain soup with beans and greens.

I just love this marinade, and you can often spot me dipping my bread in the juices, sopping up as much of the sweet but savory and winey juices as I can! And substitutions are definitely a-okay here: think artichoke hearts instead of capers, figs instead of prunes, basil and parsley instead of oregano…I have also made a vegan/vegetarian version using tofu instead of chicken. With tofu, it is especially important to marinade overnight to bring out the best flavor possible.

Chicken Marbella
from the Silver Palate Cookbook

Ingredients

  • 2 chickens, 2 1/2 lbs each, quartered, bone-in, skin-on (If you are lazy like my fam., just buy the individual pieces: breasts, thighs, whatever you like. Or, you can be way cooler and more economical than me and butcher your chicken.)
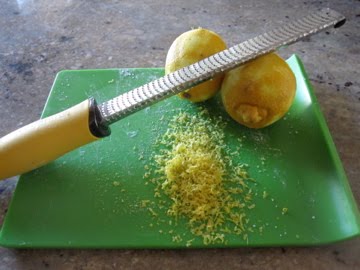
  • 1/2 head of garlic, peeled and finely puréed (sometimes I just mince the garlic)
  • 2 Tbsp dried oregano
  • Coarse salt and freshly ground pepper to taste
  • 1/4 cup red wine vinegar
  • 1/4 cup olive oil
  • 1/2 cup pitted prunes
  • 1/4 cup pitted Spanish green olives
  • 1/4 cup capers with a bit of juice
  • 3 bay leaves
  • 1/2 cup brown sugar
  • 1/2 cup white wine
  • 2 Tbsp fresh Italian parsley or cilantro, finely chopped

Method

1 (Optional: Pound your chicken breasts to a nice even consistency) In a large bowl combine garlic, oregano, salt and pepper to taste, vinegar, olive oil, prunes, olives, capers with caper juice, and bay leaves. Add the chicken pieces and coat completely with the marinade. Cover and let marinate, refrigerated, several hours or overnight.

2 Preheat oven to 350°F.

3 Arrange chicken in a single layer in one or two large, shallow baking pans and spoon marinade over it evenly. Sprinkle chicken pieces with brown sugar and pour white wine around them.

4 Bake for 50 minutes to 1 hour, basting frequently with the pan juices (I check it about every 20 minutes). The chicken is done when thigh pieces, pricked with a fork at their thickest point, yield clear yellow juice (not pink).

5 With a slotted spoon, transfer chicken, prunes, olives, and capers to a serving platter. Add some of the pan juices and sprinkle generously with parsley or cilantro. Serve remaining juice in a gravy boat.

Serves 5.

Brunch Brunch Brunch!!

3 Jan

January in Los Angeles—warm, sunny, perfect. January 3rd, the Beckerman family could not have asked for a more perfect day to gather friends and family together for a booming brunch in honor of the birth of baby Mika.

Check out these gorgeous flowers!

And no brunch can be complete without some bubbling mimosas!


Bagels, of course.


Cheese soufflé. Wow. Enough said.


A lovely and light salad: spicy arugula, slivered pears, pine nuts, goat cheese.


There were so many people and so much food it was ridiculous (This is why I wear dresses, people. I can just let it all hang out and no one has to know!).

My job? Pastries, of course. I prepared a selection of homemade croissants, meyer lemon and fresh cranberry scones a la SmittenKitchen, and two choices of mini muffins, browned butter blueberry crumb and buttermilk meyer lemon poppy seed:


Brunch is always a winner in my eyes– tons of salads, cheeses, breads, and munchies, and lets not forget pastries, fruit, coffee, drinks, and dessert. Go on and invite your friends over for brunch! Make it a potluck and have each guest bring their best dish. Then sit back, schmooz, and soak up the sun (or if you are somewhere where it actually gets cold, then well, stay inside and warm your tootsies!).


P.S. If you have dogs (or any pets), make sure that you keep your pastries up where they cannot reach. Penny the dog snatched a raw scone off one of the cookie sheets. Sneaky sneaky. I guess that was partly my fault for leaving the tray on a chair. This must mean that she approves of my baking, right? Or that she will eat anything in sight. Actually, her favorite is licking the dirty dishes in the dishwasher. Mmmm.

Apple Tart

1 Jan


The very first thing I made with my new standing Kitchen Aid mixer was a batch of tart shell dough. I made the dough, wrapped it up, and stuck it in the freezer for “emergencies.”

I brought my dough over to Linda’s house yesterday because I thought we might want something more to play with! We rolled out the dough and placed it in a tart shell. We spread the shell with a layer of wild plum jam and then we layered apples from her apple tree in concentric circles around the tart, but first we tossed the apples with a bit of sugar, lemon juice, and cinnamon. We made sure not to add too much sugar because we liked the balance of the sweet crust with a nice tart apple. To top it all off, we sprinkled some raw (turbinado or demerara) sugar over the tart. This gave the tart a nice little crunch of sweetness!


I think this may be one of the best apple tarts that I have EVER tasted. Seriously. Not too sweet, but just sweet enough. The crust is perfect. And the apples are so thin and pack a punch full of flavor! Oh, and I absolutely love the combo of the wild plum jam with the apples. Mmm mmm mmm!

Now, laying your tart dough in the pan can be pretty tricky. My goal is to do it like snow white. Even after doing it over and over at work, I still have trouble. Your dough may break here and there, but the dough is pretty malleable and you can just patch things up where you need.

Sweet Tart Dough
from Alice Waters’ The Art of Simple Food

makes enough for one 9-inch tart or six 4-inch tartlets, or 30 cookies (you can make thumbprint cookies!)

Beat together until creamy:
8 Tablespoons (1 stick)
1/3 cup sugar
Add and mix until completely combined:
1/4 teaspoon salt
1/4 teaspoon vanilla extract
1 egg yolkAdd:
1 1/4 cups all-purpose unbleached flour

Mix well, stirring and folding, until there are no dry patches. Chill at least 4 hours or overnight until firm (you could probably just chill for 1 hour and be fine). Or, freeze. Just be sure to defrost for a few hours before ready to use.

Fun variations:
-mix 1 teaspoon of cinnamon into the flour
-substitute some of your all-purpose flour with cornmeal

Apple Tart
invented
1 Sweet Tart Dough (optional: you can pre-bake your shell for 10-12 minutes, but it is not necessary)

Wild plum jam, or any jam of your choice
Apples from Linda’s tree (or any good baking apple), peeled and sliced thinly
Cinnamon, a few pinches
Sugar, maybe 1 1/2-2 Tablespoons
Lemon juice, maybe 1 Tablespoon

Optional: raw (turbinado or demerara) sugar for finishing

1. Preheat oven to 350 degrees F. Lightly oil your tart pan.

2. On a lightly floured surface, roll your tart dough into a 12- inch disk. Carefully transfer to the tart pan.

2. Spread with a layer of plum jam.

3. Combine your apples, cinnamon, sugar, and lemon juice. Arrange over the dough in concentric circles.

4. Sprinkle with raw/turbinado sugar.

5. Bake for about 40-50 minutes. If your edges start to brown, cover with foil and continue baking.

6. Cool and take your gorgeous tart out of the pan. Serve warm with ice cream, coffee, or on its own.


Oh My Gah…Rainbow Cake!!!!!!!!!!

31 Dec


Yesterday I spent the day making magic in the kitchen with the infamous Linda—chef extraordinaire, queen of the kitchen, best home-cook ever! I grew up going to Linda’s house every week for Friday night dinner. She would prepare fresh baked challah bread, a homemade soup made with fresh veggies (always a different soup each time, always delicious), and then a big main course with sides galore. And for dessert—fruit, little cookies or cakes, and tea.

I really cherish those days when our families came together and enjoyed a good meal, chatting about politics and gossiping about all of the shenanigans happening in the neighborhood. Now all of the kids are older and our dinners happen less often, but when they do happen, I cherish them.

I arrived at Linda’s house yesterday with a big bag full of tart shells, sprinkles, almond extract, parchment paper, butter, aprons, and a few other miscellaneous essentials. She provided the rest.

We went to work, and our first project was to conquer one of my favorite childhood treats, RAINBOW CAKE, also known as seven layer bars.

Rainbow cake is really just almond cake with jam spread between each layer and a nice smooth layer of chocolate on top. The food coloring and sprinkles are just for aesthetics, but as Linda and I both agree, “you eat with your eyes.”


Eeeeee these are just so darling. I want to start a rainbow cake delivery service!!!!! I think that could be quite successful, don’t you? Everyone’s got a food truck these days, maybe I will start a rainbow cake truck and gallivant through different neighborhoods, putting smiles on faces.

IMG_4461
Ok, while I’m dreaming in LaLaLand, you should go ahead and start baking already. Once you have your cake batter, you just divide into three, drop some food coloring, spread into pans and bake, cool, and assemble. The hardest part about this recipe is the assembly, but don’t let that scare you. Enjoy the process because the end product will just make you plotz (Yiddish word for “burst” or “explode”) from so much deliciousness.

After Linda and I made the rainbow cakes, we moved on and made an apple tart with apples from her tree, and we baked challah bread (topped with poppy seeds, sesame seeds, and black cumin seeds) and sticky buns. Our little friend Ezra enjoyed helping us sprinkle the seeds over the challahs!


This was the most fun that I have had in a while. Thanks Linda for always inspiring me to make magic.

Rainbow Cake
(aka seven layer bars)
Recipe inspired by SmittenKitchen

makes about 5 dozen bars, or more (or you can just leave it as a cake)

4 large eggs, separated
1 cup sugar
1 (8-oz) can almond paste (I used a 7-oz package and it worked just fine)
2 1/2 sticks (1 1/4 cups) unsalted butter, softened
1 teaspoon almond extract
2 cups all-purpose flour
1/2 teaspoon salt
25 drops red food coloring
25 drops green food coloring
1 (12-oz) jar apricot preserves, heated and strained (I used raspberry preserves and did not strain them)
4-oz fine-quality bittersweet chocolate, chopped (I used Ghirardelli)

Optional: sprinkles

Special equipment: a small offset spatula, a heavy-duty stand mixer if you have one; a hand-mixer should work as well.

1. Put oven rack in middle position and preheat oven to 350°F. Butter a 13- by 9-inch baking pan (we decided that a cookie sheet may have been easier) and line bottom with wax paper, leaving a little overhang on 2 ends, then butter paper.

2. Beat whites in mixer fitted with whisk attachment at medium-high speed until they just hold stiff peaks. Add 1/4 cup sugar a little at a time, beating at high speed until whites hold stiff, slightly glossy peaks. Transfer to another bowl.

3. Switch to paddle attachment, then beat together almond paste and remaining 3/4 cup sugar until well blended, about 3 minutes. Add butter and beat until pale and fluffy, about 3 minutes. Add yolks and almond extract and beat until combined well, about 2 minutes. Reduce speed to low, then add flour and salt and mix until just combined.

 4. Fold half of egg white mixture into almond mixture to lighten, then fold in remaining whites gently but thoroughly (we found it a bit strange to be folding egg whites into a really thick batter, but it worked fine).

5. Divide batter among 3 bowls. Stir red food coloring into one and green food coloring into another, leaving the third batch plain. Pour green batter into prepared pan and spread evenly with offset spatula (layer will be about 1/4 inch thick). (If you own multiple pans, you can bake 2 layers at a time. We baked our green and white layers at the same time).

6. Bake your layers 8 to 10 minutes, until just set. (It is important to undercook. They’ll look like they’re not done, but a tester does come out clean).

7. Using paper overhang, transfer layer to a rack to cool, about 15 minutes. Bake the remaining layer (s) in same manner as above. Transfer to a rack to cool.

8. When all layers are cool, invert green onto a parchment or wax-paper-lined large baking sheet. Discard paper from layer and spread with half of preserves. Invert white on top of green layer, discarding paper. Spread with remaining preserves. Invert red layer on top of white layer and discard wax or parchment paper.

9. Cover with plastic wrap and weight with a large baking pan. Chill at least 8 hours (We chilled for 2 hours and were just fine. The reason for chilling so long is so that the preserves can really get pressed down and incorporated into the cake layers).

10. Remove weight and plastic wrap. Bring layers to room temperature.

We decided to use one layer of chocolate on top instead of one on top and one on the bottom. Do as you please…***NOTE: If you want chocolate on both top and bottom, use 7-oz of chocolate and melt it 3.5-oz at a time.

Melt chocolate in a double boiler or a metal bowl set over a saucepan of barely simmering water, stirring until smooth. Remove from heat. Keep chocolate over water. (Alternately, you can melt the chocolate in the microwave, just stir it every 30 seconds).

11. Trim edges of assembled layers with a long serrated knife. Quickly spread chocolate in a thin layer on top of cake, and sprinkle with sprinkles! Chill, uncovered, until chocolate is firm, about 30 minutes. ***NOTE: If you are doing two layers of chocolate, spread your top with chocolate, refrigerate uncovered for about 15 minutes, invert, and spread your next layer with chocolate. Now you can add sprinkles. Chill.

12. Cut lengthwise into strips, Cut strips crosswise into 3/4-inch-wide cookies. Or, just leave the cake as a cake and cut slices as you please!

  • Do ahead: Cookies keep, layered between sheets of wax paper or parchment, in an airtight container at room temperature 2 weeks. They’ll keep even longer in the freezer.


Lemon Cornmeal Biscotti with Cranberries and Walnuts

28 Dec

These cookies are addicting. No matter how hard you try, you simply cannot just have one. I think it is impossible.

I call them biscotti but they are softer and chewier than the typical hard and crumbly biscotti. Whatever the name, these little guys are so so so so so darn good! I believe that this may be my favorite type of cookie batter to lick the bowl with. Mmm, so buttery and lemony and comforting!


And using my new KitchenAid mixer makes everything so much easier; I can just plop my ingredients in the mixer and it does all the work for me.

This recipe makes a LOT of biscotti, I was overwhelmed and froze half of the cookies for my family to eat when I go back at school.

Here is a link to an interesting article about twice-baked cookies, mandelbrot vs. biscotti.

With a twice-baked cookie, you first make your dough, roll it out into several long logs, bake, slice, and bake again.


I chose to add lemon zest, walnuts, and cranberries (I added golden raisins and dried blueberries, too!), but feel free to add in whatever you like: chocolate chips, pistachios, hazelnuts…

I also really like the texture that the cornmeal lends to the cookie. Soft, chewy, with a little added cornmeal crunch! Very nice.

Lemon Cornmeal Biscotti with Cranberries and Walnuts

makes a LOT of cookies, I would guess about 6 dozen

2 sticks cold butter, cubed
4 eggs
2 1/2 cups sugar
1 teaspoon salt
1 Tablespoon baking powder
4 cups all purpose flour
3/4 cups cornmeal

zest of 2 lemons
dried fruit combo, about 1 cup
toasted nuts, about 1 cup

In the bowl of an electric mixer fitted with a paddle attachment, mix together the butter and sugar unitl nice and smoothe and fluffy. Add your eggs one at a time.

Combine the rest of your dry ingredients and add them to your butter, sugar, egg mixture. Stir in the lemon zest, dried fruit, and nuts.

Divide the dough into 6 even pieces. Lightly flour a clean surface and roll each piece into a nice, even log. Place on a baking sheet lined with parchment paper (I ran out of parchment so I just lightly greased the cookie sheet).

Bake at 350 degrees F for about 25 minutes, rotating the baking sheets at least once. Take the logs out of the oven and let them cool for about 5 minutes. Using a serated knife, slice your logs into individual cookies and place the cookies cut side down. Bake for another 15 minutes or so, you will have to watch them.

This make a LOT of cookies, which are great for freezing, storing, or giving as gifts!