Archive | breakfast RSS feed for this section

Review: The Buttermilk Truck

22 Dec


Ever since I saw TheKitchyKitchen’s post about the Buttermilk Truck, I could not wait to come back to LA to taste the sought-after breakfast wonders served from a truck.

Gosh, it has been weeks and every day I have ogled over the bite size treats on the Buttermilk website.

The owner/founder, Gigi Pascual, graduated LMU with a BA in Business Administration and shortly after went to culinary school in NYC at The French Culinary Institute for Pastry Arts. After working in a few restaurants, she decided to open up this truck.

Food trucks are just everywhere these days. You can feast on your tacos from truck A, scarf down your cupcake from truck B, and indulge in your midnight burger from truck C. My brother raves about this organic ice cream truck in NYC, and my friend Natasha won’t shut her trap about the crème brûlée cart in San Francisco’s Mission district! I just found the Grilled Cheese Truck online, and wowza does that sound cheesy and comforting!

The Buttermilk truck twittered about coming to the San Fernando Valley on Tuesday December 22, so this was the day I planned to go get my buttermilk breakfast fix.

My brother and I drove 20 minutes to get to this truck. The weather was windy, very very windy. The darn wind was not so conducive to us waiting in line for 30 minutes and then having no place to sit but the parking lot curb to eat all the while having the wind blowing my hair, my sweater, my food, and my napkins all over the place.

Due to the extreme windy conditions, I was almost too overwhelmed to take nice pictures of all the food. I managed to snap a few, but if you really want to see some nice photos, check out the KitchyKitchen or the Buttermilk website.

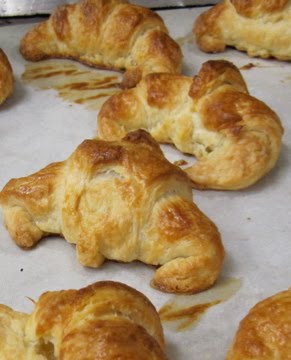
I ordered the breakfast sandwich—a fried egg with chicken apple sausage sandwiched between two buttermilk biscuits. It was supposed to come with a cute little hashbrown pancake, but they ran out just before we ordered. Bummer.


This little b-fast sandwich looked pretty darn delish, but honestly, it needed to be salted and peppered, and even though the yolk was nice and runny, the sandwich altogether was pretty dang DRY.

My bro ordered French toast on Hawaiian bread—it came dusted with powdered sugar and garnished with a slice of strawberry. Pretty good. Nice and crunchy on the outside. Very sweet and very fried.

Then we shared the cake donut bites. These were definitely the winners of the morning. Could have been slightly more aesthetically pleasing, but I’m kind of a food snob, so sue me.

The sandwich, French toast, and cake donuts cost $8.50. Not too bad?

Well, it took 20 minutes to drive there, 30 minutes to wait in line, 10 minutes to eat, and 20 minutes to drive back home. Plus, we were kind of in the middle of nowhere, well, we were in the middle of a bunch of warehouses. That’s a lot of minutes for windy, mediocre breakfast from a truck.


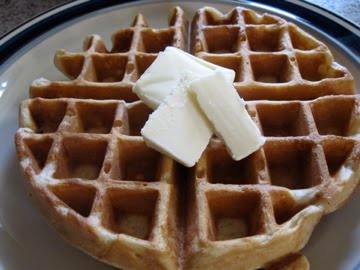
Here is my suggestion: if the Buttermilk truck happens to be in your area, yah, hit that up. Otherwise, eh, just come over to my house and I can make you the breakfast of your dreams (my brother can vouch for that).

Brown Sugar Buttermilk Waffles

17 Dec

These are some sexy waffles.

They can be drizzled with maple syrup, slabbed with butter, dolloped with ice cream, smothered with yogurt, dusted with powdered sugar, spread with jam (or lemon curd) and peanut butter, dipped in coffee…

Sometimes when I’m feelin’ a little devilish, I will even add walnuts, dates, and bananas to my batter! Jeepin’ Jilipers that’s good!

I want to eat my waffles groove by groove.

You can smell these waffles from down the street.

These waffles kick Eggo Waffles booty!

These waffles contain buttermilk and brown sugar. Now is that sexy or what?

They only take 10 minutes to prepare and about 2 minutes to cook, and my belly is satisfied for hours!

Go make these waffles, top and fill with the condiment of your choosing, start the day off right.

Brown Sugar Buttermilk Waffles
Recipe from JoyTheBaker

Ingredients

3 cups all purpose flour

1 Tablespoon baking powder

1 teaspoon baking soda

1 teaspoon salt

¼ cup brown sugar

¾ teaspoon cinnamon

¼ teaspoon freshly grated nutmeg

4 eggs

2 ½ cups buttermilk

2/3 cup oil

2 teaspoons vanilla

Directions

Set up your waffle iron on a level, clean surface and turn on to preheat.

In a large bowl combine flour, baking powder, baking soda, salt, brown sugar, cinnamon, and nutmeg. Whisk to blend. In a medium bowl, whisk together eggs, oil, buttermilk and vanilla extract. Add the wet ingredients to the dry ingredients and fold. (If you choose, once almost fully incorporated, add walnuts, bananas, or dates to your batter; chocolate chips are fun, too!). Stir. Try not to over mix the batter or the waffles will become tough. It’s ok if a few lumps remain in the batter.

Cook according to your waffle machine

Homemade Croissants, Part II: Rolling, Baking, Eating

15 Dec

Ok folks, so now that you have gone through part I of the adventure in homemade croissants, you’ve got your laminated dough ready to be rolled and shaped and eaten!

This was the scary part for me. How can I possibly roll these little guys out to look the way they do in a real French bakery (well, I’ve still never been to France but I have a very distinct image in my head)?

How big should I make my triangles? Should they be equilateral, isosceles…? Do I pinch my ends together or leave them open?

Stephanie. Calm down. Breathe. You can do this. Lets take it step-by-step, shall we?

To begin, you should have ready a baking sheet lined with parchment paper and a rolling pin and pizza cutter nearby.

Step 1: Take you laminated dough out of the refrigerator. It should look like this:

Step 2: On a lightly floured surface, roll your dough out into a large rectangle about ½ an inch thick and maybe 2 feet wide. Using a pizza cutter, I cut my rectangle in half the long way, so that I had two rectangles, each about 2 feet wide and 6 inches tall.

Step 3: Using your pizza cutter, cut your dough into long isosceles triangles. At the restaurant, we way out each triangle to roughly 3 ¾ oz., but I just eyeball it when I make them at home. Your triangles should look similar to this:

Step 4: Cut a tiny slit at the base of each triangle. Also, I like to stick any extra leftover end pieces of dough inside some of the triangles. Nothing goes to waste!

Step 5: With the base closest to you, begin to roll your croissant outward, your right hand rolling to the right, your left hand rolling to the left. Then, turn your triangle so the tip faces you and simultaneously stretch the dough with your right hand and roll it toward you with your left hand. Tuck the end of the tip underneath and pinch your sides together.

Optional: You can fill your croissants with prosciutto and cheese, with chocolate, with anything you like! Plain are a good place to start, though.

Step 6: Place your croissants on a baking sheet lined with parchment. Either wrap in saran wrap and stick them in the fridge overnight, or let your croissants sit at room temperature until they are nice and springy when you touch them.
**If you stick your croissants in the fridge, just pull them out about 40 minutes before you want to bake them so that they can come to room temperature and proof.

Step 7: When you are ready to bake, preheat your oven to about 400-425°F. Crack an egg and beat it with a touch of cream. Brush your croissants with the egg wash. Bake for about 20-25 minutes until golden everywhere.

OMG eat them eat them eat them…yum yum yum, they are so beauuuuttttiiiiifffffullll and delicious and flaky and warm! Gah!!!!

**NOTE: Rolling these out takes a bit of practice. The first time I made these all on my own, I did not pinch my ends together nor did I make sure the tip of my triangle was tucked underneath. Alas, here is what my first batch came out looking like:


Not too shabby, but I like the pinched ends look better!

Homemade Croissants Part I: Laminating the Dough

14 Dec

Homemade croissants. The ultimate guide. Arrrrrreeeee yooooooouuuuu reeaaaaaaddddddy?!

I think we may need to do a warm-up before we start.

Drop and give me 20 push ups. Ok, now lets see those arm muscles go to work!

Homemade croissants are very simple (I know you think I’m crazy for saying that making croissants are simple, but keep reading). Only a few ingredients needed to make a big, flaky, buttery pastry. What makes the process so daunting is the amount of time it takes; not necessarily on-hand time, just waiting around time. Rolling out your dough, folding it, refrigerating for an hour. Rolling out your dough, folding it, refrigerating. Etc. etc. etc.

Ok people, really, it is sooooooo worth it! You can make a bunch of dough and just freeze the amount that you are not using right away.

I want to make this dough again and again and again (and I will).

Alright, pop quiz. What does it mean to laminate dough? Laminate means alternating layers. In the culinary world, this means alternating layers of dough-butter-dough in the case of puff pasty, flaky pastry, Danish or croissant dough.

I made a LOT of dough. Like a LOT. I used roughly 12 cups of flour and 3 pounds of butter. Yes people, 3 pounds of butter! (Just remember, those 3 pounds got spread over many many many croissants).

Here I give you an abbreviated version of my dough recipe. Shout out to my boss, Kiri, who showed my the ways of croissant making!

You ask: Stephanie, how dooooo you do it?
I answer: why LOVE of course!

What follows is a quick overview of the process, step-by-step, picture-by-picture (the actual recipe is below):

Yeasty, sugary, milky, foamy mixture

Yes I used 3lbs. of butter


I got a little help from one of my housemates to pound out the butter (here is where the push-ups begin to come in handy)!


Yeasty flour mixture ready to be rolled out


Here is the yeasty flour mixture rolled out into a rectangle


Lay your block of butter on top of the flour mixture like so


Fold it like a letter (in thirds)

Nice!

Once again, push-ups are helpful to build up the arm strength

This is what your dough should look like when done! Yahoooo!
Croissant Dough
Recipe from Kiri, adapted from Nancy Silverton

Yield: about 2 1/2 lbs. of dough (aka about 20 croissants?)
Ingredients

* 1 1/2 cups whole milk, heated to warm (105°F–110°F) (You should be able to comfortably stick your finger into the warm milk)

* 1/4 cup sugar (I used half brown, half white)

* 1 tablespoon plus 1/4 teaspoon active dry yeast (from two 1/4-oz packages)

* 4 cups unbleached all-purpose flour (you may need to add more or less depending on your dough)

* 1 Tablespoon kosher salt

* 3 sticks (1 1/2 cups) cold unsalted butter

Make dough:
Stir together warm milk, sugars, and yeast in bowl and let stand until foamy, about 5 minutes. (If it doesn’t foam, discard and start over.) Add your flour and salt and mix by hand until dough is smooth and very soft, about 7 minutes (or if you own a standing Kitchen Aid mixer, you can mix the dough with a dough hook).

Transfer the dough to a work surface and knead by hand 2 minutes more, adding more flour as necessary, a little at a time, to make a soft, slightly sticky dough. Form dough into a roughly 1 1/2-inch-thick rectangle and chill, wrapped in plastic wrap, until cold, about 1 hour.

Prepare and shape butter:
After dough has chilled, arrange sticks of butter horizontally, their sides touching, on a work surface. Pound butter with a rolling pin to soften slightly (butter should be malleable but still cold). Scrape butter into a block and put on a kitchen towel or piece of parchment paper, then cover with other towel or parchment. Pound and roll out on both sides until butter forms a uniform 8- by 5-inch rectangle. Set aside for now.

Roll out dough:
Unwrap dough and roll out on a lightly floured surface, dusting with flour as necessary and lifting and stretching dough (especially in corners), into a 16- by 10-inch rectangle. Arrange dough with a short side nearest you. Put butter in center of dough so that long sides of butter are parallel to short sides of dough. Fold as you would a letter: bottom third of dough over butter, then top third down over dough.

Turn dough so a short side is nearest you, then flatten dough slightly by pressing down horizontally with rolling pin across dough at regular intervals, making uniform impressions. Roll out dough into a 15- by 10-inch rectangle, rolling just to but not over ends.

Fold in thirds again like a letter, as above, stretching corners to square off dough, forming a 10- by 5-inch rectangle. (You have completed the first “fold.”) Chill, wrapped in plastic wrap, 1 hour.

Make remaining “folds”:
Make 3 more folds in same manner, chilling dough 1 hour after each fold, for a total of 4 folds. (If any butter oozes out while rolling, sprinkle with flour to prevent sticking.) Wrap dough tightly in plastic wrap and chill at least 8 hours but no more than 18 (after 18 hours, dough may not rise sufficiently when baked).

****NOTE: Since I made about 3 times this recipe, I cut my dough into thirds at the end, wrapped each one in saran wrap, stuck one in the freezer, and the rest in the fridge.

Ebelskivers: Pancake Balls Filled with Heaven

30 Nov


Last year, I was browsing through a Williams Sonoma catalog and I flipped to a page with a picture of one of the most amazing-looking pancake nibbles that my eyes ever saw.

Everything in the Williams Sonoma catalog is drool-worthy, but this pan, I had to buy this pan and make those stuffed flapjacks. I had to.

So I did.

Wow.


This investment definitely hits the top of my list.

Now I can’t stop making ebelskivers. I make them for the fam., I brought my pan to a friend’s house (she’s got hungry brothers, and her hungry brothers have hungry friends…so we whipped up these ebelskivers for a snack and then later in the evening for dessert…we went through an entire box and a half of pancake mix and a menagerie of fillings), I brought my pan up to school with me, and I just brought my pan back home for Thanksgiving break.

Basically, you mix up some your favorite pancake batter, decide on your filling of choice, and well, there you have it—ebelskivers! Brush the hole with a bit of butter, fill with about a tablespoon of batter, dollop about a teaspoon of filling, and top with another tablespoon of batter. Wait until it bubbles, and flip. I like to use two wooden skewers to flip my pancake balls, but you can also use two spoons if you like.


Your filling can be anything from grand to bare-bones simple. You do not even need filling if you just want your pancake in the shape of a mini tennis ball.

Check out the Williams Sonoma website for some great filling ideas, or invent your own:

-berries
-jam
-pecan pumpkin
-cinnamon bun
-cheese
-chocolate
-banana and peanut butter
-lemon mascarpone
-lemon curd
-custard
-spiced apple

One of my favorite fillings is goat cheese (or feta cheese) mixed with jam. The cheese gets all melty and the jam/cheese combination is so satisfying!

This week I filled my ebelskivers with leftover pumpkin custard and cranberry sauce. I’m salivating right now. I’m sorry, I just can’t help it…


Go splurge and buy this pan. They are anywhere from 25-40 dollars (Bed, Bath, and Beyond or Williams Sonoma or Sur la Table will definitely carry them).

Oooo, and check out this video of Rachael Ray making ebelskivers! Here is a second video in case you want another tutorial on how to use the pan.

Ebelskiver Pancake Balls Stuffed with Heaven
Adapted from Williams Sonoma and Rachael Ray

Ingredients:

Pancake batter of your choice
Filling of your choice
Melted butter, for brushing the pan

Directions:

1. In a medium-size mixing bowl, prepare your pancake batter. Have your filling in a small dish next to your batter as you’ll need it quickly once you start cooking the ebelskivers.

2. Place an ebelskiver pan over medium heat. Melt your butter in a separate dish and brush your pan with a bit of butter.

3. Using a spoon, fill each dip in the pan about halfway with the batter (about 1 tablespoon of batter). Using another spoon, place a small dollop of your filling into the center of each indent on the pan, leaving a ring of batter all around it to enclose it in the pancake. Top each indent off with another small dollop of batter.

4. Allow the pancakes to cook for about 1 ½ minutes, until light golden brown on the outside (you can check them by lifting them up with a skewer, teaspoon or the tip of a knife).

5. Using two skewers, teaspoons, or paring knives, flip each pancake over in its indent to cook the other side. Allow the pancakes to cook for another 2 minutes, then remove them to a plate until you’re ready to serve them.

6. Continue the above process until you’ve used up all of the batter. Serve up the ebelskivers as soon as they’re finished cooking with a dusting of powdered sugar, if you like.