>Shortbread Cookies (aka Butter in My Mouth!)

20 Apr

>
So this past week especially I’ve been into the whole bread n’ butter thing. You know, like bread and butter, butter + bread, bread + butter and maybe a dash of salt, (cheesy) eggs n’ buttered toast, (cheesy) pasta with garlic herb butter on bread…

Bread with oil and vinegar is a whole other moment of joy for me! Fun fact: To test flavored vinegars, let’s take raspberry vinegar as an example…dip a sugar cube in the vinegar and suck…you can just taste raspberry (no acidity). Amazing. Food science. Neat stuff.

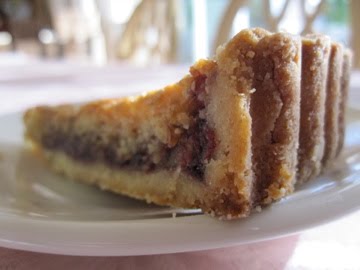
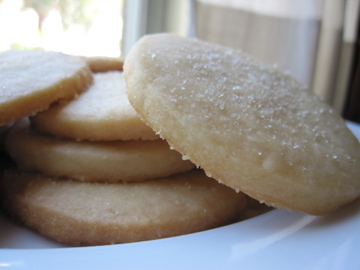
In lieu of my bread and butter phase, I made some shortbread cookies, because, well, why not?

Like bread and butter, shortbread cookies are simple. And simple is good. Simple is damn good. Few ingredients, banging results!

These cookies can be made big, medium, small, or mini, and you can get creative with the shapes (We have a Texas cookie cutter and a, for lack of a better word, penis cookie cutter at my co-op. Totally random, totally great, but I just stuck with the classic circle shape this time).

These would make great little ice cream sandwich cookies, too!

Anyway, have fun, eat bread and butter, eat some buttery shortbread, embrace your curves.

Shortbread Cookies
recipe adapted from JoyofBaking

Ingredients

2 cups all-purpose flour

1/4 teaspoon salt

1 cup (2 sticks) unsalted butter, at room temperature

1 cup powdered (confectioners) sugar

1 teaspoon vanilla extract

optional: more sugar (for sprinkling), chocolate (for melting and dipping), sprinkles (for cuteness), sea salt (for “gourmet” sprinkling)

Directions

1. Sift together the flour and salt in a small bowl and set aside.

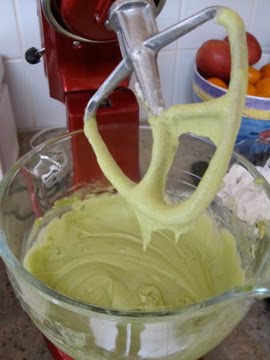
2. Beat butter until nice and smooth and creamy. Add the powdered sugar and continue beating until smooth. Beat in the vanilla. Gently stir in the flour mixture until just incorporated.

3. Flatten the dough into a disk shape, wrap in plastic wrap, and chill in the refrigerator for at least an hour or overnight.

4. Preheat the oven to 350 degrees F. Line baking sheet with parchment.

5. On a lightly floured surface, roll out the dough into 1/4 inch thickness. Cut into whatever shapes you wish using a lightly floured cookie cutter.

6. Place the cookies on the baking sheet and place in the refrigerator for about 15 minutes. This will firm up the dough so the cookies will maintain their shape when baked. Sprinkle a little bit of sugar on top of each cookie and bake for 8-10 minutes or until the cookies are light brown.

7. (optional) After the cookies have completely cooled, melt some chocolate (I just melted mine in the microwave, just remember to stir every 30 seconds. I also added a touch of boiling water to achieve my desired consistency). Dip half of the cookie into the melted chocolate and immediately sprinkle with SPRINKLES or sea salt or whatever else suits your fancy. Let the cookies set (I stuck mine in the refrigerator for a few minutes to speed up the “setting” process).

>Big Crumb Coffeecake with RHUBARB

12 Apr

>
Let’s catch up, shall we?

In the last week or so…

-One of my housemates compared my matzo balls to ones that his grandmother used to make (people, this is the ULTIMATE compliment)

-At the beginning of this week I got food poisoning and spent a day and a half bouncing from my bed to the toilet to the couch and back and forth and back and forth. blech.

-I’ve been house hunting for next year…ideally I would love a quaint house with a beautiful kitchen (or at least a kitchen that could accommodate my KitchenAid standing mixer, my mortar and pestle, and my soon-to-have ice cream machine!!)

-I spent almost 5 hours at a park: mimosas, Frisbee, daisy chains, sunshine…followed by a lovely yet kind of creepy night hike through some Berkeley trails

-I’ve been waiting a year to attend the annual dachshund derby, a day at the race track with little wiener dogs racing about 15 feet. Way too cute! Unfortunately this year the rain washed all the wieners away and the race was canceled.


some photos from last year’s derby…cute or cute?

Well, after a bout of craziness this week, today was finally the day that I was able to wake up, bake, snap some photos, and, well, eat.


Rhubarb has finally arrived. Rhubarb looks kind of like red celery. While the leaves are poisonous, the red stalk delivers a tart, zingy flavor that is usually incorporated into sweet baked goods. Just please, do not eat RAW rhubarb. No good. No no. Just don’t. Come eat my cake instead.

At work, we are currently serving rhubarb jam with toast in the morning and panna cotta with wine-poached rhubarb as one of our evening desserts.

Today I made this coffeecake with rhubarb:


My ideal Sunday starts off with a big breakfast baked with love. Whether it’s pancakes, waffles, eggs n’ toast, or some sweet treat (or all of the above !!) , I am always a happy camper. Really, though, the best is when I get to make breakfast for/with others, because those smiling faces and satisfied bellies are all I need in return.

Here is my pal, Rennie, modeling with the coffeecake:


Rennie did not actually get to taste my cake (he’s vegan), but I swear I almost saw him sneak a bite behind my back 😉

This coffeecake even survived the rain today. Now that’s sayin’ somethin’.


Now friends, I have often pondered this question myself: why do they call it coffeecake if there is no actual coffee in the recipe? Well, coffeecake falls under a class of cakes intended to be served with coffee or for similar breaks and snacks. So there you have it.


Oh, and on June 9th, look out because apparently it’s national Strawberry Rhubarb Pie Day. Just thought I’d let you all know in advance.

‘Big Crumb’ Coffeecake with Rhubarb

Adapted from SmittenKitchen, originally from The New York Times 6/6/07


Butter for greasing pan

For the rhubarb filling:
1/2 pound rhubarb, trimmed
1/4 cup sugar
2 teaspoons cornstarch
1/2 teaspoon ground ginger

For the crumbs:
1/3 cup dark brown sugar
1/3 cup granulated sugar
1 teaspoon ground cinnamon
1/2 teaspoon ground ginger
1/8 teaspoon salt
1/2 cup (1 stick or 4 ounces) butter, melted
1 3/4 cups cake flour (all-purpose works just fine)

For the cake:
1/3 cup sour cream (I used plain low-fat yogurt)
1 large egg
1 large egg yolk
2 teaspoons vanilla extract
1 cup cake flour (ditto on the all-purpose flour–works just fine)
1/2 cup sugar
1/2 teaspoon baking soda
1/2 teaspoon baking powder
1/4 teaspoon salt
6 tablespoons softened butter, cut into 8 pieces.

1. Preheat oven to 325 degrees. Grease an 8-inch-square baking pan. For filling, slice rhubarb 1/2 inch thick and toss with sugar, cornstarch and ginger. Set aside.

2. To make crumbs in a large bowl, whisk sugars, spices and salt into melted butter until smooth. Then, add flour with a spatula or wooden spoon. It will look and feel like a solid dough. Leave it pressed together in the bottom of the bowl and set aside.

3. To prepare cake, in a small bowl, stir together the sour cream, egg, egg yolk and vanilla. Using a mixer fitted with paddle attachment, mix together flour, sugar, baking soda, baking powder and salt. Add butter and a spoonful of sour cream (or yogurt) mixture and mix on medium speed until flour is moistened. Increase speed and beat for 30 seconds. Add remaining sour cream mixture in two batches, beating for 20 seconds after each addition, and scraping down the sides of bowl with a spatula. Scoop out about 1/2 cup batter and set aside.

4. Scrape remaining batter into prepared pan. Spoon rhubarb over batter. Dollop set-aside batter over rhubarb; it does not have to be even.

5. Using your fingers, break topping mixture into big crumbs, about 1/2 inch to 3/4 inch in size. They do not have to be uniform, but make sure most are around that size. Sprinkle over cake. Bake cake until a toothpick inserted into center comes out clean of batter (it might be moist from rhubarb), 45 to 55 minutes. Cool completely before serving.

Give the cake a nice lil’ dusting of powdered sugar, too. It makes makes it just that much better.

Yield: 6 to 8 servings

Almond Frangipane and Blackberry Jam Tart

2 Apr


For a while now, frangipane has been a big mystery to me. I often dip my finger in a batch at my work (shh, don’t tell) and shiver with satisfaction. I have tasted frangipane many times, and I know it has almond in it, but what else? How does one make it? I thought it had liquor in it, but nope (although…a little dash might be nice). Just your good ol’ fashioned butter, egg, sugar. Seriously, who needs anything else in life?

Why do they call it frangipane? Well, I’m still not quite sure. Apparently the word is derived from frangere il pane (Italian for “break the bread”). What this has to do with one of the most divine almond tarts ever tasted? Still a mystery to me.

In just the tiniest bite of this Almond Frangipane and Blackberry Jam Tart, I can taste it all. BUTTER, ALMOND, BLACKBERRY, LOVE.

This tart is very versatile. I can see it served during the cold winter months as well as the springtime (Easter brunch dessert?!). You can change up the jam to whatever suits your fancy.

At my work, we use frangipane in our tarts and puff pastry turnovers. In addition to almond, we like to mix it up and use other nuts and flavorings (hazelnut is dreamy!).


Just make this. Indulge. Love it.

Almond Frangipane and Blackberry Jam Tart

adapted from SmittenKitchen

1 recipe’s worth of sweet tart dough, pre-baked in a 9-inch removable tart pan

1 cup coarsely chopped almonds, blanched if you can find them
1 1/2 tablespoons all purpose flour
2/3 cup sugar
9 tablespoons (1 stick plus 1 tablespoon) unsalted butter, at room temperature
1 large egg
1 large egg white
1/2 teaspoon almond extract
1 1/2 teaspoons orange zest (not traditional, but just lovely in there)
1/3 cup jam (I used blackberry)
Slivered or sliced almonds, for garnish (optional)

Finely grind almonds and flour in processor. Mix in sugar, then butter, extract and orange zest. Blend until smooth. Mix in egg and egg white. Transfer filling to medium bowl. Cover and chill at least 3 hours.

Position rack in center of oven and preheat to 350°F. Spread jam over base of tart shell. Dollop the almond filling all over, then spread it carefully with an offset spatula. If using slivered or sliced almonds as garnish, sprinkle them over the top now. Bake tart until golden and tester inserted into center of filling comes out clean, about 45 minutes. Cool tart in pan on rack.

To serve, push pan bottom up, releasing tart from pan. Cut tart into wedges and sprinkle with powdered sugar, if desired.

Do ahead: Almond filling can be made 2 days ahead. Keep chilled. Whole tart can also be made half a day in advance. Let stand at room temperature.

Buttermilk Avocado Pound Cake

28 Mar

I dropped the cake. I dropped my Buttermilk Avocado Pound Cake midway through it’s baking cycle. I dropped the cake all over the oven, in the oven.

And here was my attempt to salvage the cake:


Sort of looks like a cheesy baked…something or other.


But alas, it is cake, not cheese. Sweet, not savory. Despite my clumsiness, the parts that I managed to salvage actually tasted quite, well, tasty. I had a grand time picking off all the browned spots (my favorite)! At least I had another loaf pan of cake that I did not drop. Phew.

My clumsiness was like “heyday” for the dogs. The following series of photographs chronicles Penny the dog’s happiness/determination regarding my dropping the cake/her trying to help me clean up the delicious green gooey mess (NOTE: I cleaned up the mess hours before I took these photographs; apparently Penny could still taste the yumminess).


“What? I’m just casually lingering by the oven, looking all innocent”

“mmmm, oh yah, this is good”“I’ve got to get into every crevice, who knows where some extra cake goup may be hiding”
“Searching, searching…”

“Got it!”

“This is my last lick, I swear”

“Ok really, I’m almost done. Lickity Split”

Finnegan the dog usually enjoys a steady diet of dirty, sweaty socks and tomato plants + their fertilized soil, but whenever I come visit, he is also thrilled to lick up my baking accidents.

So yes, cake. Buttermilk Avocado Pound Cake. Different. Strange. Wonderfully moist and one of the best cakes that I have eaten/made in a while. Plus, it’s green!

Ever since I saw this cake posted on Joy’s blog, I knew I needed to make it. The combination of buttermilk and avocado is utter bliss. Joy notes how the avocado taste is “subtle but distinct with a nice sweetness and a hint of crunch from cornmeal.” A home run, indeed, Joy.

Want to get fancy? Try pairing the cake with creme fraiche ice cream and candied kumquats. Oh, or an olive oil whipped cream! But really, this cake is perfect on its own. Really, perfect.

Just try not to drop it like I did.

Buttermilk Avocado Pound Cake

recipe from www.joythebaker.com

makes 2 9x4x3-inch loaves

3 cups all-purpose flour

1/2 cup yellow cornmeal

1/2 teaspoon salt

1 teaspoon baking powder

1 teaspoon baking soda

3/4 cup unsalted butter, softened

3 cups sugar

4 large eggs

2 teaspoons pure vanilla extract (I used my own homemade extract!)

3/4 cup buttermilk

flesh of 1 1/2 ripe avocados, just over a cup of avocado, mashed

Preheat oven to 350 degrees F. Grease and flour two loaf pans and set aside.

In a medium sized bowl, sift together flour, cornmeal, salt, baking powder and baking soda. Set aside. Set the four eggs out on the counter to come to room temperature while you beat the butter and sugar.

In the bowl of a stand mixer, beat butter on medium speed until softened and pliable. Add the sugar and beat until light and fluffy, about 4 minutes. Add the avocado and beat another minute to incorporate. Scrape down the sides of the bowl to ensure that everything is thoroughly mixed.

Add the eggs one at a time, beating 1 minute after the addition of each egg. Beat in vanilla extract.

Reduce the mixer speed to low and add half of the flour mixture, all of the buttermilk, and then the rest of the flour mixture. Beat just until combined.

Divide the dough between the two loaf pans and place in the oven. Bake for 40-45 minutes or until a skewer inserted in the center of the cakes comes out clean (Here is where I messed up. I wanted to rotate my cakes halfway through baking, and plop, I missed a beat and it fell EVERYWHERE. Go Steph). Check the cakes every ten minutes or so after the 30 minute mark. Let cool in the pan for 10 minutes, then invert onto a cooling rack to cool completely.

IMG_1763

New picture: June 2015

Avocado pound cake with plain yogurt and homemade apple sauce

>Soup’s On: Easy Carrot Soup with a Dill n’ Yogurt Swirl

25 Mar

>
Fun Fact: Cooked carrots supposedly provide more nutrients than raw carrots (credit: Natasha).

A few weekends ago, I was dining at Pizzaiolo Restaurant in Oakland and ordered a carrot soup. My goodness, this was the most perfect way to start my meal. This utterly irresistible bowl of soup arrived at the table and my only job was to eat, savor, enjoy. And that I did.

The soup had a tangy tone that took it to the next level. I later discovered the secret gem that made the soup so “tangy:” lemongrass. Oh, and the soup had this dilled yogurt sauce swirled into it, which provided a beautiful medley of color and flavor.

I’ve been dreaming about this soup ever since, and as I was flipping through Cooking Light Magazine the other day, I saw a recipe for a simple carrot soup that I just had to make. This soup is not only satisfying but is also very low in calories and fat (yay).

By the way, if you have not already seen this, you should check out thisiswhyyourefat! Delicious and totally gross.

Cooking Light’s recipe uses a touch of sesame oil which “lends depth to this velvety soup”. Joining the carrots are shallots and ginger, giving the soup a nice sweet and spicy punch.


The magazine pairs this soup as a part of an Easter brunch menu: carrot soup, Parmesan thyme rolls, champagne cocktails, asparagus and spring greens salad with Gorgonzola vinaigrette, and deviled eggs with smoked salmon.

I used dill instead of mint as my herb garnish, but any fresh herb should go nicely. I also chose to top my soup with some cubed avocado.


Carrot Soup with a Yogurt Swirl

Yield: (supposedly) 8 servings (serving size: 1/2 cup soup, 1 tablespoon yogurt, and 1 mint sprig)

***NOTE: This soup barely served 4 in my house

Ingredients

  • 2 teaspoons dark sesame oil
  • 1/3 cup sliced shallots (about 1 large)
  • 1 pound (baby) carrots, peeled and cut into 2-inch pieces
  • 2 cups fat-free, less-sodium chicken broth
  • 1 teaspoon grated peeled fresh ginger
  • 1/2 cup 2% Greek-style plain yogurt
  • 8 fresh mint sprigs

Preparation

1. Heat oil in a medium saucepan over medium heat. Add shallots to pan; cook 2 minutes or until almost tender, stirring occasionally. Add carrots; cook 4 minutes. Add broth; bring to a boil. Cover, reduce heat, and simmer 22 minutes or until tender. Add ginger; cook 8 minutes or until carrots are very tender. **NOTE: I had to add a LOT more broth than the recipe calls for. Cover and let stand 5 minutes at room temperature.

2. Pour half of carrot mixture in a blender. Remove center piece of blender lid (to allow steam to escape); secure blender lid on blender. Place a clean towel over opening in blender lid (to avoid splatters). Blend until smooth. Pour into a large bowl. Repeat procedure with remaining carrot mixture. Return pureed soup to pan; heat over medium heat 2 minutes or until heated.

3. Spoon soup into small bowls, and top with plain yogurt and fresh mint sprigs.

Nutritional Information

Calories: 47
Fat: 1.6g (sat 0.4g,mono 0.5g,poly 0.5g)
Protein: 2.2g
Carbohydrate: 6.5g
Fiber: 1.7g
Cholesterol: 1mg
Iron: 0.6mg
Sodium: 163mg
Calcium: 36mg