Archive | fruit RSS feed for this section

>Honey Vanilla Ice Cream + Summer Fruit Crisp

18 Aug

>


Amidst my camera breaking, my new apartment still coming together, no Internet at the new apartment, and my weekend getaway trips gallivanting around northern California, my blog posts have been/will be a bit delayed.

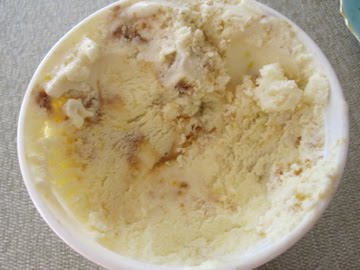
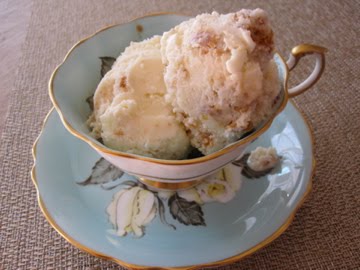
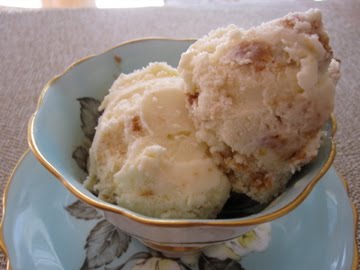
My new kitchen is filled with fun gadgets: my KitchenAid candy-apple-red mixer, my mortar and pestle, tons of baking pans, and my ICE CREAM MAKER. And what a better way to break-in the kitchen than to make some refreshing ice cream?! Honey vanilla ice cream!!!

Lately I have been eating tons of melon: cantaloupe, watermelon, orange honeydew melon, canary melon, muskat melon……..mmmmmm. This honey vanilla ice cream is the perfect accoutrement to any melon. For some more melon fun, check out this post by the KitchyKitchen.


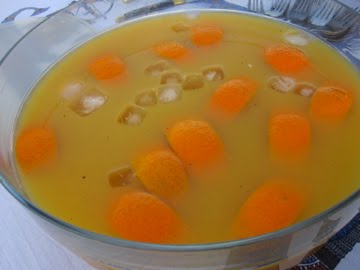
The way that I pick a good melon is to give it a sniff at right at the end where that circular nub is (see above photo). It should smell like fragrant flowers. If there is no smell, you can still buy the melon but let it sit for a few days on the counter. You can also try to shake or knock the melon. If the seeds are loose, the melon is ripe.

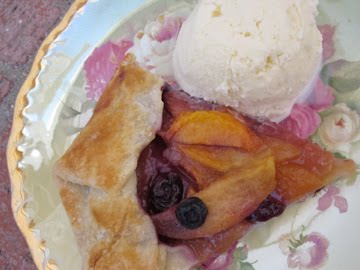
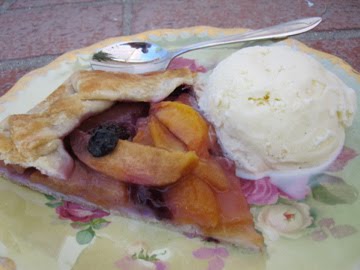
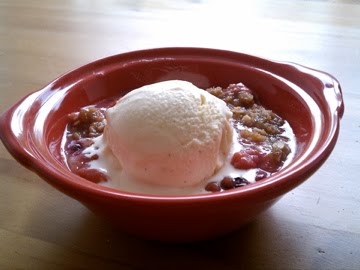
The honey vanilla ice cream can be served with melon, served on its own, served with some peanut butter and sliced sauteed bananas (deconstructed Elvis Presley-style?), served with a summer fruit crisp, or any other way you can imagine.

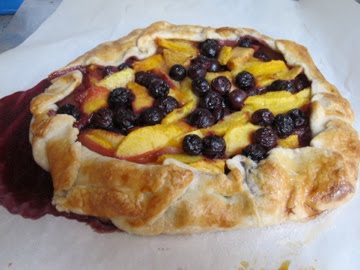
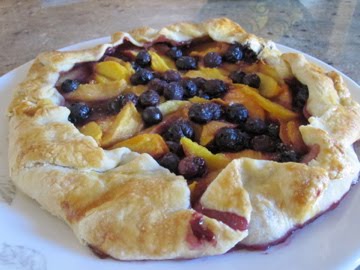
A summer fruit crisp is an easy, comforting dessert that can be thrown together in a pinch. Use whatever fruit you like, sprinkle the crisp topping on, and bake. Gosh, you get your fruit and your oat-y crumbly crunch. And it is just divine with the ice cream.


To make the crisp: I sliced dapple dandy pluots, a nectarine, and sprinkled a few blueberries into an 8 in by 8 in square baking pan (feel free to make minis in little ramekins, too). I added a tablespoon and a half of all-purpose flour (you can also add a sprinkle of sugar and/or lemon depending on the sweetness of the fruit). Then I topped the fruit with some crisp topping (recipe below) and baked it all in a 375 degree oven for about 30-40 minutes. Serve warm with the ice cream on top…YUM!


Honey Vanilla Ice Cream
adapted from Chez Panisse Fruit

makes 1 quart

** BEWARE: This ice cream is really heavy on the honey flavor. If you just want a slight honey flavor, add only 1/2 a cup or less of honey. But if you are a major honey lover, add the whole 3/4 cup (that’s what I did)

6 egg yolks
1 cup half and half (I just used milk because that was all I had…it still came out great)
1 pinch salt
1 vanilla bean
2 cups heavy cream, chilled
1/2-3/4 cup honey, depending on how much of a honey lover you are

Set the heavy cream into a large bowl or bucket and set a fine mesh strainer or sieve over the top. Set the bowl into another larger bowl of ice water.

In a mixing bowl, whisk the egg yolks just enough to break them up. Gently heat the milk and salt in a medium-size saucepan or pot. Split the vanilla bean lengthwise, scrape out the seeds with a paring knife, and put them into the milk mixture along with the bean pod. Stir slowly over low heat until the milk is steaming.

Drizzle the warm mixture into the egg yolks, whisking constantly as you pour (this is called tempering the egg yolks).

Return the milk and egg yolk mixture to the saucepan or pot. Cook the mixture over low heat, stirring slowly and scraping the bottom of the pan with a wooden spoon or heat-resistant rubber spatula until the mixture thickens enough to coat the spoon (this happens at a temperature of about 170 degrees F).

Immediately remove from the heat and strain through the fine-mesh strainer/sieve into the cold cream. Whisk in the 3/4 cup of honey.

Whisk together to cool the mixture over the ice bath. Once chilled, cover the ice cream base and refrigerate until thoroughly chilled (at least a half hour or over-night).

Freeze the mixture according to your ice cream machine’s instructions. Transfer the frozen ice cream to a clean dry container, cover, and store in the freezer for several hours before serving to firm up.

Variations:

To make honey lavender ice cream: Add 1 tablespoon of dried lavender when you are heating the milk.

To make vanilla ice cream, use milk instead of half and half and add 2/3 cup of sugar when you heat the milk. Omit the honey.

Fruit Crisp Topping

adapted from Deborah Madison

3/4 cup light brown sugar
2/3 cup flour
1/2 cup rolled oats or finely chopped almonds
1/4 tsp. salt
1/2 tsp. nutmeg
1 tsp. cinnamon, optional
6 Tbsp. butter, cut into small chunks

Using your fingers or the paddle attachment of a mixer, combine the topping ingredients and work in the butter until the texture is coarse and crumbly.

**The topping can be made ahead and refrigerated for a week or so or frozen for several weeks.

>Lemon Ice Cream with Graham Cracker Crumbs

2 Aug

>
No, I did not buy this ice cream from the corner store. Yes, I made this ice cream from scratch with real lemons, some quality dairy products, a touch of sugar, and lots of love. And I added crumbled graham cracker crumbs (I used Trader Joe’s whole wheat cinnamon graham crackers) to this ultimate lemon ice cream just because, well, what the heck, right?!

Lemon ice cream with graham cracker crumbs. Eaten out of some fancy china, eaten out of the container, or eaten straight from the ice cream maker…it’s just that good…


Lemon Ice Cream with Graham Cracker Crumbs

adapted from Tartlette

Finely grated zest of 3 lemons
1/2 cup fresh lemon juice
3/4 cup sugar or 2/3 cup agave nectar
pinch of salt
4 egg yolks
1 cup milk
2 cups heavy cream

cinnamon graham crackers or gingersnaps, broken into tiny bite-size pieces

In a non-reactive bowl, mix the lemon zest, juice, sugar, and salt. Refrigerate 1-2 hours to blend flavors.

Pour your 2 cups of cold cream into a bowl or bucket and set a fine mesh strainer over the top.

In a large bowl, slightly beat the egg yolks to break them up. Heat milk to a bare boil in a large heavy saucepan. Pour the milk over the eggs, stirring constantly, and return combined mixture to the saucepan and gently heat until the mixture slightly starts to thicken and coats the back of a spoon.

Pour through the fine mesh strainer into the cold cream.

Set the milk and cream mixture over a larger bowl of ice water until cold. Refrigerate until completely chilled. Combine the milk/cream mixture with the lemon slush mixture. Spin in the ice cream maker according to the manufacturers instructions. In the last few minutes of churning, add your graham cracker crumbs.

>Blueberry and Summer Peach Galette with Homemade Vanilla Bean Ice Cream

1 Aug

>
Oh baby, look at that oozing berry juice spilling out of the galette!!!!!!!!!!!!!!

Light, summery, refreshing, beautiful. This fruit galette is just heaven– beautiful blues and purples from the blueberries and reds and orange colors from the peaches. The thin flaky crust serves as the perfect bed for the sweet juicy fruit. Paired with some dang good homemade vanilla bean ice cream, all I have to say is “mmm mmm mmm mmm mmm!”


A galette is a thin, free-form open-face tart. The dough is not sweet and can be used for savory tarts as well as dessert. Once you make the dough, the filling is your choice, pretty much anything goes.

…I am at a loss for words. Just make it, eat it, share it, enjoy it.

Blueberry and Summer Peach Galette

adapted from Alice Waters’ In the Green Kitchen

6 to 8 servings

This recipe makes enough dough for 2 tarts. The dough will keep in the refrigerator for 2 days or in the freezer for several months

2 cups unbleached all-purpose flour
1/2 teaspoon salt (omit if using salted butter)
12 tablespoons (1 1/2 sticks) cold unsalted butter
1/3 to 1/2 cup ice-cold water

3-4 medium peaches
1 cup of blueberries
sugar
1 egg

If making the crust by hand: Measure the flour and salt (if including) into a bowl. The butter should be cold and firm, but not hard. Cut into 1/4-1/2 inch cubes and put about half of it into the bowl. Work it into the flour with your fingertips, lightly rubbing and breaking the flour-coated pieces of butter into small bits, until the mixture is roughly the texture of oatmeal or cornmeal. Add the rest of the butter and work it quickly into the dough until the pieces of butter are about half of their original size. Dribble the water into the dough while tossing the mixture with a fork. Keep adding water only until the dough begins to clumo and hold together when you squeeze a handful. You may not need the full 1/2 cup. Divide the dough into two and gather each part into a ball. Wrap each ball in plastic and flatten it into a disk. Let the dough rest, refrigerated, for an hour or so (I like to do it the night before…). You may want to freeze the second disk of dough for future use.

If you are using an electric mixer: Just follow the above directions but instead of using your fingers to incorporate the butter, use your fingers to turn on your mixer (use the paddle attachment).

When ready to make the tart: Let the dough warm up at room temperature for 15 minutes or so and preheat the oven to 400 degrees F. Roll out the dough on a lightly floured surface into a rough circle about 12 inches in diameter and about 1/8 inch thick. Transfer the pastry to a baking sheet lined with parchment paper and refrigerate while preparing the fruit.

Peel and slice the peaches (or whatever fruit you use) and toss with 1 to 2 tablespoons of sugar. I added blueberries to this, too. Freely pile the fruit in the center of the dough, leaving a 1 1/2-inch border of dough around the whole circumference. Fold the dough over up over the fruit, and brush the rim of the dough lightly with beaten egg. Sprinkle sugar over the dough and fruit; use more or less, depending on the tartness of the fruit.

Bake in the lower part of the oven for 45-50 minutes, until the fruit is tender and the pastry is golden brown and slightly caramelized at the edges. Slide the tart off the pan to cool on a rack. Serve warm or at room temperature–with softly whipped cream or homemade ice cream, if you like.

Some notes:

If you are using juicy stone fruits such as peaches, nectarines, apricots, and plums: to help absorb the juices sprinkle a mixture of 2 tablespoons sugar, 1 tablespoon flour, and 1 tablespoon ground almonds (optional) on the pastry before topping with the fruit.

Apple galette is delicious when you spread the rolled-out dough with apricot jam before arranging the apples on top. After baking, brush the apples with warm apricot jam for a beautiful glaze.

French Home Cooking in the Suburbs of Paris

10 Jul

I feel lucky. I feel very lucky. I feel very lucky to have just spent the last week in the suburbs of Paris, France with a lovely French family. A lovely French family who gave me a bed to sleep in at night, a clean shower, and home-cooked meals. Let’s just say that I have eaten well this past week, eaten well with great company (and don’t forget about the wine!!).

Let us start from the beginning, shall we? I have a friend, her name is Alex (pictured below on the right). Alex is from France.


Alex and I worked/lived together last summer (2009). We worked together in Berkeley, California at a cooking camp for children.

This summer (2010) I went on a 3-week Euro-trip where I spend my last week with Alex and her family in Paris, France. Actually, they live right outside Paris in a town called Vincenne. Just before I arrived, Alex was at her family’s country home where she picked fruits and made jams with them: rhubarb, cassis (black currant), groseille (red currants), apricot, apple, raspberry…

Groseille (red currant) jam

Apparently Alex and her family have NEVER had to buy jam before. They always make it in abundance with the summer fruits from their country home. And every morning they eat their jam on a toasted baguette. What a life, eh?

Rhubarb jam 

Speaking of rhubarb, check out this piece of rhubarb:


It is huge! And green! Totally different than the rhubarb that I am familiar with back in the states. I have made rhubarb jam before, it was red. Their jam is green. “C’est la vie.”


Pictured below is Alex’s mom, Catherine. She is making rhubarb jam and she is literally the queen of her kitchen, my taste buds can attest to that:


Alex recently celebrated her 22nd birthday. Bon anniversaire! (that means “happy birthday” in French). Of course we had to celebrate with good food and good drinks. We had a multi-course meal with a bottle or two of wine for each course!

This multi-course meal, however, was as simple as can be. It all started with fresh scallops. During the winter months, Alex’s family buys fresh scallops, shucks them, and freezes them. Her mom defrosted these scallops over-night in milk so that they would not dry out or smell. A sprinkle of oil in a hot pan with a dash of fresh garlic, sauteed two minutes on each side and these babies are done! Accompanied with a fresh baby spinach salad, I found such joy in the hot/cold, soft/crunchy balance of foods. Mmm summer!


Next, we had a little somethin’ called “tarte tatin,” which is sort of like an upside-down tart. Typically, you see a tarte tatin for dessert, made with fruits such as apples. But Catherine prepared a savory tarte tatin with a confit of ratatouille-style vegetables, topped with slivers of fresh Parmesan cheese.


And with every great meal there is always fresh baguette…


Now lets talk dessert. I sat with Catherine as we picked through a big bucket of fresh red currants, separating stem from fruit.


We were adding these currants to a fresh fruit crumble. Rhubarb and red currant crumble. No sugar was added to the fruit. I couldn’t believe it. Seriously? Yes, why add sugar when you can just taste how good the fruits are as is?


Topped with a pastry crust: 200 grams each of flour, ground almonds, sugar, and butter.


Pat it down and Voilà! We added a little special touch to the crumble by making the number “22” out of the pastry.


And after it baked, the currants just exploded over the pastry top and all that was left was this special “22.” Yum-o! I love the tart fruit mixed with the sweet pastry crust. Really just so simple and not too much sugar.


Now, last year when Alex came to Berkeley, she made this cake that I have since dreamed about all year long. This cake is of the chocolate variety. It is called Fondant au Chocolat and is the best darn chocolate cake I have ever tasted. It only works if you use very good chocolate. There is only about 2 tablespoons of flour in the whole cake. So easy to whip up and so quick to bake. The key is timing and temperature of the oven. Oh how I adore this cake.


Alex’s mom probably could have prepared the cake with a blind-fold on and one hand tied behind her back. It was like a little dance watching her bake with such easy and joy.


Let us meet dad now, yes? Everyone, meet Emmanuel. The wine connoisseur, the grill master, the cheese aficionado, the jokester. This man knows everything and more about French wine. We even tasted a very special red wine that is supposed to be eaten ONLY with really good chocolate (yes, we drank this wine with our fondant au chocolat). Below, Emmanuel grills pork and lamb on the rooftop of their flat.


What a beautiful summer evening, the perfect night for another perfect meal…


Roasted potatoes, perfectly browned…


Special French salt called “fleur de sel.” It’s great for sprinkling as a final touch to any dish…


On my last night in France, Alex hosted a barbecue for friends. On the menu was a simple tabouleh salad: cucumbers, tomatoes, couscous, lemon juice, olive oil. There was also a salad with fresh sliced tomatoes, hericot vert (French green beans), and feta cheese.

Prepping the tabouleh
Tabouleh Salad
Hericot vert, tomato, and feta cheese salad

Alex made a lovely fruity rum cocktail with fresh orange slices and vanilla beans:


And then the meat…chicken and ribs. Dude.

Poulet (chicken)
Alex at the grill
Meeeeeaaaaaat!


Wow, what a week. I really admire Alex’s family for not having “snack” foods around. Not even cereal or oats or crackers. Everything was fresh. Lots of yogurts, fruits, cheeses, and everyday more baguettes appear. After every meal, I would “cleanse” my palate with strong French cheeses. I miss those cheeses already!

Until next time, Paris!

>Buttermilk Pie With Warm Berry Sauce

5 Jun

>
Get ready. This pie is the real deal. It all begins with the crust, and WOW is this a crust. Butter + buttermilk +a little flour, sugar, salt.
Uh. Yeeeeaa. And it doesn’t stop there…the filling entails more butter, more buttermilk, and a little bit of love. Drizzled (or in my case, slabbed on…) with a hearty tinge of berry sauce (heat jam + a bit of liquor), it all seems to good to be true.

Actually, I especially liked the pie the following day after it had been in the refrigerator all night; all of the flavor really got to settle in and it was nice and cold–it seemed more like a cheesecake this way.

Over the years, my math skills have gone down the drain, and I was never that great at geometry to begin with. One of the most difficult tasks for me now as a baker is cutting a tart or pie into even pieces. In a professional food setting, I would have to plate every slice of pie exactly the same size. Your average tart or pie would probably be cut into 9 slices. 9 is a tough number. I have to draw a diagram so that I remember how to cut. Finding the center is also very challenging for me. For tarts baked in a tart pan, I have also resorted to counting the number of ridges per slice (8-9 ridges equal one slice). Goodness, I have a headache now!

When I am in a more casual setting, I just let everyone slice for themselves (or, if I am the one slicing, I just do a rough eyeball). I don’t need anything fancy (In my family, we tear our bread loaves rather than slice; it’s just more fun that way). There are always those who just want a little sliver of pie, and those who want a slice the size of my head, so I just stand back and let them do their thing.


Anyhoot, this pie is so rich that it feels so light. I’m kind of floating right now (or maybe I just have too much CA sunshine running through my veins). Either way, come on over for a slice of pie, it’s my treat.


Buttermilk Pie with Warm Berry Sauce

recipe from Joythebaker.com


Buttermilk Pie Dough


2 sticks (8 ounces) cold unsalted butter

2 1/2 cups all-purpose flour

1 Tablespoon sugar

1 teaspoon salt

1/2 cup buttermilk, cold

Cut butter into 1 inch pieces and place in the freezer to chill for 15 minutes.

Sift together the flour and sugar into the bowl of a stand mixer fitted with a paddle attachment. Sifting eliminates lumps and aerates the mixture, making the dough tender and lighter. Add the partially frozen butter and the salt. Mix on low speed for 2 minutes, or until the butter is reduced to the size of broken walnut meats. Stop the machine and by hand pinch flat any large pieces of butter that remain.

Turn the mixer on low speed and add the buttermilk all at once. Mix until the dough comes together, about 15 seconds. The dough should be tacky, but not sticky, and still rather shaggy.

Remove the dough from the bowl and quickly form into a rough disk. Wrap in plastic. Try not to overwork the dough. Chill for at least 1 hour before rolling out. At this point the dough will keep in the refrigerator for up to 3 days or in the freezer for up to 3 weeks. For freezing roll the dough into sheets and wrap them in airtight plastic film first.

Roll the dough out into about 1/8th inch thickness. Transfer to a pie plate and stick in the freezer (or fridge) while you prepare the filling.


Buttermilk Filling

3 large eggs

1 cup sugar

2 Tablespoons all-purpose flour

1 stick melted butter, slightly cooled

1 cup buttermilk

2 teaspoons pure vanilla extrct

1 unbaked 9-inch pie shell

Beat eggs slightly. Mix sugar and flour well and add to the eggs. Mix until creamy. Add melted butter, mixing well. Add buttermilk and vanilla extract. Bake at 325 degrees F for 45 minutes to 1 hour (my pie took about 1 hour and 15 minutes) until the custard sets. Tip: the custard will still jiggle a bit in the oven even when it’s set. Just make sure that the middle does not jiggle a lot more than the sides. That means it needs more time.


Berry Sauce


1/2 cup berry preserves (I used raspberry jam p.s. it had seeds, which I like because it adds a fun little crunch. If you prefer seedless, by all means go seedless!)

1 Tablespoon Chamborde liqueur, also considered orange liqueur or a bit of Triple Sec

Pour the preserves in a saucepan and arm on medium heat, stirring constantly with wire whip until smooth. Remove from heat and add liqueur. Let cool slightly and drizzle over pie.


**Just a shout-out to Joy: After hours and hours spent baking her recipes and perusing her blog, I decided to start my own blog a year ago. She has truly been an inspiration for my baking, my writing style, and my sense of well-being. I thank you again and again and again Joy! (Below is a photograph of Joy, on the right, and myself at a roof-top picnic that she put together for her and her fellow blogging friends/readers last year.)