Archive | dinner RSS feed for this section

Cornbread fit for 60!

11 Sep


Where’s the peeler? You mean I have to soak the beans overnight? How much liquid do I use for the rice? These questions cross my mind every week as I prepare to cook dinner for sixty hungry college students living in my co-op.

As head cook, I start preparing dinner with one other person in the afternoon to have the meal ready by 7 p.m. I want to cater to everyone’s likes, dislikes, and needs—to vegetarians, vegans, meat-lovers, gluten-free eaters, and picky eaters. Seasonal produce, bread, meat, and dairy products regularly get delivered to the house, and the kitchen is already stocked with the basics—spices, grains, dry beans, oils and vinegars…

Cornbread. Always a crowd-pleaser. So moist and comforting—I feel guilty with glee, it is like eating cake with dinner!


Golden yellow in the center and perfectly browned on the edges, this cornbread really is the best ever! And you know why it is the best ever? Because it calls for the butter to be browned! Yes, browning the butter is the secret! It was also the secret in these blueberry muffins!


The key to browning your butter is to melt it on the stove over medium heat and to turn it off as soon as it stops “singing” (aka sizzling/cracking/popping/making noise…you get the picture). You can see the butter go from yellow to a nice brown color, and the smell is so sinfully delicious and nutty!


This is just a basic recipe for cornbread. If you are feelin’ a little cra’ cra’ (aka crazy!!) you can add in some cheese, fresh corn kernels, jalapeños, chives…


This recipe is so moist and all the flavors come together so nicely that I found no need to add any extra butter, honey, sour cream… on top. But if you feel so inclined, please go right ahead!

Best Cornbread Ever
Adapted from herbivoracious.com
Serves 60! (divide recipe by 6 and use an 8×8 in. pan to get the original proportions)

* 6 sticks unsalted butter
* 12 eggs
* 6 cups buttermilk (I used 3 cups nonfat milk + 3 cups 2% milk and 6 T. white vinegar)
* 6 cups cornmeal
* 6 cups all-purpose flour
* 2 cups sugar
* 6 teaspoons salt (aka 2 Tablespoons)
* 3 teaspoons baking soda

1. Preheat the oven to 375 °F and butter two large rectangular pans.
2. Melt the butter in a saucepan over medium heat. Continue cooking about 10 minutes or more until it is turning a light brown and has a delicious, nutty aroma. Do not skim, keep all those browned milk solids (that is where most of the flavor is concentrated!).
3. Whisk together the eggs and buttermilk. Drizzle in the butter, whisking constantly to avoid cooking the eggs.
4. Whisk together the dry ingredients in a separate bowl.
5. Combine the wet and dry ingredients and stir just enough to form a batter. It is ok if there are a few lumps. Avoid over-beating as this could make the cornbread tough (tough cornbread=yuck).
6. Pour into the pan and bake about 25 minutes until golden brown and a toothpick inserted in the center comes out dry.
7. Serve while still hot. Get it while you can because in a house full of hungry 20-something year olds, it will all be gone in a matter of minutes!

>Jews, Schmooz, Barbecues

27 Aug

>
Ahh, the start of a fresh school year…

The sun is shining, people are happy…there are new beginnings aplenty!

Fraternities and sororities are bustling and bursting out in rush-songs and secret handshakes. Incoming college freshmen are scurrying around campus trying to find the correct building. The co-ops are still semi-clean. Actually, nevermind. I take that back.

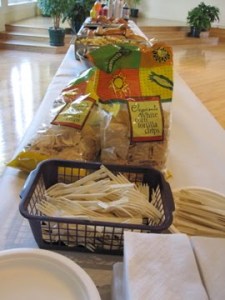
Clubs and organizations parade you with fliers and free food, trying to get you to sign up for this and that.

Berkeley Hillel, a Jewish center for student life, is all about giving free food to hungry college students and encouraging social interaction…

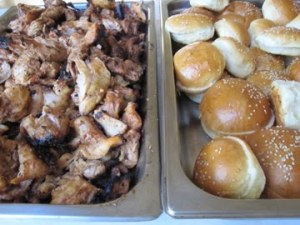
Every Wednesday, a handful of students join together to prepare a massive barbecue at Berkeley Hillel. We make a rockin’ guacamole and salsa, a leafy green salad, a colorful pasta dish, barbecued chicken and hot dogs with accompanying bread buns (we always do a vegetarian option, too!), French fries, and a dessert!


Cooking for a crowd is a whole lot different than cooking for four. We usually barbecue enough for about 300-500 people!

I used to be a sucker for following a recipe step-by-step and taking my time to slowly and thoughtfully put a meal together. Now I have learned how to use a recipe only as a guide and how to cook mostly by feel, leaving lots of room to experiment and get creative in the kitchen!

While I sometimes miss cooking for four, when cooking for a crowd there are many more compliments, which always make me feel good after a long afternoon of chopping, roasting, baking, and sautéing!

When cooking for a large crowd, it is a luxury to be able to get a case of avocados. Avocados are a miracle fruit. They can fit into many different cuisines—Japanese sushi, Mexican guacamole, American sandwich filling…Recently, avocados are used as a thickener and base to hold everything together in baked goods, and also makes for a creamy ice cream flavor! Although I have yet to try this, avocados are also great for make-at-home face masks and beauty regimes. They are great for the skin and have a lot of “healthy” fats and vitamins.

I make guacamole by feel. Sometimes I like to have the chunks of avocado bits and other times I like to mash the avocados for a smoother feel.

Rockin’ Guacamole
Serves 2-4

Ingredients:
2 avocados
¼ red onion, finely minced
lemon or lime juice (about 1-2 Tablespoons)
salt and pepper

optional add-ins:
1-2 tomatoes, diced
jalapeño, finely minced
cilantro
fresh corn
diced mango

1. Slice the avocados in half. Scoop out the pit or lightly bang with a sharp knife and twist it out. See here for a more thorough explanation for how to cut and peel an avocado. **Reserve the pits (see step 7)
2. Score the avocados into a criss cross pattern and scoop out the cubes with a spoon. Alternatively, you do not have to score the flesh and can just scoop it out with a spoon and mash with a fork or potato masher.
3. Finely mince the onion and combine with the avocado.
4. Add in the lemon/lime juice, and salt and pepper to taste.
5. Add in diced tomato, jalapeño, and cilantro to garnish.
6. For a fun twist, add in fresh corn or diced mango!!
7. If you are not eating the guac right away, place the pits in the guac to prevent browning (I do not know if this really works, but I do it anyway!! It looks pretty, too!).
8. Serve with chips, veggie crudités, corn tortillas, or use as a sandwich spread!

One tip I learned while working at Spago Restaurant is how to correctly boil pasta. When you boil the water, throw in enough salt for it to taste like an ocean! Really, a LOT of salt. When you add the pasta to the water, the salt gets incorporated into the dough and then you do not have to add so much extra salt to your sauce.

Do a taste test. Taste some plain pasta that has been cooked in heavily salted water and then try some that was cooked in only water. Wow. The flavor of the salt really pops out and makes such a big difference! Thank you Spago chefs!

Another tip is to reserve some of the pasta water before you drain the pasta to incorporate into a sauce.


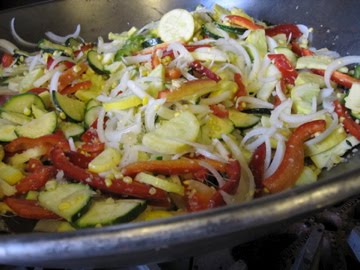
Pasta salad with summer vegetables

You can adapt proportions according to how many people are eating!

Dry pasta (I like to an assortment of fun shapes!)

Fresh seasonal produce (I used cherry tomatoes which I left whole, fresh corn, zucchini and yellow crookneck summer squash, red bell peppers, garlic, and onions!)

A few splashes of Balsamic vinegar and good quality extra virgin olive oil

Fresh herbs such as basil or parsley

Optional: cheese (feta, Parmesan, mozzarella…_)

1. Cook the pasta in boiling SALTED water.
2. Drain (reserve some of the pasta water in case you want to add some back).
3. Chop the veggies into shapes of your choice—circular slices, thin strips, small chunks…
4. Sauté the onions first for a few minutes. Then add the rest of the veggies and stir until cooked. Add some salt.
5. Combine the sautéed veggies and pasta.
6. Add a splash of the balsamic vinegar and olive oil and stir. If the mixture seems dry, add some of the reserved pasta water (although most likely the vegetables will add enough moisture).
7. Stir in cheese. Garnish with fresh herbs.


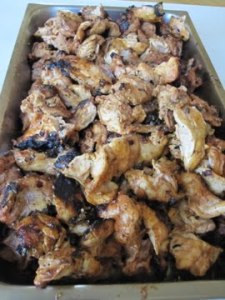
After making the Silver Palate cookbook recipe for homemade barbecue sauce, it is hard to eat the store bought stuff. This is a really fresh tasting sauce that you can add or substitute ingredients according to your own taste buds.

I often make it and then toss it with some chicken to either pop in the oven or throw on the grill! It is always a hit, tastes better than the store bought sauce, and is super easy to prepare!


Homemade Barbecue Sauce!

Adapted from the Silver Palate cookbook
Makes about 3 cups

Ingredients:
2 cups ketchup
1/2 cup cider vinegar
1/2 cup water
Juice from 1 lemon
2 Tablespoons Worcestershire sauce
2 Tablespoons Tabasco sauce (I used a drop of Asian red chili sauce)
2 Tablespoons unsulfured molasses
2 Tablespoons Dijon mustard
1/4 cup (packed) dark brown sugar
2 Tablespoons chili powder
2 teaspoons finely minced garlic (I used a few cloves of roasted garlic…mmm!)
2 teaspoons smoked paprika
salt and freshly ground pepper, to taste

1. Combine all the ingredients in a saucepan.
2. Cook over medium-low heat, stirring, to heat through and to blend the flavors, 10-12 minutes. Do not boil.
3. Use immediately or store in the refrigerator, covered, for up to 2 weeks.

>20 Minute Family Dinner with the Help of Good Ol’ Trader Joe

22 Aug

>
Dear Trader Joe,

You are filled with fun snacks and irresistible brand name treats! Why do you tempt me so?

Your thick cinnamon raisin bread is just heavenly when turned into French Toast! Your Raisin Bran and Vanilla Almond Clusters cereal…once I start, I can’t stop! All of those cute prepared salads! And your pizza doughs! Don’t even get me started on your trail mix collection and those gosh darn chocolate covered almonds! You used to carry this Greek style Fig Yogurt, but now you don’t…tears…sniff sniff…

In case you haven’t seen this video yet, anyone familiar with Trader Joe’s market should watch! Here you go!

Anyway, I just spent 5 days with the fam basking in the San Diego sunshine, cruising the beaches, and riding the waves on a sailboat and a powerboat, a kayak and a jet-ski!


After sitting in traffic on the way back to Los Angeles, we had no desire to “futz” around in the kitchen. Quick, easy, and delicious was tonight’s motto.

We decided to be inventive and use up whatever was left in the house (which was pretty slim pickin’s since we were out of town for 5 days!).

Well, those “slim pickin’s” made a mighty fine 20-minute dinner! We took the easy way out and popped some Trader Joe’s brand “chicken tenders in panko bread crumbs” in the oven with marinara sauce and shredded mozzarella cheese. We sautéed a little spinach with some garlic and salt to top it all off!


Trader Joe, you did it again! We took your simple already made chicken and kicked it up a few notches with our own twist!


To keep our chicken dish company, I prepared a “musgo” (pronounced muZgo; term for everything in the fridge “must go”) chopped Italian style salad with celery, cucumber, hearts of palm, olives, sun-dried tomatoes, and pepperoncinis. Drizzled with some oil and vinegar, a dash of salt, and a sprinkle of rosemary, this salad was a big hit tonight for the fearsome foursome!


Breaded Baked Chicken with Tomato Sauce, Spinach, and Cheese

1 package of Trader Joe’s “chicken tenders in panko bread crumbs”
½ a large jar of your favorite marina sauce
a few handfuls of shredded cheese (mozzarella…parmesan…)
Garlic (1-2 cloves)
Spinach

Directions:

  • Preheat oven to 350°F. Line a large baking dish with foil.
  • Place the chicken tenders on the foil and cover with sauce. Sprinkle with cheese.
  • Bake until heated through and the cheese is melty, about 10-15 minutes or so.
  • Meanwhile, heat a little oil in a pan and add the garlic. Cook for about 1-2 minutes. Add a bag of spinach and sauté until wilted. Sprinkle with salt and pepper. When the chicken comes out of the oven, lay the spinach over the top!


“Musgo” Chopped Salad

4 stalks of celery
3 Persian cucumbers
1 can of Hearts of Palm
Sundried tomatoes in oil
Olives
Pepperonici

Extra Virgin Olive Oil
Vinegar (I used Balsamic, but feel free to use Red wine or another vinegar of your choice)
Salt
Rosemary (I used dried but fresh would be ideal! Also, you can substitute whatever herbs you prefer!)

  • Chop everything into bite-sized pieces. Dress lightly with oil and vinegar, herbs, and salt.
  • Feel free to add in whatever ingredients you have on-hand or like to eat. I would love some chunks of feta cheese! Some toasted nuts! Artichoke hearts! Avocado! Let your imagination run wild!

>Bonjour! Now let’s eat crepes!

17 Jul

>
I’m learning to speak French. Well, sort of.

So far, I have mastered how to say, “where is the bathroom?” and “did you sleep well?”

Although my French speaking abilities are quite limited, I am learning a thing or two about French cooking these days. What I am realizing is that most desserts are really simple—just eggs, milk, sugar, and flour. This is the basis for famous clafoutis (just add cherries), Moelleux au Chocolat (just add chocolate), and of course, crepes!

The French rarely use baking powder or baking soda, either. The key is to whip the eggs really well!

When I think of crepes, I imagine a burly man standing on the cobblestone streets with a cart, using his special tool to spread the batter very thinly over the hot pan.

Many different cultures have a variation of the pancake-like crepe—the Italians have crespelle, the Jewish blintz, Dutch babies, African injera, the tortilla, the Indian dosa, and the Mexican sope…

When making the first crepe of the batch, it is bound to get messed up, but have no fear! It still tastes great and the rest of them come out looking beautiful—very delicate, lacy, and lady-like, almost like an edible doily!

So for your next Saturday morning pancake and mimosa breakfast, why not impress your friends and family with some simple and light homemade crepes enjoyed on the porch with the shining morning sun?!

Crepes
Adapted from the Joy of Cooking

Makes about 5-8 large crepes depending on the size of your pan

Wet ingredients:
2 eggs, beaten well
2/3 cup milk
½ cup water
a pinch of salt

Dry Ingredients:
¾ cup flour
2-3 Tablespoons of sugar (optional)

1. Beat eggs. Add the rest of the wet ingredients, including salt.
2. Slowly sift the dry ingredients over the wet ingredients and whisk in a quick motion to be sure there are no lumps.
3. Let the batter rest. It is best to rest the batter for one or more hours in the fridge, but we did not have the patience and rested the batter for a mere 10 minutes! (the crepes still turned out great!)
4. Spray a nonstick skillet or crepe pan with cooking oil spray (we tried some with butter, but found that the butter burned too fast).
5. Place on ladle-full of batter into the pan and swirl quickly to cover the pan, getting the batter as thin as possible.
6. With a spatula, slowly check the under edges for doneness.
7. Flip the crepe over and cook a few more minutes.
8. Transfer to a plate and cook up the rest of the crepes.
9. Sprinkle a topping of your choice over the crepes, fold it up, and eat!

Sweet Topping ideas:
-butter and salt with a pinch of sugar
-jam
-fruit: strawberries, figs, bananas nectarines…
-lemon and powdered sugar
-Nutella spread
-honey

Savory egg and cheese crepes

1. Follow directions for crepe batter but omit the sugar.
2. Cook one crepe on both sides.
3. With the crepe still on the hot pan, add cheese and crack an egg in the middle.
4. Fold it over and let everything get gooey and melted!
5. Repeat with remaining batter.

More savory crepe ideas:
-Cooked spinach, onion, mushroom and cheese
-Add some pesto
-Fresh herbs and cheese
-Chicken with the works
-Artichoke hearts and sun-dried tomatoes
-Scrambled or fried egg with crumbled sausage

>Dinner for One, Please

7 Jul

>After a long day at work or school, it can be hard for many to think about messing around in the kitchen and cooking up a “fancy shmancy” dinner—especially if you are just cooking for yourself.

Often times I just end up toasting some bread, preparing a raw salad, and cooking an egg—poached, scrambled, or sunny side up. Simple, easy, nourishing, and tastes great!

Another no fail meal is chopping up whatever vegetables I have lying around—carrots, eggplant, peppers, green onion, garlic, spinach…and sautéing them in a peanut sauce with some tofu and spaghetti or rice. I top everything off with a sprinkle of sesame seeds and chopped peanuts or cashews.

Peanut Sauce
about 1 tablespoon peanut butter
½ a tablespoon soy sauce
½ tablespoon sesame oil
2 tablespoons milk (I usually use soymilk because it is what I have on hand)
A little hot water, if needed

Whisk it all up and voila—peanut sauce made for one! If you want to get real fancy you can add some red wine vinegar and grated garlic and ginger. Throw the veggie/tofu mixture in the sauce and cook in the skillet until the veggies are tender.

~~~~~~~~~~~~~~~~~~~~~~~~~~~~~~~~~~~~~~~~~~

Tonight I had some zucchini and tomatoes on hand that were going to go bad if I didn’t do something with them soon! I assembled this zucchini, tomato, and corn bake in about 5 minutes! Boy was this yummy—the veggies were tender but the lightly cheesy breadcrumb mixture was crispy and comforting.


Feel free to use whatever vegetable you want and if Parmesan is not your thing, experiment with Gruyere, mozzarella, or a cheese of your choice. Paired with some cucumber sticks and shredded carrots, and a little leftover pesto sauce, this was the perfect meal built for one!


Tomato, Zucchini, and Corn Bake with Cheesy Breadcrumb Topping

Ingredients

Tomatoes (I used 2), sliced thinly

Zucchini or other summer squash (I used 1-2 small squashes), thin slices

Fresh or frozen corn kernels

A little less that ½ a cup of breadcrumbs

A little less than ¼ cup of freshly grated parmesan cheese (use a microplane to grate)

A pinch of salt

A dash of balsamic vinegar

1. Preheat oven to 400°F. Spray or oil a baking dish.
2. Combine breadcrumbs and cheese.
3. Slice tomatoes and zucchini squash.
4. Arrange the tomatoes and zucchini in an alternating pattern on the bottom of a baking dish (I just used two loaf pans). Sprinkle with a small handful of corn.
5. Optional: sprinkle each tomato slice with a tiny pinch of salt and a dash of balsamic vinegar.
6. Sprinkle the breadcrumb and cheese mixture on top of everything.
7. Bake uncovered for about 30 minutes. Cover with foil and bake for 10 more minutes, until the vegetables are tender.
8. EAT!