Archive | cookie RSS feed for this section

Co-op Food + Lemon Ginger Molasses Pinwheel Cookies

1 Mar


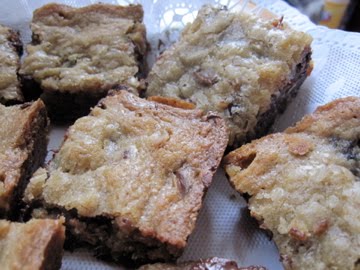
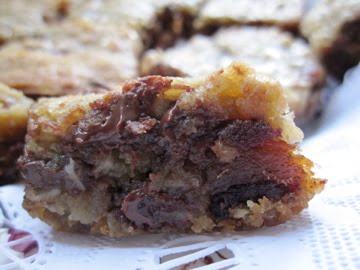
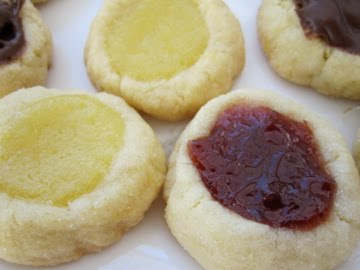
I come home from a good sweaty yoga sesh only to find myself munching on a frosted chocolate cake. Oh, living in a co-op. Food is EVERYWHERE at every hour of the day. I come home to a huge hotel pan of chocolate cake, to the smell of homemade granola just out of the oven, to waffles wafting throughout the house, to cookies and flan and pie.

Aside from all of the sweet stuff, I come home to dinner every night at 7pm. Salads and roasted veggies and grains and beans and meats and cheese. To something new and exciting. To soups, stews, and casseroles. Comfort food, health food, vegan food, ethnic food.

Fresh baked bread. Fresh baked bread made with wheat gluten instead of flour: an accidental miracle. Snack shift. Oh, snack shift. Brownies, salsa, midnight madness.

Here is a photo of a typical co-op meal made by moi:


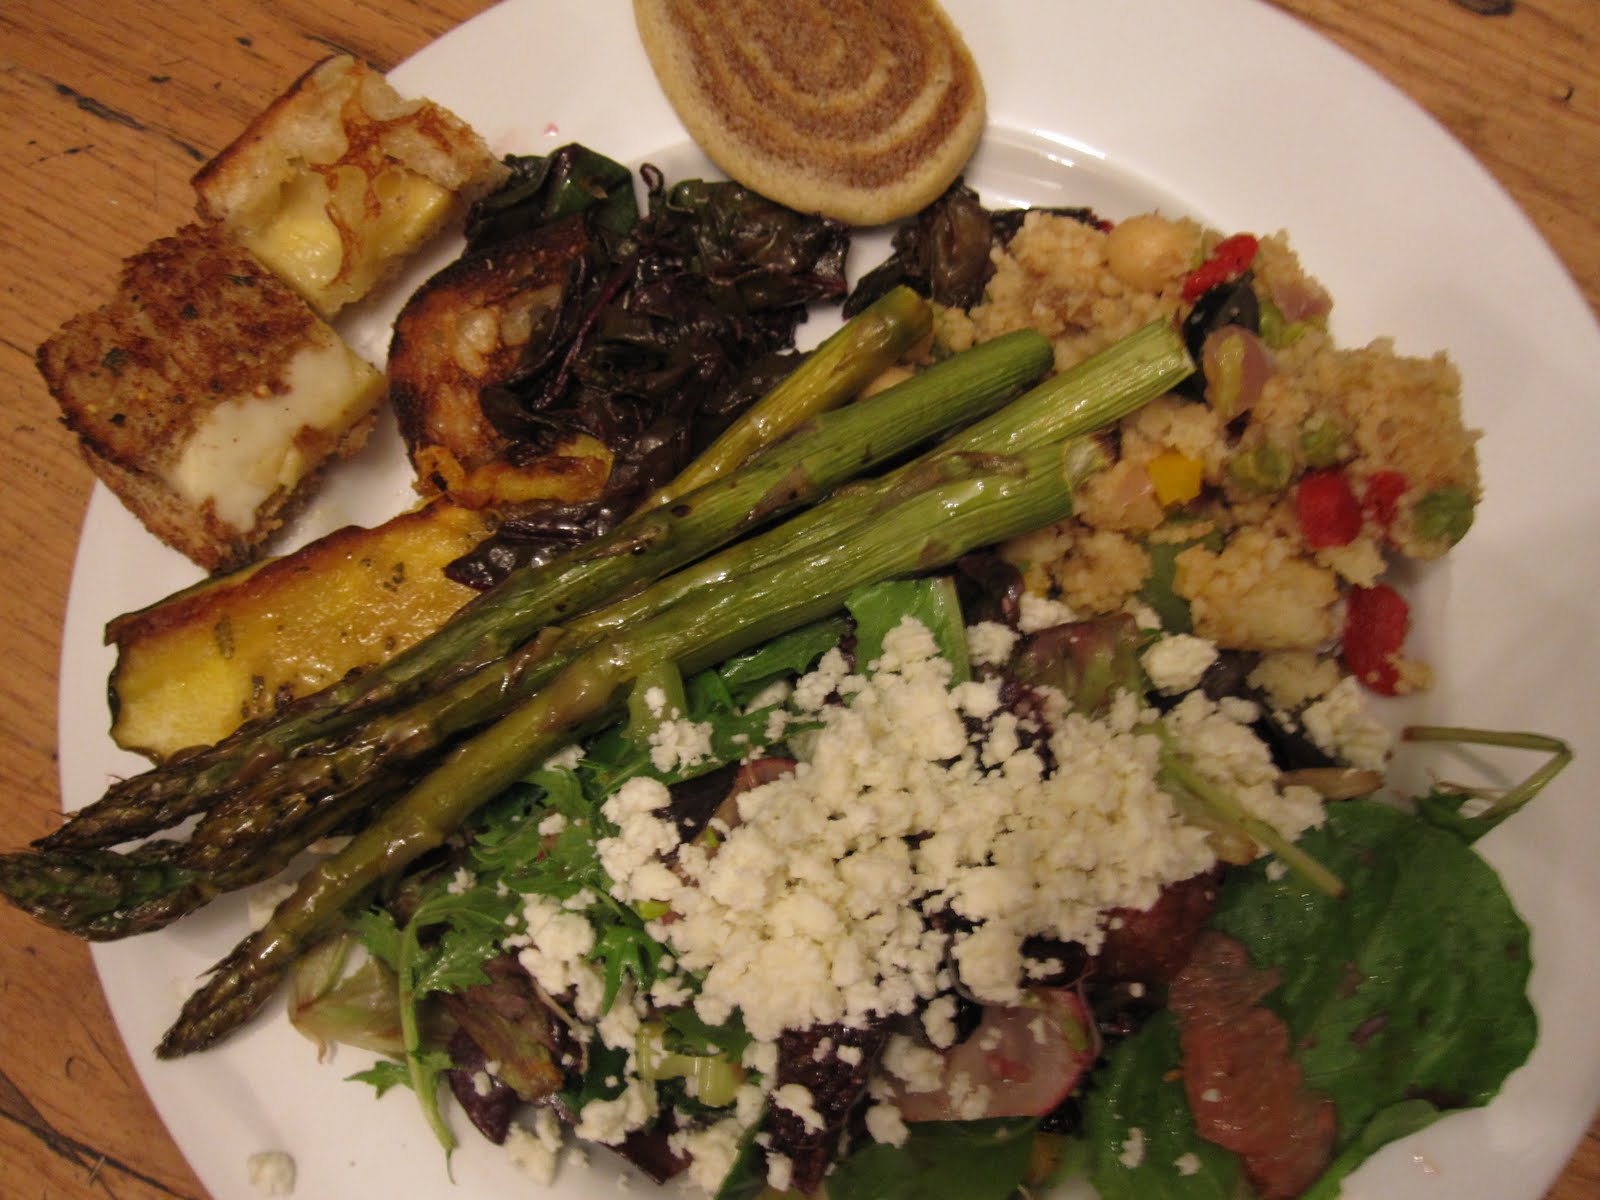
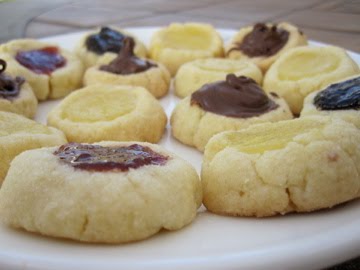
Mini grilled cheese bites (with a rosemary butter), balsamic roasted asparagus with sautéed chard, couscous salad with chickpeas, roasted bell peppers, olives, onion, and peas, and a spring mix salad with citrus (blood oranges, cara cara oranges, and grapefruit), cranberries, and feta cheese. Oh yes, and lemon ginger molasses pinwheel cookies as well as vegan sugar cookies for the vegans.
And here is a picture of a strawberry streusel coffee cake that I made last week (recipe from JoytheBaker):

Buttermilk Biscuit Bonanza:

A Whole Lotta Breaded n’ Baked Chicken:

With the gargantuan amount of food that a cook makes for the house (I live with 60 people, some other co-ops have only 20 people, and some 160 people), it can be difficult to take nice photos because everything is made in large, industrial pots and pans, and I am usually rushing to finish cooking so I do not have a moment to photograph in nice lighting before someone devours the food.

What a rewarding experience it is to cook here. I get everything delivered (no grocery shopping necessary) and I get to cook with a variety of ingredients that come in seasonally. I can experiment and people will eat my experiments and compliment me, yay!

We even bought and entire cow to be more “green” and to save money for the house. We also recently switched to having all-organic Straus milk and yogurt in the house. Our eggs are organic, too.

While cooking for and living with 60 college students can be tough at times, it is nice to have a “family” to eat dinner with every night.

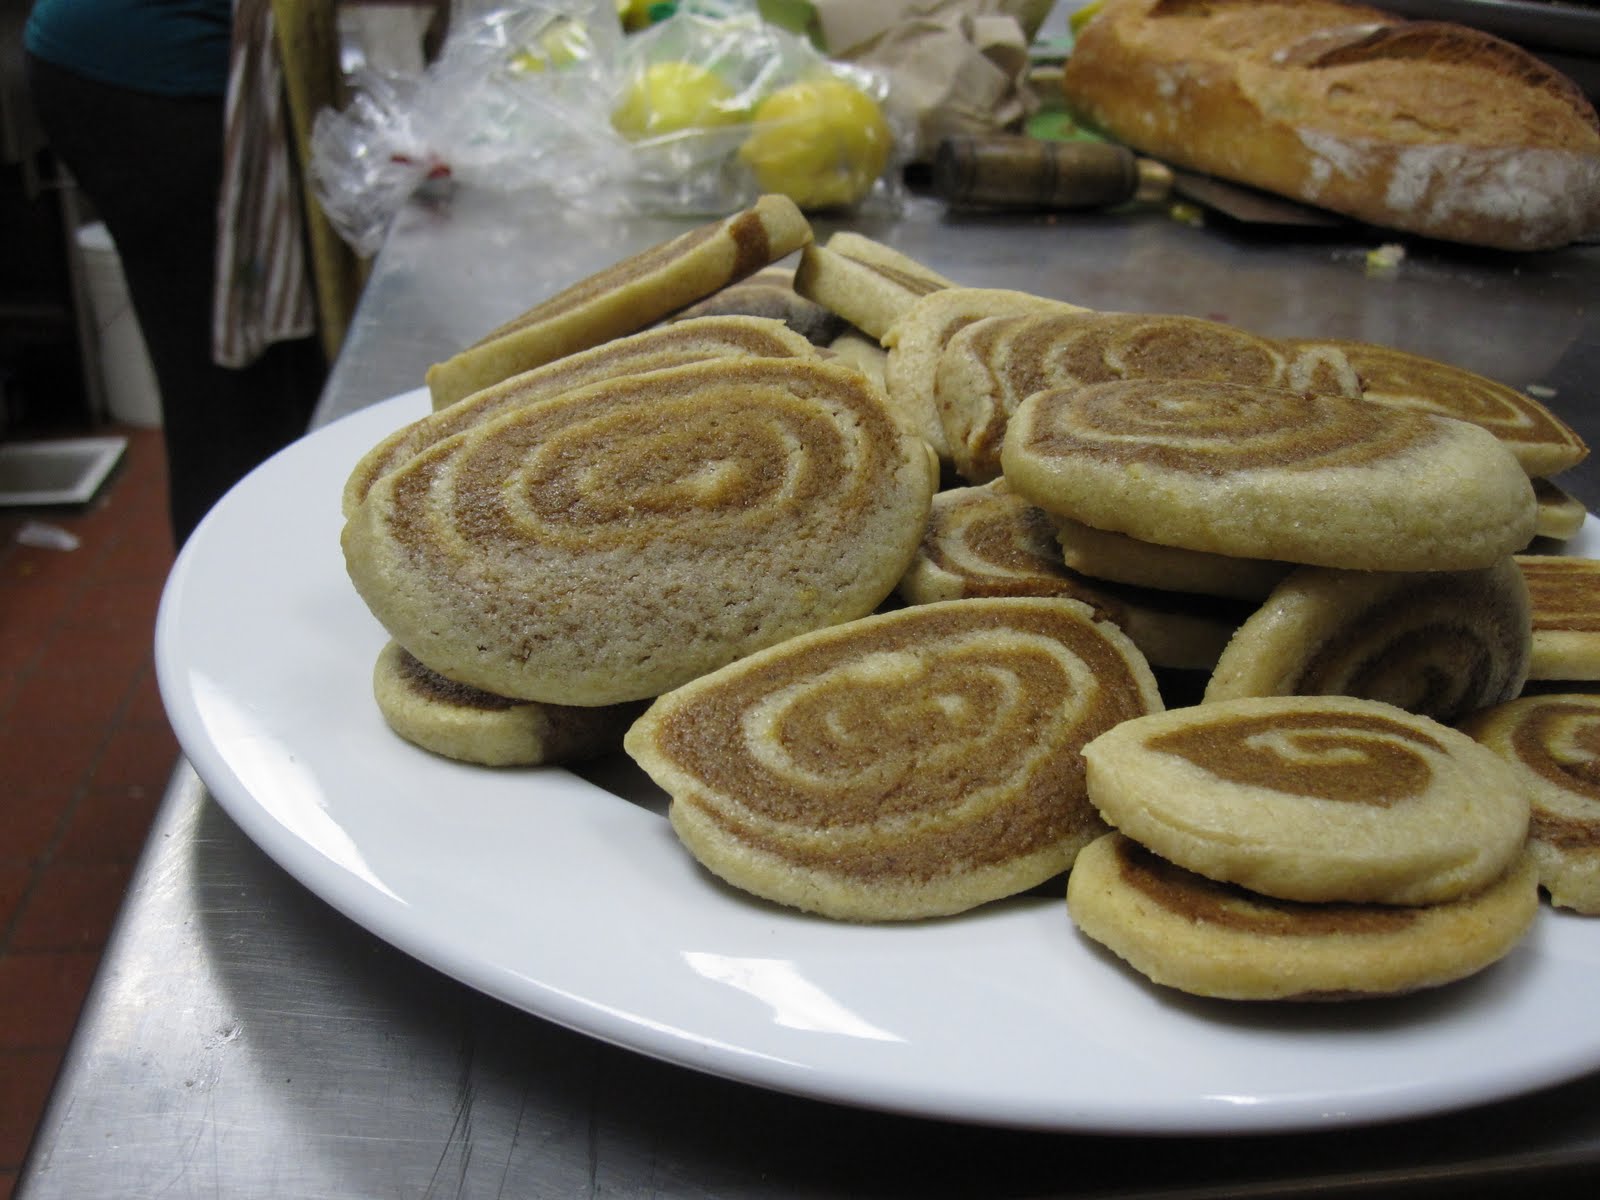
Oh, and here is the recipe for the Lemon Ginger Molasses Pinwheel Cookies. These cookies require a bit of time just because the dough has to be refrigerated a few times and rolled out and rolled up and cut. Worth it. I taste real ingredients and I taste something sweet, satisfying, and soothing for my body.

Alice in Wonderland, the movie, is coming out next weekend, and these cookies would be great to make if you are hosting a “mad hatter” themed party in honor of Alice. They’ve got that Treshire Cat vibe going on.

Lemon Ginger Molasses Pinwheel Cookies
From CookingLightyield: 40 cookies, serving size: 1 cookie

Ingredients

  • Ginger dough:
  • 1/4 cup (1/2 a stick) unsalted butter, softened
  • 1/3 cup packed dark brown sugar
  • 1/4 cup molasses
  • 1 large egg yolk
  • 6 ounces all-purpose flour (about 1 1/3 cups)
  • 3/4 teaspoon ground ginger
  • 3/4 teaspoon ground cinnamon
  • 1/4 teaspoon salt
  • 1/8 teaspoon ground nutmeg
  • Dash of ground allspice
  • Lemon dough:
  • 5 tablespoons unsalted butter, softened
  • 2/3 cup granulated sugar
  • 1 large egg white
  • 2 teaspoons grated lemon rind
  • 3/4 teaspoon vanilla extract
  • 6 ounces all-purpose flour (about 1 1/3 cups)
  • 1/4 teaspoon salt

Preparation

1. To prepare ginger dough, place 1/4 cup butter and brown sugar in a medium bowl; beat with a mixer at medium speed until well combined (about 3 minutes). Add molasses and egg yolk; beat until well blended. Weigh or lightly spoon 6 ounces (about 1 1/3 cups) flour into dry measuring cups; level with a knife. Combine 6 ounces flour, ginger, and next 4 ingredients (through allspice); stir with a whisk. Add flour mixture to butter mixture; beat at low speed just until combined. Wrap dough in plastic wrap; chill 30 minutes.

2. To prepare lemon dough, place 5 tablespoons butter and granulated sugar in a medium bowl; beat with a mixer at medium speed until blended (about 3 minutes). Add egg white; beat until blended. Beat in rind and vanilla. Weigh or lightly spoon 6 ounces (about 1 1/3 cups) flour into dry measuring cups; level with a knife. Combine 6 ounces flour and 1/4 teaspoon salt. Add flour mixture to butter mixture; beat at low speed just until combined. Wrap dough in plastic wrap; chill 30 minutes.

3. Unwrap ginger dough. Roll ginger dough between sheets of plastic wrap into a 13 x 8 1/2–inch rectangle (3/16 inch thick); chill 10 minutes. Unwrap lemon dough. Roll lemon dough between sheets of plastic wrap into a 13 x 9–inch rectangle (3/16 inch thick); chill 10 minutes. Carefully stack ginger dough on top of lemon dough, leaving a 1/2-inch border along one long edge. Starting with the long side without a border, roll up dough, jelly-roll fashion. Seal edges (do not seal ends of roll). Cover with plastic wrap; freeze 30 minutes.

4. Preheat oven to 350°F.

5. Unwrap dough. Cut with a sharp knife into 40 slices (about 1/4 inch thick). Reshape rounds, if necessary. Arrange slices 1 inch apart on baking sheets lined with parchment paper. Bake, 1 batch at a time, at 350° for 8 to 9 minutes or until set and lightly browned. Cool on wire racks.

Nutritional Information

Calories: 81
Fat: 2.8g (sat 1.7g,mono 0.7g,poly 0.2g)
Protein: 1.1g
Carbohydrate: 13.1g
Fiber: 0.3g
Cholesterol: 12mg
Iron: 0.6mg
Sodium: 33mg
Calcium: 9mg

>Blondies with Chocolate, Dates, and Shredded Coconut

30 Jan

>
When it comes to food, I have no self control. I want I want I want. And then I want some more.

I’ve got a weak spot for uber rich desserts. The richer the better. Sometimes I hear people talk about a dessert, claiming it is so rich that they can only have a few bites. I could probably eat a whopping platter of the stuff.

Did you know that cats/felines cannot detect “sweet?” Yep, that’s right. They do not have the T1R2 taste receptor that is one of the components of sweet. No wonder cats and I don’t click (just kidding…maybe).

Today I made some sweet blondies for my favorite blondie’s birthday. I added a mixture of chocolate chips, shredded coconut, and chopped dates to the batter. The dates and chocolate chips packed quite the sweet punch, and (gasp) I may have erred on the side of too sweet. If I just add a touch less sugar next time, no one would know, and the natural sweetness of the dates could really shine.

You ask me, “What is the difference between a blondie and a brownie?” According to cakespy,

Generally, a blondie is accepted as a type of brownie–but not so much a brownie flavor, more like an identical cousin. An identical, albino cousin. Generally, it uses vanilla or butterscotch base instead of chocolate, and thus has a lighter hue which gives it its name. In our opinion, the finest blondies will have a texture (though not taste) halfway between a cakey and a fudgy brownie: that is to say, delightfully chewy, rich, and dense.”

These blondies are super easy to throw together and you can choose whatever add-ins suit your fancy. Bourbon, walnut, and chocolate is another favorite combination of mine (just add an extra tablespoon of flour to soak up some of the bourbon). I must confess, however, that I made a minor mistake in the process. I was supposed to melt the butter but intsead I just used softened butter and creamed it together with the brown sugar. I’m assuming that my batch came out more like a cookie than a fudgey cakey texture, but either way these blondies are bomb!

Oh, and I may have purposely under-baked these, just a tad.

Fresh and hot out of the oven, the melty oozing chocolate just kills me.

Blondies with Chocolate, Dates, and Shredded Coconut
adapted from SmittenKitchen

1 stick (8 tablespoons) unsalted butter, melted
1 cup brown sugar NOTE: If using dates, I might cut my brown sugar down by a few tablespoons.
1 egg
1 teaspoon vanilla
A pinch of salt
1 cup flour

3/4 or 1 cup chocolate chips
1/2 cup shredded coconut
3/4 to 1 cup chopped dates

1. Preheat oven to 350 degrees F. Grease an 8 by 8 inch baking pan.
2. Melt the butter and let cool slightly. Mix it with the brown sugar until smooth.
3. Add the egg, then the vanilla and salt.
4. Stir in the flour.
5. Add in the chocolate, coconut, and dates or any additions of your choice.
6. Pour into the prepared pan and bake for 20-25 minutes until set in the middle (Although a tad gooey is a-okay in my book).

The Epitome of Cookie– Big, Soft, Chewy, Oatmeal Raisin Cookies

22 Jan


When I’m craving a cookie, I’m craving a damn good cookie. A big, soft, chewy cookie with lots of chocolate chips, or lots of raisins, or lots of walnuts. LOTS. I feel cheated if there are only 2 or 3 chocolate chips floating among a sea of dough. No, there must be an abundance. After all, picking out the choco chips/raisins/nuts/etc. is the best part about eating the cookie (next to a tall glass of milk)!


These oatmeal raisin cookies are the epitome of good cookie for me. The oats provide so much texture and there are soo soo soo many raisins/choco chips. I absolutely looove walnuts with this mixture, too.

Today I went cookie crazy and made some homemade oreos, too.

So, whose ready for some cookies?
The Epitome of Cookie- Big, Soft, Chewy, Oatmeal Raisin Cookies
recipe from the one and only SmittenKitchen

makes about 18 cookies

1/2 cup butter, softened
2/3 cup brown sugar, packed
1 egg
1/2 t. vanilla
3/4 cup all-purpose flour
1/2 t. baking soda
1/2 t. cinnamon
1/2 t. salt
1 1/2 cup rolled oats
3/4 cup raisins
1/2 cup walnuts
1/2 cup chocolate chips (optional)

1. Preheat oven to 350 degrees F.

2. Cream together butter and sugar. Add the egg and vanilla.

3. In a separate bowl, whisk together flour, baking soda, cinnamon, and salt. Add this to the butter mixture.

4. Stir in the oats, raisins, nuts, and if using, the chocolate chips. Either scoop onto a parchment lined cookie sheet and freeze for 25 minutes (or until it gets semi-hard/cold), or just freeze the dough for 25 minutes and then scoop it out onto a cookie sheet (Deb from SmittenKitchen finds that the cookie will be thicker when baked from the cold. I trust her.).

5. Bake it straight from the freezer for about 12 minutes. The edges should be golden and the tops should look slightly undercooked. Let them cool and enjoy!

>Thumbprint Cookies

21 Jan

>
Today I woke up when it was pitch black, the wind was howling, and pouring sheets of rain managed to break my umbrella. As my day progressed, I sat down on a chair and some sharp object of destruction crept up on me and ripped a hole in the derriere of my jeans. Later, I sloshed through a grove of wet, sticky mud which managed to get all over my rain boots (at least this can wash off).

I walked home up a bazillion steep hills while carrying 3 huge textbooks, a messenger bag, an extra coat, and a wet, broken umbrella. After shoving mounds of chocolate chips down my throat and collapsing onto my cushiony desk chair in my warm house, I feel slightly better. Slightly.

Thumbprint cookies. Reminiscing about these thumbprint cookies makes me feel a bit better, too. I made these back down in sunny Los Angeles just before I drove back up to rainy Berkeley. Don’t get me wrong, I absolutely LOVE being back in Berkeley, I could not be happier, but today is just one of those days.

Whether it is sunny or rainy, snowy or hail-y, these cookies with hit the spot.


When making thumbprint cookies, you literally push your thumb into the ball of dough, making a small indent that cannot wait to be filled with goodness!

And guess what? This dough is exactly the same dough that I used to make my apple tart! It’s like when you see a spread in a magazine where the same skirt or jacket can be worn for work, weekend, and a night-out-on-the-town. Crazy, I know, but true. Even though I used the same dough recipe, I can really taste a harder, crumblier tart shell crust in my apple tart and a softer, chewier, cakier cookie dough in the thumbrpint cookies. Isn’t it amazing how different the same thing can turn out when paired with something new?!

And the best part? I get to fill these babies with anything I want! Not only have I been on a Meyer lemon kick lately, but Nutella is now my new obsession. So, I chose to do variety of fillings–Meyer lemon curd (homemade of course), Nutella (the store-bought kind of course), and I threw in some fig/walnut jam as well as some strawberry jam. Mmmm mmm mmm now I can have one of each because of course, I must taste them all!

And look, this Nutella one came out looking like a little Hershey’s kiss, cute!

Thumbprint Cookies
(NOTE: this is the same “Sweet Tart Dough” used to make my apple tart)

makes about 30 cookies

Beat together until creamy:
8 Tablespoons (1 stick)
1/3 cup sugar

Add and mix until completely combined:
1/4 teaspoon salt
1/4 teaspoon vanilla extract
1 egg yolk

Add:
1 1/4 cups all-purpose unbleached flour

Mix well, stirring and folding, until there are no dry patches. Chill for a bit, maybe 3o minutes to an hour.

Preheat the oven to 350 degrees F.

Take your dough out of the refrigerator and roll into little balls about the size of a large walnut in its shell (1-inch?). Fill a shallow bowl or plate with about 1/2 a cup of:
granulated sugar

Roll each ball into the sugar.

Press your thumb gently into the top of each ball until a small indent forms. Bake for 12 minutes, remove from the oven, and fill the indents with:
lemon curd
or
jam (If using Nutella or chocolate kisses, wait)

Bake for another 5 minutes, or until light and golden. Let them cool. Now you can fill them with:
Nutella (I just plopped some in with a spoon)
or
Hershey’s kisses

Oh My Gah…Rainbow Cake!!!!!!!!!!

31 Dec


Yesterday I spent the day making magic in the kitchen with the infamous Linda—chef extraordinaire, queen of the kitchen, best home-cook ever! I grew up going to Linda’s house every week for Friday night dinner. She would prepare fresh baked challah bread, a homemade soup made with fresh veggies (always a different soup each time, always delicious), and then a big main course with sides galore. And for dessert—fruit, little cookies or cakes, and tea.

I really cherish those days when our families came together and enjoyed a good meal, chatting about politics and gossiping about all of the shenanigans happening in the neighborhood. Now all of the kids are older and our dinners happen less often, but when they do happen, I cherish them.

I arrived at Linda’s house yesterday with a big bag full of tart shells, sprinkles, almond extract, parchment paper, butter, aprons, and a few other miscellaneous essentials. She provided the rest.

We went to work, and our first project was to conquer one of my favorite childhood treats, RAINBOW CAKE, also known as seven layer bars.

Rainbow cake is really just almond cake with jam spread between each layer and a nice smooth layer of chocolate on top. The food coloring and sprinkles are just for aesthetics, but as Linda and I both agree, “you eat with your eyes.”


Eeeeee these are just so darling. I want to start a rainbow cake delivery service!!!!! I think that could be quite successful, don’t you? Everyone’s got a food truck these days, maybe I will start a rainbow cake truck and gallivant through different neighborhoods, putting smiles on faces.

IMG_4461
Ok, while I’m dreaming in LaLaLand, you should go ahead and start baking already. Once you have your cake batter, you just divide into three, drop some food coloring, spread into pans and bake, cool, and assemble. The hardest part about this recipe is the assembly, but don’t let that scare you. Enjoy the process because the end product will just make you plotz (Yiddish word for “burst” or “explode”) from so much deliciousness.

After Linda and I made the rainbow cakes, we moved on and made an apple tart with apples from her tree, and we baked challah bread (topped with poppy seeds, sesame seeds, and black cumin seeds) and sticky buns. Our little friend Ezra enjoyed helping us sprinkle the seeds over the challahs!


This was the most fun that I have had in a while. Thanks Linda for always inspiring me to make magic.

Rainbow Cake
(aka seven layer bars)
Recipe inspired by SmittenKitchen

makes about 5 dozen bars, or more (or you can just leave it as a cake)

4 large eggs, separated
1 cup sugar
1 (8-oz) can almond paste (I used a 7-oz package and it worked just fine)
2 1/2 sticks (1 1/4 cups) unsalted butter, softened
1 teaspoon almond extract
2 cups all-purpose flour
1/2 teaspoon salt
25 drops red food coloring
25 drops green food coloring
1 (12-oz) jar apricot preserves, heated and strained (I used raspberry preserves and did not strain them)
4-oz fine-quality bittersweet chocolate, chopped (I used Ghirardelli)

Optional: sprinkles

Special equipment: a small offset spatula, a heavy-duty stand mixer if you have one; a hand-mixer should work as well.

1. Put oven rack in middle position and preheat oven to 350°F. Butter a 13- by 9-inch baking pan (we decided that a cookie sheet may have been easier) and line bottom with wax paper, leaving a little overhang on 2 ends, then butter paper.

2. Beat whites in mixer fitted with whisk attachment at medium-high speed until they just hold stiff peaks. Add 1/4 cup sugar a little at a time, beating at high speed until whites hold stiff, slightly glossy peaks. Transfer to another bowl.

3. Switch to paddle attachment, then beat together almond paste and remaining 3/4 cup sugar until well blended, about 3 minutes. Add butter and beat until pale and fluffy, about 3 minutes. Add yolks and almond extract and beat until combined well, about 2 minutes. Reduce speed to low, then add flour and salt and mix until just combined.

 4. Fold half of egg white mixture into almond mixture to lighten, then fold in remaining whites gently but thoroughly (we found it a bit strange to be folding egg whites into a really thick batter, but it worked fine).

5. Divide batter among 3 bowls. Stir red food coloring into one and green food coloring into another, leaving the third batch plain. Pour green batter into prepared pan and spread evenly with offset spatula (layer will be about 1/4 inch thick). (If you own multiple pans, you can bake 2 layers at a time. We baked our green and white layers at the same time).

6. Bake your layers 8 to 10 minutes, until just set. (It is important to undercook. They’ll look like they’re not done, but a tester does come out clean).

7. Using paper overhang, transfer layer to a rack to cool, about 15 minutes. Bake the remaining layer (s) in same manner as above. Transfer to a rack to cool.

8. When all layers are cool, invert green onto a parchment or wax-paper-lined large baking sheet. Discard paper from layer and spread with half of preserves. Invert white on top of green layer, discarding paper. Spread with remaining preserves. Invert red layer on top of white layer and discard wax or parchment paper.

9. Cover with plastic wrap and weight with a large baking pan. Chill at least 8 hours (We chilled for 2 hours and were just fine. The reason for chilling so long is so that the preserves can really get pressed down and incorporated into the cake layers).

10. Remove weight and plastic wrap. Bring layers to room temperature.

We decided to use one layer of chocolate on top instead of one on top and one on the bottom. Do as you please…***NOTE: If you want chocolate on both top and bottom, use 7-oz of chocolate and melt it 3.5-oz at a time.

Melt chocolate in a double boiler or a metal bowl set over a saucepan of barely simmering water, stirring until smooth. Remove from heat. Keep chocolate over water. (Alternately, you can melt the chocolate in the microwave, just stir it every 30 seconds).

11. Trim edges of assembled layers with a long serrated knife. Quickly spread chocolate in a thin layer on top of cake, and sprinkle with sprinkles! Chill, uncovered, until chocolate is firm, about 30 minutes. ***NOTE: If you are doing two layers of chocolate, spread your top with chocolate, refrigerate uncovered for about 15 minutes, invert, and spread your next layer with chocolate. Now you can add sprinkles. Chill.

12. Cut lengthwise into strips, Cut strips crosswise into 3/4-inch-wide cookies. Or, just leave the cake as a cake and cut slices as you please!

  • Do ahead: Cookies keep, layered between sheets of wax paper or parchment, in an airtight container at room temperature 2 weeks. They’ll keep even longer in the freezer.