Archive | chocolate RSS feed for this section

>Shortbread Cookies (aka Butter in My Mouth!)

20 Apr

>
So this past week especially I’ve been into the whole bread n’ butter thing. You know, like bread and butter, butter + bread, bread + butter and maybe a dash of salt, (cheesy) eggs n’ buttered toast, (cheesy) pasta with garlic herb butter on bread…

Bread with oil and vinegar is a whole other moment of joy for me! Fun fact: To test flavored vinegars, let’s take raspberry vinegar as an example…dip a sugar cube in the vinegar and suck…you can just taste raspberry (no acidity). Amazing. Food science. Neat stuff.

In lieu of my bread and butter phase, I made some shortbread cookies, because, well, why not?

Like bread and butter, shortbread cookies are simple. And simple is good. Simple is damn good. Few ingredients, banging results!

These cookies can be made big, medium, small, or mini, and you can get creative with the shapes (We have a Texas cookie cutter and a, for lack of a better word, penis cookie cutter at my co-op. Totally random, totally great, but I just stuck with the classic circle shape this time).

These would make great little ice cream sandwich cookies, too!

Anyway, have fun, eat bread and butter, eat some buttery shortbread, embrace your curves.

Shortbread Cookies
recipe adapted from JoyofBaking

Ingredients

2 cups all-purpose flour

1/4 teaspoon salt

1 cup (2 sticks) unsalted butter, at room temperature

1 cup powdered (confectioners) sugar

1 teaspoon vanilla extract

optional: more sugar (for sprinkling), chocolate (for melting and dipping), sprinkles (for cuteness), sea salt (for “gourmet” sprinkling)

Directions

1. Sift together the flour and salt in a small bowl and set aside.

2. Beat butter until nice and smooth and creamy. Add the powdered sugar and continue beating until smooth. Beat in the vanilla. Gently stir in the flour mixture until just incorporated.

3. Flatten the dough into a disk shape, wrap in plastic wrap, and chill in the refrigerator for at least an hour or overnight.

4. Preheat the oven to 350 degrees F. Line baking sheet with parchment.

5. On a lightly floured surface, roll out the dough into 1/4 inch thickness. Cut into whatever shapes you wish using a lightly floured cookie cutter.

6. Place the cookies on the baking sheet and place in the refrigerator for about 15 minutes. This will firm up the dough so the cookies will maintain their shape when baked. Sprinkle a little bit of sugar on top of each cookie and bake for 8-10 minutes or until the cookies are light brown.

7. (optional) After the cookies have completely cooled, melt some chocolate (I just melted mine in the microwave, just remember to stir every 30 seconds. I also added a touch of boiling water to achieve my desired consistency). Dip half of the cookie into the melted chocolate and immediately sprinkle with SPRINKLES or sea salt or whatever else suits your fancy. Let the cookies set (I stuck mine in the refrigerator for a few minutes to speed up the “setting” process).

>Blondies with Chocolate, Dates, and Shredded Coconut

30 Jan

>
When it comes to food, I have no self control. I want I want I want. And then I want some more.

I’ve got a weak spot for uber rich desserts. The richer the better. Sometimes I hear people talk about a dessert, claiming it is so rich that they can only have a few bites. I could probably eat a whopping platter of the stuff.

Did you know that cats/felines cannot detect “sweet?” Yep, that’s right. They do not have the T1R2 taste receptor that is one of the components of sweet. No wonder cats and I don’t click (just kidding…maybe).

Today I made some sweet blondies for my favorite blondie’s birthday. I added a mixture of chocolate chips, shredded coconut, and chopped dates to the batter. The dates and chocolate chips packed quite the sweet punch, and (gasp) I may have erred on the side of too sweet. If I just add a touch less sugar next time, no one would know, and the natural sweetness of the dates could really shine.

You ask me, “What is the difference between a blondie and a brownie?” According to cakespy,

Generally, a blondie is accepted as a type of brownie–but not so much a brownie flavor, more like an identical cousin. An identical, albino cousin. Generally, it uses vanilla or butterscotch base instead of chocolate, and thus has a lighter hue which gives it its name. In our opinion, the finest blondies will have a texture (though not taste) halfway between a cakey and a fudgy brownie: that is to say, delightfully chewy, rich, and dense.”

These blondies are super easy to throw together and you can choose whatever add-ins suit your fancy. Bourbon, walnut, and chocolate is another favorite combination of mine (just add an extra tablespoon of flour to soak up some of the bourbon). I must confess, however, that I made a minor mistake in the process. I was supposed to melt the butter but intsead I just used softened butter and creamed it together with the brown sugar. I’m assuming that my batch came out more like a cookie than a fudgey cakey texture, but either way these blondies are bomb!

Oh, and I may have purposely under-baked these, just a tad.

Fresh and hot out of the oven, the melty oozing chocolate just kills me.

Blondies with Chocolate, Dates, and Shredded Coconut
adapted from SmittenKitchen

1 stick (8 tablespoons) unsalted butter, melted
1 cup brown sugar NOTE: If using dates, I might cut my brown sugar down by a few tablespoons.
1 egg
1 teaspoon vanilla
A pinch of salt
1 cup flour

3/4 or 1 cup chocolate chips
1/2 cup shredded coconut
3/4 to 1 cup chopped dates

1. Preheat oven to 350 degrees F. Grease an 8 by 8 inch baking pan.
2. Melt the butter and let cool slightly. Mix it with the brown sugar until smooth.
3. Add the egg, then the vanilla and salt.
4. Stir in the flour.
5. Add in the chocolate, coconut, and dates or any additions of your choice.
6. Pour into the prepared pan and bake for 20-25 minutes until set in the middle (Although a tad gooey is a-okay in my book).

The Epitome of Cookie– Big, Soft, Chewy, Oatmeal Raisin Cookies

22 Jan


When I’m craving a cookie, I’m craving a damn good cookie. A big, soft, chewy cookie with lots of chocolate chips, or lots of raisins, or lots of walnuts. LOTS. I feel cheated if there are only 2 or 3 chocolate chips floating among a sea of dough. No, there must be an abundance. After all, picking out the choco chips/raisins/nuts/etc. is the best part about eating the cookie (next to a tall glass of milk)!


These oatmeal raisin cookies are the epitome of good cookie for me. The oats provide so much texture and there are soo soo soo many raisins/choco chips. I absolutely looove walnuts with this mixture, too.

Today I went cookie crazy and made some homemade oreos, too.

So, whose ready for some cookies?
The Epitome of Cookie- Big, Soft, Chewy, Oatmeal Raisin Cookies
recipe from the one and only SmittenKitchen

makes about 18 cookies

1/2 cup butter, softened
2/3 cup brown sugar, packed
1 egg
1/2 t. vanilla
3/4 cup all-purpose flour
1/2 t. baking soda
1/2 t. cinnamon
1/2 t. salt
1 1/2 cup rolled oats
3/4 cup raisins
1/2 cup walnuts
1/2 cup chocolate chips (optional)

1. Preheat oven to 350 degrees F.

2. Cream together butter and sugar. Add the egg and vanilla.

3. In a separate bowl, whisk together flour, baking soda, cinnamon, and salt. Add this to the butter mixture.

4. Stir in the oats, raisins, nuts, and if using, the chocolate chips. Either scoop onto a parchment lined cookie sheet and freeze for 25 minutes (or until it gets semi-hard/cold), or just freeze the dough for 25 minutes and then scoop it out onto a cookie sheet (Deb from SmittenKitchen finds that the cookie will be thicker when baked from the cold. I trust her.).

5. Bake it straight from the freezer for about 12 minutes. The edges should be golden and the tops should look slightly undercooked. Let them cool and enjoy!

Oh My Gah…Rainbow Cake!!!!!!!!!!

31 Dec


Yesterday I spent the day making magic in the kitchen with the infamous Linda—chef extraordinaire, queen of the kitchen, best home-cook ever! I grew up going to Linda’s house every week for Friday night dinner. She would prepare fresh baked challah bread, a homemade soup made with fresh veggies (always a different soup each time, always delicious), and then a big main course with sides galore. And for dessert—fruit, little cookies or cakes, and tea.

I really cherish those days when our families came together and enjoyed a good meal, chatting about politics and gossiping about all of the shenanigans happening in the neighborhood. Now all of the kids are older and our dinners happen less often, but when they do happen, I cherish them.

I arrived at Linda’s house yesterday with a big bag full of tart shells, sprinkles, almond extract, parchment paper, butter, aprons, and a few other miscellaneous essentials. She provided the rest.

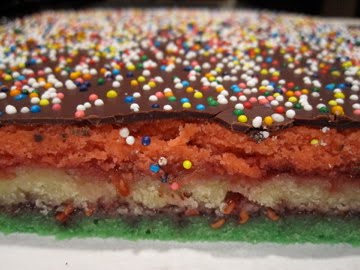
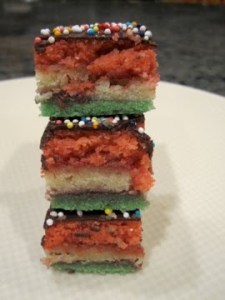
We went to work, and our first project was to conquer one of my favorite childhood treats, RAINBOW CAKE, also known as seven layer bars.

Rainbow cake is really just almond cake with jam spread between each layer and a nice smooth layer of chocolate on top. The food coloring and sprinkles are just for aesthetics, but as Linda and I both agree, “you eat with your eyes.”


Eeeeee these are just so darling. I want to start a rainbow cake delivery service!!!!! I think that could be quite successful, don’t you? Everyone’s got a food truck these days, maybe I will start a rainbow cake truck and gallivant through different neighborhoods, putting smiles on faces.

IMG_4461
Ok, while I’m dreaming in LaLaLand, you should go ahead and start baking already. Once you have your cake batter, you just divide into three, drop some food coloring, spread into pans and bake, cool, and assemble. The hardest part about this recipe is the assembly, but don’t let that scare you. Enjoy the process because the end product will just make you plotz (Yiddish word for “burst” or “explode”) from so much deliciousness.

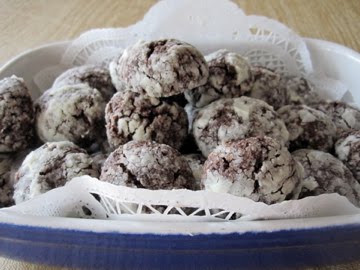
After Linda and I made the rainbow cakes, we moved on and made an apple tart with apples from her tree, and we baked challah bread (topped with poppy seeds, sesame seeds, and black cumin seeds) and sticky buns. Our little friend Ezra enjoyed helping us sprinkle the seeds over the challahs!


This was the most fun that I have had in a while. Thanks Linda for always inspiring me to make magic.

Rainbow Cake
(aka seven layer bars)
Recipe inspired by SmittenKitchen

makes about 5 dozen bars, or more (or you can just leave it as a cake)

4 large eggs, separated
1 cup sugar
1 (8-oz) can almond paste (I used a 7-oz package and it worked just fine)
2 1/2 sticks (1 1/4 cups) unsalted butter, softened
1 teaspoon almond extract
2 cups all-purpose flour
1/2 teaspoon salt
25 drops red food coloring
25 drops green food coloring
1 (12-oz) jar apricot preserves, heated and strained (I used raspberry preserves and did not strain them)
4-oz fine-quality bittersweet chocolate, chopped (I used Ghirardelli)

Optional: sprinkles

Special equipment: a small offset spatula, a heavy-duty stand mixer if you have one; a hand-mixer should work as well.

1. Put oven rack in middle position and preheat oven to 350°F. Butter a 13- by 9-inch baking pan (we decided that a cookie sheet may have been easier) and line bottom with wax paper, leaving a little overhang on 2 ends, then butter paper.

2. Beat whites in mixer fitted with whisk attachment at medium-high speed until they just hold stiff peaks. Add 1/4 cup sugar a little at a time, beating at high speed until whites hold stiff, slightly glossy peaks. Transfer to another bowl.

3. Switch to paddle attachment, then beat together almond paste and remaining 3/4 cup sugar until well blended, about 3 minutes. Add butter and beat until pale and fluffy, about 3 minutes. Add yolks and almond extract and beat until combined well, about 2 minutes. Reduce speed to low, then add flour and salt and mix until just combined.

 4. Fold half of egg white mixture into almond mixture to lighten, then fold in remaining whites gently but thoroughly (we found it a bit strange to be folding egg whites into a really thick batter, but it worked fine).

5. Divide batter among 3 bowls. Stir red food coloring into one and green food coloring into another, leaving the third batch plain. Pour green batter into prepared pan and spread evenly with offset spatula (layer will be about 1/4 inch thick). (If you own multiple pans, you can bake 2 layers at a time. We baked our green and white layers at the same time).

6. Bake your layers 8 to 10 minutes, until just set. (It is important to undercook. They’ll look like they’re not done, but a tester does come out clean).

7. Using paper overhang, transfer layer to a rack to cool, about 15 minutes. Bake the remaining layer (s) in same manner as above. Transfer to a rack to cool.

8. When all layers are cool, invert green onto a parchment or wax-paper-lined large baking sheet. Discard paper from layer and spread with half of preserves. Invert white on top of green layer, discarding paper. Spread with remaining preserves. Invert red layer on top of white layer and discard wax or parchment paper.

9. Cover with plastic wrap and weight with a large baking pan. Chill at least 8 hours (We chilled for 2 hours and were just fine. The reason for chilling so long is so that the preserves can really get pressed down and incorporated into the cake layers).

10. Remove weight and plastic wrap. Bring layers to room temperature.

We decided to use one layer of chocolate on top instead of one on top and one on the bottom. Do as you please…***NOTE: If you want chocolate on both top and bottom, use 7-oz of chocolate and melt it 3.5-oz at a time.

Melt chocolate in a double boiler or a metal bowl set over a saucepan of barely simmering water, stirring until smooth. Remove from heat. Keep chocolate over water. (Alternately, you can melt the chocolate in the microwave, just stir it every 30 seconds).

11. Trim edges of assembled layers with a long serrated knife. Quickly spread chocolate in a thin layer on top of cake, and sprinkle with sprinkles! Chill, uncovered, until chocolate is firm, about 30 minutes. ***NOTE: If you are doing two layers of chocolate, spread your top with chocolate, refrigerate uncovered for about 15 minutes, invert, and spread your next layer with chocolate. Now you can add sprinkles. Chill.

12. Cut lengthwise into strips, Cut strips crosswise into 3/4-inch-wide cookies. Or, just leave the cake as a cake and cut slices as you please!

  • Do ahead: Cookies keep, layered between sheets of wax paper or parchment, in an airtight container at room temperature 2 weeks. They’ll keep even longer in the freezer.


Chocolate Crackle Cookies

23 Dec

I am now the proud owner of a Candy Apple Red 90th Anniversary Kitchen Aid Standing Mixer with a glass bowl.


Beautiful. This is my baby.


I had to make SOMETHING immediately after I brought my baby home. First, I made tart dough. Then I stuck that in the freezer to use later in the week.

Then I made these chocolate crackle cookies from Alice Waters’ The Art of Simple Food.


Ok, so at first, I was not happy with the outcome of these cookies; they were super cute but I felt like they were lacking something in taste, and I could not pinpoint what it was. At first, I thought maybe they were too rich?…or maybe the ground almonds, which my cousin mistook for coconut, gave these cookies a funky texture?

I mean, these cute little guys are made with only good things—dark chocolate, cognac (a variety of brandy), ground almonds…and they only have 3 tablespoons of butter! But, sadly, I was not that impressed. They are not necessarily bad, but I thought they were nothing worth swooning over.

So it has been a few days now and I figured I would give these cookies another shot. Well, actually I brought my friends a few samples to snack on and I was very afraid of what they would say, but to my surprise, yes, they were swooning: “Oh my, Stephanie! These taste like little petit fours, like chocolate truffles, like little baby cake bites!”

Really guys? Ok fine, I’ll give them another taste. As I bit into a 4-day-old chocolate crackle cookie, yes, holy heck, these were sooooo yummy! My friends were right, these DO taste like a little truffle cake bite! A few days ago, I thought they were too rich. Now, I think they could be even richer!


I guess these cookies/petit fours/truffle bites taste better as they age. Make them, taste them, let them sit a few days, taste them again. Really, you will taste a difference!

I think next time I make these, I will futz with the recipe a bit…I definitely think that a few pinches of salt and some vanilla extract will benefit, as well as a bit of good quality cocoa powder. Adding in some coffee or experimenting with another kind of extract (mint…?) might be fun, too! Also, maybe next time I might nix the ground almonds and just use more flour? This is the beauty (or for some people, the stressor) about cooking and baking–nothing is ever constant!

Chocolate Crackle Cookies
From The Art of Simple Food

Makes about 3 dozen cookies

Pulverize in a food processor:
1 cup almonds, toasted
2 Tablespoons sugar

Put them in a bowl, and combine with:
½ cup flour
½ teaspoon baking powder

Melt in a heat-proof bowl over simmering water:
8 oz. bittersweet chocolate, coarsely chopped (I used Ghirardelli)
3 Tablespoons butter

Stir in:
1 ½ Tablespoons brandy (I used cognac, and had a few sips for myself but boy, is that stuff STRONG!!)

Set the mixture aside off the heat. Whisk together:
2 eggs, at room temperature
¼ cup sugar

Continue whisking until the mixture forms a ribbon, about 5-7 minutes. Stir in the melted chocolate and the almond and flour mixture. Chill the dough in the refrigerator for 1 to 2 hours or until firm (I just chilled mine overnight).

Before baking, preheat the oven to 325°F. Fill a small bowl with:
Granulated sugar

Fill another small bowl with:
Sifted powdered sugar

Roll the cookie dough into 1-inch balls. Roll a few at a time in the granulated sugar to coat them, then roll them in the powdered sugar.

Set them on parchment-lined baking sheets 1 inch apart. Bake for 12-15 minutes. Midway through baking, rotate the baking sheets for even baking. When the cookies are done they will have cracks in their white shells and they will be firm on the edges, but still soft in the center. Do not overbake.